[Johannes] uses Stable Diffusion‘s SDXL Turbo to create a baseline image of “photo of a red brick house, blue sky”. The hardware dials act as manual controls for applying different embeddings to this baseline, such as “coral”, “moss”, “fire”, “ice”, “sand”, “rusty steel” and “cookie”.
By adjusting the dials, those embeddings are applied to the base image in varying strengths. The results are generated on the fly and are pretty neat to see, especially since there is no appreciable amount of processing time required.
The MIDI controller is integrated with the help of lunar_tools, a software toolkit on GitHub to facilitate creating interactive exhibits. As for the image end of things, we’ve previously covered how AI image generators work.
Subway cars have a tough life. Moving people through a city efficiently underground every day and night takes a toll on the hardware. To keep things running efficiently, NYC rebuilds its cars every six years.
The enormous job of refurbing a subway car back to factory spec happens in one of two yards, either in Brooklyn or Manhattan. The cars are pulled off their 16,000 lb trucks, and treated to an overhaul of their “doors, windows, signage, seats, floor tiles and HVAC.” The trucks are inspected and wheels can be reground to true at the six year mark; they get all new wheels every 12.
Once everything is repaired, the shiny and like-new components are inspected and reassembled to go back out on the line. While it’s no small job, the overhaul shops can process over 1,000 cars in a year to keep things running smoothly. Before the overhaul program was introduced in the 1980s, NYC subway cars typically experienced failures every 16,000 miles, but between the scheduled maintenance and other advances that number has soared to an average failure rate every 140,000 miles.
Hydroforming is a very effective way to turn a ductile metal like aluminium or stainless steel into a specific shape, either using a die or by creating a closed envelope in which the hydraulic fluid is injected. While trying to think of ways to create a hydroformed airplane without spending big bucks on having it done professionally – or learning to weld sheet metal together with waterproof welds along the seams – [Adrian Perez] decided that using plain aluminium foil as found in the average kitchen might be a good way to get his feet wet here. When stuck together with double-sided tape, the foil is both strong and light enough to be inflated like a party balloon and still fly better than a lead balloon (which do fly, albeit poorly).
The basic design for the initial Luma glider that he assembled is based around a Kline-Fogleman (KA) airfoil. This type of airfoil is mostly characterized by the simplicity of construction, having been devised in the 1960s for paper airplanes. It uses a stepped approach rather than a continuous airfoil and has seen mostly attention in hobby circles. Even if this Luma glider brings to mind the ill-fated Goodyear Inflatoplane, a hydroformed version of these foil prototype gliders would not have to rely on being inflated to function.
For small-scale prototypes, using low-cost aluminium foil or similar to test out shapes before committing to a design to be welded and hydroformed does seem like a useful approach.
Various decades have their musical signature, like the excessive use of synthesizers and hairspray in the 1980s pop music scene. Likewise, the early 2010s was marked by a fairly extreme use of autotune, a technology that allows sounds, especially vocals, to be shifted to precise pitches regardless of the pitch of the original source. In this dark era, a wide swath of instruments and voices on the charts were auto-tuned at some point, although we don’t remember this iconic instrument ever being featured among the annals of pitch-shifted pop music.
The auto-tuned kazoo created by [Guy Dupont] does its pitch corrections on-the-fly thanks to a built-in ESP-32-S3 microcontroller which, through a microphone inside the kazoo, listens for note of the musician’s hum and corrects it to the closest correctly pitched note. Once it identifies the note it outputs a kazoo-like pitch-corrected note from a small speaker, also hidden inside the instrument. It does this fast enough for live performances using the YIN fundamental frequency estimation algorithm. Not only can the kazoo be played directly, but thanks to the implementation of MIDI it can be used to control other synthesizers or be played through other means as a stand-alone synthesizer.
Much like the 80s, where the use of synthesizers relaxed from excessive use on nearly every instrument on every track throughout the decade to a more restrained use as the decade faded, so has autotune been toned down in most music to be more subtly applied. But like our enjoyment of heavily synthesized tunes outside the 80s like those by Daft Punk or The Weeknd, we can also appreciate something heavily auto-tuned outside of the 2010s like a stylized kazoo or a T-Pain-style guitar effects pedal.
Cathode-ray tube (CRT) televisions may no longer be in production, but its last bastion came in the form of extremely cheap little Chinese portable sets with a black-and-white tube. They’re now useless for broadcast TV, so can often be had for next-to-nothing. [Action Retro] has a video showing a Mac Classic clone using one, and with a built-in Raspberry Pi and a copy of RiscOS it almost makes a usable computer.
The video below the break is a little heavy on the 3D printer sponsor and the Mac case comes from a Thingiverse project, but it’s well executed and we’re grateful for being introduced to that original project. We’d have gone for a period-correct beige filament rather than the glow-in-the-dark green one used here.
We’re guessing that more than one reader will have a few of those TVs around the place, such is their ubiquity. Is it worth making this as a novelty item? It depends upon your viewpoint, but we can’t help liking the result even if perhaps it’s not for us. If RiscOS isn’t quite the thing, there’s an option a little closer to the real thing.
Ring buffers are incredibly useful data structures that allow for data to be written and read continuously without having to worry about where the data is being written to or read from. Although they present a continuous (ring) buffer via their API, internally a definitely finite buffer is being maintained. This makes it crucial that at no point in time the reading and writing events can interfere with each other, something which can be guaranteed in a number of ways. Obviously the easiest solution here is to use a mutual exclusion mechanism like a mutex, but this comes with a severe performance penalty.
A lock-free ring buffer (LFRB) accomplishes the same result without something like a mutex (lock), instead using a hardware feature like atomics. In this article we will be looking at how to design an LFRB in Ada, while comparing and contrasting it with the C++-based LFRB that it was ported from. Although similar in some respects, the Ada version involves Ada-specific features such as access types and the rendezvous mechanism with task types (‘threads’).
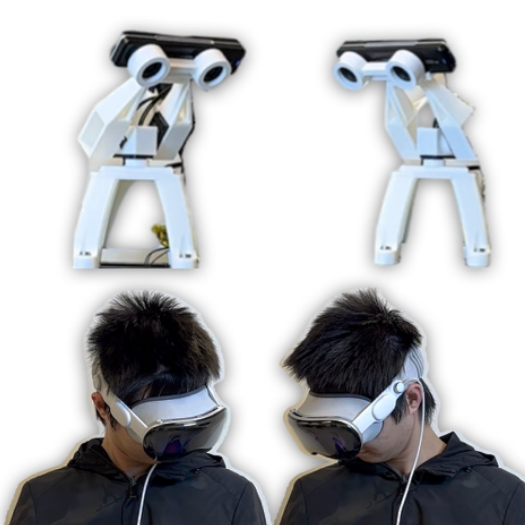
Don’t let the name of the Open-TeleVision project fool you; it’s a framework for improving telepresence and making robotic teleoperation far more intuitive than it otherwise would be. It accomplishes this in part by taking advantage of the remarkable technology packed into modern VR headsets like the Apple Vision Pro and Meta Quest. There are loads of videos on the project page, many of which demonstrate successful teleoperation across vast distances.
Teleoperation of robotic effectors typically takes some getting used to. The camera views are unusual, the limbs don’t move the same way arms do, and intuitive human things like looking around to get a sense of where everything is don’t translate well.
A stereo camera with gimbal streaming to a VR headset complete with head tracking seems like a very hackable design.
To address this, researches provided a user with a robot-mounted, real-time stereo video stream (through which the user can turn their head and look around normally) as well as mapping arm and hand movements to humanoid robotic counterparts. This provides the feedback to manipulate objects and perform tasks in a much more intuitive way. In short, when our eyes, bodies, and hands look and work more or less the way we expect, it turns out it’s far easier to perform tasks.
The research paper goes into detail about the different systems, but in essence, a stereo depth and RGB camera is perched with a 3D printed gimbal atop a humanoid robot frame like the Unitree H1 equipped with high dexterity hands. A VR headset takes care of displaying a real-time stereoscopic video stream and letting the user look around. Hand tracking for the user is mapped to the dexterous hands and fingers. This lets a person look at, manipulate, and handle things without in-depth training. Perhaps slower and more clumsily than they would like, but in an intuitive way all the same.
Interested in taking a closer look? The GitHub repository has the necessary code, and while most of us will never be mashing ADD TO CART on something like the Unitree H1, the reference design for a stereo camera streaming to a VR headset and mirroring head tracking with a two-motor gimbal looks like the sort of thing that would be useful for a telepresence project or two.