3D Miniature Chess Pieces Made With A Laser Cutter

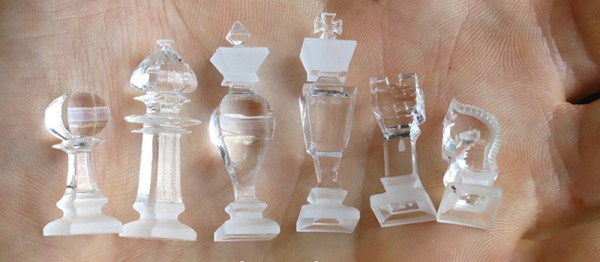
When you think of laser cutters, you generally don’t think of 3d parts. Well, at least not without using something like glue, nuts and bolts, or tabs and slots to hold multiple parts together. [Steve Kranz] shows you how to make these very tiny 3D chess pieces by making 2 passes at right angles to thick acrylic. The first pass cuts one side’s profile, then the part is rotated 90 degrees and a second pass is cut, giving the part more of a “real” 3D look, rather than something cut out of a flat sheet. If you’re having a hard time imagining how it works, his pictures do a great job of explaining the process. He even added some engraving to give the chess pieces for a selective frosted look. We think it’s a cool idea, and well executed too!

But that got us to thinking (always dangerous) that we’ve seen rotary attachments for laser cutters, but they are mainly for etching cylindrical objects like champagne flutes and beer bottle. What if you added a rotating “3rd” axis to a laser cutter that could hold a block of material and rotate it while being cut? (Much like a traditional 4th Axis on a CNC machine). Would the material also need to be raised and lowered to keep the laser focused? Surely software that is aimed at 3D CNC would be needed, something like Mach3 perhaps. A quick Google search show that there are some industrial machines that more-or-less do 3D laser cutting, but if you, or someone you know of, has attached a 3rd axis to a desktop laser, let us know in the comments, we would love to see it.

(via Adafruit)

Laser Cutter Exhaust Interlock Is Silly, Educational, Useful

If there’s one maker space that has an excess of mad scientist type hackers, it has to be LVL1 in Louisville, KY. They sure do a lot of crazy stuff, like this simple device to defeat the laser cutter smoke monster. Nobody got the memo about the “simple” part. Instead they created a functional, educational and aesthetically pleasing element for the hackerspace.

LVL1 has a large format laser cutter. Laser cutters emit nasty smoke. Said smoke needs to be vented outside. To do so, it needs to pass through a scrubber/filter so the neighbouring Pigs don’t complain. So they installed a larger, better filter. The Pigs are happy, until the filter gets clogged and the smoke monster decides to escape. Next they install a pressure switch which disables the laser when the filter gets clogged. Laser cutters have a myriad of safety interlocks, so quite often, it isn’t apparent which one caused it to trip. Hence, the Laser Cutter Enable Module – LCEM.

The simple part was to install an indicator that lights up when the pressure switch is enabled, and off when not. But when it’s off, it isn’t clear if the pressure switch is off, or the indicator has failed. Simple, just install a bi-color LED – Red for off, Green for On. But then what about color blind folks who cannot tell the two colors apart? So, finally, two LED’s with clearly labelled text marking them as Enabled and Disabled.

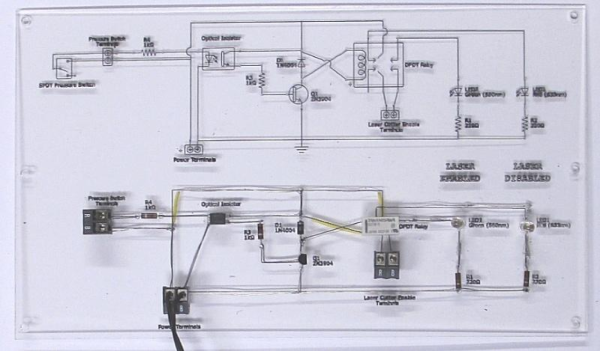
A simple (this time for real) circuit was finally agreed upon. The SPDT contacts of the pressure switch drive the LED in an optoisolator. Its output drives a DPDT relay via a transistor. One set of contacts light up the two indicator LED’s and the other set of contacts goes to the laser cutter enable contacts. Of course, the optoisolator is totally redundant and over kill too – it’s input LED shares the same power supply as the output transistor! Remember the missing memo?

It was time to assemble the circuit. This is where the mad scientist dudes got really creative. On one half of a piece of acrylic, the schematic diagram was etched using the laser. This ensures n00bs get some education. And the remaining half had the circuit laid out in old-skool wire wrap fashion. Holes were drilled and connections were drawn (using the laser, of course) for the various components. Parts were inserted, and wires were soldered to make the connections. The result is what they call the PCB/Mounting Plate/Educational Schematic/Acrylic thing. Of course, exposed connections and wires are no good. So they made a sandwich consisting of a flat acrylic base, and a cut out frame in the middle to accommodate the wire connections and joints. All of this to light up an indicator. Because.

Thanks [JAC_101] from LVL1 for sending in this tip.

If you want to read more about LVL1 shenanigans, check out this post about their Rocketry group, or this post when Hackaday visited LVL1.

PCB Manicure Wields Laser Cutter For Your Nails

Wearable electronics is a hot topic these days. Although these fancy talons are only for show, they could lead to more in the future.

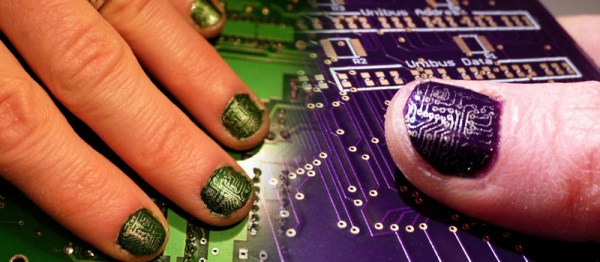
[Shelby] and [Colleen AF] showed people how to include a laser cutter in your nail care at a recent event at NYC Resistor. The technique used here starts off with a base coat of the background color before heading to the laser cutter. Now don’t worry, you don’t need to risk any of your digits. A type of reverse silk screen is made with the laser by deeply etching the artwork into a piece of flat acrylic sheet. Those voids are then filled with the secondary color for the circuit traces and the excess is removed with a squeegee. A sponge is then used to transfer the paint from the recesses in the acrylic to the nails.

Granted, PCB finger nails might not be your cup of tea, but it does make us wonder: What if conductive ink was used? Would it be possible to build a circuit on your own fingernail? Obviously you would want to use a sticky, conductive glue rather than solder. (Please don’t try to reflow solder your fingers at home.) What kind of power supply would fit? What could you build? We also see other possible applications of the process like labeling non-flat surfaces. Let us know what you think in the comments below.

UPDATE: [David Flint] points out in the comments that this is a type of offset gravure printing.

A Folding Laser Cutter

Want a laser cutter, but don’t have the space for one? How about a portable machine to engrave and cut wood and plastics? A folding laser cutter solves these problems, and that’s exactly what Red Ant Lasers was showing off last weekend at Maker Faire.

Inside the team’s Origami laser cutter is a 40 Watt CO2 tube, shooting its beam along an entirely enclosed beam path. The beam travels through the body of the machine, out into the folding arm of the machine, and down to whatever material you’ve placed the Origami on. It’s a 40 Watt laser so it will cut plywood and plastics, and as shown in the video above, does a fine job at engraving plywood.

This is a Class 4 laser device operating without any safety glass, but from the short time I spent with the Red Ant team, this is a reasonably safe device. You will need safety glasses if you’re within five feet, but after that, everything (according to OSHA, I think) is safe and not dangerous. Either way, it’s a tool just like a table saw. You don’t see commentors on the Internet complaining about how a spinning metal blade is dangerous all the time, do you?

The Red Ant guys are currently running a Kickstarter for their project, with a complete unit going for $4200. It’s pricier than a lot of other lasers, but not being constrained by the size of a laser cutters enclosure does open up a few interesting possibilities. You could conceivably cut a 4×8 sheet of plywood with this thing, and exceptionally large engravings start looking easy when you have a portable laser cutter.

Upgrading a Laser Cutter with RAMPS

Upgrade That Cheap-o Laser Cutter!

Laser cutters are perhaps one of the most useful tools in a hackerspace’s arsenal of tools, rivaled only by 3D printers and CNC mills. The problem is they’re quite expensive — unless you get one of the cheap little ones from China that is! Unfortunately, you get what you pay for. Lucky for us though they aren’t that hard to upgrade!

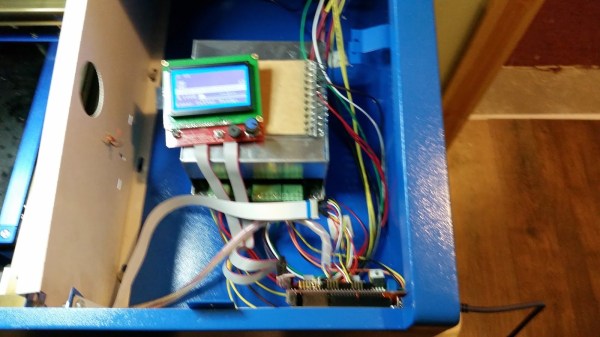
[Dan Beaven] just finished upgrading his 40W CO2 laser to use an Arduino Mega 2560 and RAMPS 1.4 — wanting to share his knowledge he’s posted a guide to help others do the same. The upgrade itself isn’t that difficult, although can be a bit messy for wiring. In the future [Dan] hopes to design a PCB with all the connectors so it’s as simple as plugging it into the RAMPS board.

To control the laser he’s using firmware from the Lansing Makers Network (GitHub) designed for use with marlin electronics. He’s modified it a bit for his own purposes (Google Drive) including a low output LASAR activation signal.The cool thing with setting up your laser with this hardware is that you can use a laser output plugin right in Inkscape!

Fold-out Laser Cutter Prototype Promises Portability (But Maybe Not Safety)


fold out laser cutter

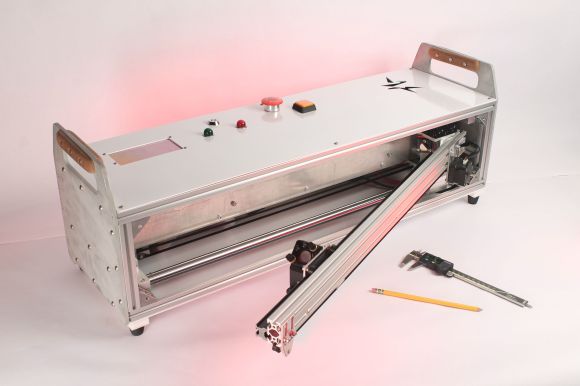
Often times it’s tricky to make space for a full size laser cutter… so a group of friends over at Pittsburgh TechShop have been working on designing a fold-out version for easy storage. It’s still a prototype/proof of concept, so we’ll overlook the obvious safety concerns for now.

It’s built predominately out of aluminum extrusion and a few custom machined parts. A 40W CO2 laser tube sits in the back with optics reflecting it out to the laser head. The X-axis pivots on a heavy duty hinge mechanism and then locks in place for use. Unfortunately there are no videos of it in action, but the whole arm-linkage is apparently quite rigid and robust.

Like we said, this is one of their first prototypes or proofs of concept — as they continue to enhance the design they are considering taking it to Kickstarter down the road. They plan on enclosing the beam path in order to make it safe, and we’ll certainly be interested to see how that works out!

For more info on the project, there’s a thread on Reddit going strong.

[Thanks Ollie!]

Making Flexible Wood Using A Laser Cutter

laser cut curved wood

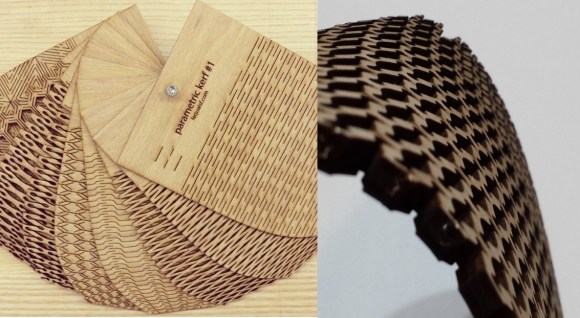
If you’re one of the lucky ones who has access to a laser cutter, you’re definitely going to want to check out [Aaron Porterfield’s] latest work. He’s been experimenting with making flexible wood.

We’ve all probably seen wood cut with slots added to allow flexibility in a single direction, but did you know with the use of lattice hinges you can do so much more? [Aaron’s] been playing around with parametric patterns and has made some really cool examples — the best part is, he’s sharing them all for free (both .DXF and vector files)!

His main goal was to create a pattern that is in flexible in multiple directions, which he almost achieved — but the really cool thing he figured out was creating a pre-formed curved surface by mapping the bend in Photoshop first…

Continue reading “Making Flexible Wood Using A Laser Cutter”