PCB Manicure Wields Laser Cutter For Your Nails

Wearable electronics is a hot topic these days. Although these fancy talons are only for show, they could lead to more in the future.

[Shelby] and [Colleen AF] showed people how to include a laser cutter in your nail care at a recent event at NYC Resistor. The technique used here starts off with a base coat of the background color before heading to the laser cutter. Now don’t worry, you don’t need to risk any of your digits. A type of reverse silk screen is made with the laser by deeply etching the artwork into a piece of flat acrylic sheet. Those voids are then filled with the secondary color for the circuit traces and the excess is removed with a squeegee. A sponge is then used to transfer the paint from the recesses in the acrylic to the nails.

Granted, PCB finger nails might not be your cup of tea, but it does make us wonder: What if conductive ink was used? Would it be possible to build a circuit on your own fingernail? Obviously you would want to use a sticky, conductive glue rather than solder. (Please don’t try to reflow solder your fingers at home.) What kind of power supply would fit? What could you build? We also see other possible applications of the process like labeling non-flat surfaces. Let us know what you think in the comments below.

UPDATE: [David Flint] points out in the comments that this is a type of offset gravure printing.

Hippie-Redneck Solar-Heated Swimming Pool Slash Hot Tub

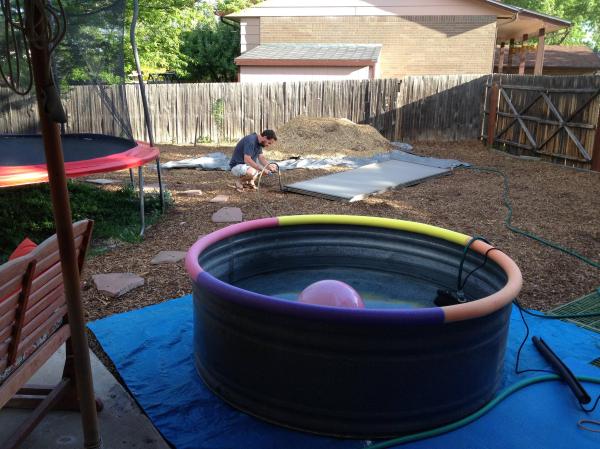
In need of a jacuzzi to complete your backyard but just don’t have the cash? Need a swimming pool for the little ones but tired of the cheap plastic ones popping and leaking all over the place? Look no further than [inexplorata]’s self-explanatory “Hippie-Redneck Solar-Heated Kiddo Swimmin’ Pool And Hot Tub“.

The pool uses a six-foot-diameter metal stock tank, provided by a neighbor. After some liberal use of JB Weld, the tank functions as a makeshift pool on the cheap, but the magic doesn’t end there. [inexplorata] found a solar thermal water heater that someone was getting rid of and snagged it to heat up the water, which is almost a necessity for most parts of the Northern Hemisphere right now.

A sump pump in a bucket handles water circulation, and [inexplorata] points out that the single water heater is more than enough to keep the water nice and warm (“hot enough to poach a rhino” is the scientific term used on the project page) so if you’ve got the means, this might be a welcome addition to the backyard! The build was posted on Reddit, the users of which had some helpful suggestions for improving the pool if you want to tackle this yourself. If you don’t have a solar thermal water heater, you could always make one of those too.

A Class D Amp Made From Scrap

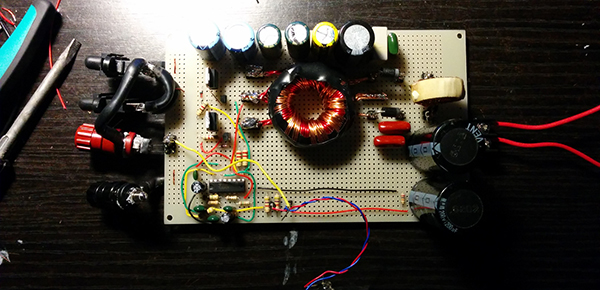
[Boolean90] needed an amplifier for a subwoofer, and had a lot of parts sitting around in a scrap bin. His project, a Class D sub amp made out of scrap, is a great example of what you can build with the right know-how and a very large pile of junk.

With digital logic and PWM chips, a Class D amp is one of the simpler ways to get a lot of amplification easily in an efficient package. It’s really not that complicated; an audio signal is turned into a PWM’d square wave, this is sent out to a Mosfet bridge, and finally out to the speaker.

Most Class D amps have a switching frequency of hundreds of kilohertz to the Megahertz range, but since this is an amplifier for a subwoofer that has a cutoff frequency of about 1kHz, the switching frequency doesn’t need to be quite as fast. [Boolean] is using a 50kHz carrier frequency; it’s more than high enough to recreate low frequencies.

With the completed project, [Boolean] has an extremely loud amplifier that has around 75-150W of output power. The subwoofer is only rated for 200W, but with the volume [Boolean] is getting, this isn’t an amp he’ll be rebuilding anytime soon.

How To Zip, Stick, And Screw Stuff Together

One of the first problems every new hacker/maker must solve is this: What’s the best way to attach part “A” to part “B”. We all have our go-to solutions. Hot glue, duck tape ( “duct tape” if you prefer) or maybe even zip ties. Super glue, epoxy, and if we’re feeling extra MacGyver-ish then it’s time for some bubble gum. For some Hackaday readers, this stuff will seem like old hat, but for a beginner it can be a source of much frustration. Even well versed hackers might pick up a few handy tips and tricks presented in this video after the break.

In part one of this series, [Ben Krasnow] shows us the proper use of just a few of the tools and techniques he uses in his shop. [Ben] starts out with a zip-tie tool which he loves in part because of a tension setting that ensures it’s tight but not overly. He moves on to advice for adhesive-vs-material and some tips on using threaded fasteners in several different circumstances. He also included a list of the parts and tools he uses so you don’t have to go hunting them down.

[Ben] is no stranger to us here at Hackaday. He does some epic science video. You can subscribe to his channel or follow his blog if you enjoy what you see.

Continue reading “How To Zip, Stick, And Screw Stuff Together”

Nexus 7 Dashboard

Custom Double-Din Mount For Nexus 7 Carputer

Many new vehicles come with computers built into the dashboard. They can be very handy with features like GPS navigation, Bluetooth connectivity, and more. Installing a computer into an older car can sometimes be an expensive process, but [Florian] found a way to do it somewhat inexpensively using a Nexus 7 tablet.

The size of the Nexus 7 is roughly the same as a standard vehicle double-din stereo slot. It’s not perfect, but pretty close. [Florian] began by building a proof of concept mounting bracket. This model was built from sections of MDF hot glued and taped together. Plastic double-din mounting brackets were attached the sides of this new rig, allowing it to be installed into the dashboard.

Once [Florian] knew that the mounting bracket was feasible, it was time to think about power. Most in-vehicle devices are powered from the cigarette lighter adapter. [Florian] went a different direction with this build. He started with a cigarette lighter to USB power adapter, but he cut off the actual cigarette lighter plug. He ended up wiring this directly into the 12V line from the stereo’s wiring harness. This meant that the power cord could stay neatly tucked away inside of the dashboard and also leave the cigarette lighter unused.

[Florian] then wanted to replace the MDF frame with something stronger and nicer. He modeled up his idea in Solidworks to make sure the measurements would be perfect. Then the pieces were all laser cut at his local Techshop. Once assembled, the plastic mounting brackets were placed on the sides and the whole unit fit perfectly inside of the double-din slot.

When it comes to features, this van now has it all. The USB hub allows for multiple USB devices to be plugged in, meaning that Nexus only has a single wire for both power and all of the peripherals. Among these peripherals are a USB audio interface, an SD card reader, and a backup camera. There is also a Bluetooth enabled OBD2 reader that can monitor and track the car’s vitals. If this project seems familiar to you, it’s probably because we’ve seen a remarkably similar project in the past.

Show Me The Data: Hackaday.io Year #01

Today marks exactly one year since we announced to the world the first product from our software lab – Hackaday.io. In what has been an incredibly exciting year for all of us, we evolved from a simple idea and a prototype to a truly massive community that’s making its mark on the world. Day after day, carefully listening to the invaluable feedback from our users, we have improved and moved forward, one line of code at the time.

We still have a long way to go, but we’ll pause for a second now and reflect on how far we’ve come. Then get right back to fixing bugs and developing new features.

It all started with a simple idea – building a better project hosting website. Though there are project and content websites galore out there, with new ones popping up every day, it all still felt too bland. We thought we could do better. After all, the medium is the message. The place where something lives sooner or later becomes a key part of its identity. So in order to prevent a dystopian future in which we’re all hosting our projects using the (fictional) Microsoft Maker Suite 2020 and simply don’t care, we started to work on providing an alternative.

We quickly realized that we had a much bigger mission on our hands. Sure, a better project hosting website would be nice, but what we felt we really needed was something [Brian Benchoff] has been talking about for quite some time – a “virtual hackerspace.” Not just a place where you can post your builds once you’re done (and hope someone sees it), but a living, breathing community: a place where you can start with an idea and get feedback as it develops, find collaborators, iterate, and ultimately end up building something way more amazing than you would have accomplished on your own.

This has been the aim of Hackaday for many years, but most of the collaboration was constrained to the limited space of post comment threads and biased by the editorial choice of articles and topics. With the introduction of Hackaday.io, we open up a space for anyone to unleash their creativity and expertise, and together, change the way people build things.

The Data

Unfortunately, making bold claims about how we’re out there changing the world is pretty much a commodity these days. As most Web startups can testify, it doesn’t take more than a simple landing page with nice photography and some uplifting message for any arbitrary claims to appear credible.

So instead of trying to convince you with words about how awesome the last year had been, we’ll just stick with the data.

Continue reading “Show Me The Data: Hackaday.io Year #01”

New Part Day: Time Of Flight Sensors

Every robotics project out there, it seems, needs a way to detect if it’s smashing into a wall repeatedly, acting like the brainless automaton it actually is. The Roomba has wall sensors, just about every robot kit has some way of detecting obstacles its running into, and for ‘wall-following robots’, detecting objects is all they do.

While the earliest of these robots used a piece of wire and a metal contact to act like a switch for these object detectors, ultrasonic sensors – the kind you can buy on eBay for a few bucks – have replaced this clever wire spring switch. Now there’s a new sensor for the same job – the VL6180 – and it measures the speed of light.

The sensors that are used for object and collision detection now use either ultrasonic or infrared light. They’re susceptible to noise, and if you’re doing anything automated, you really don’t want rogue measurements. A time of flight sensor clocks out photons and records how long it takes them to return at 299,792,458 meters per second. It’s less sensitive to noise, and if you can believe this SparkFun demo of this sensor, extremely accurate

This is not the first Time of Flight distance sensor on the market; earlier this week we saw a project use a sensor called the TeraRanger One. This sensor costs €150.00. The VL6180 sensor costs about $6 in quantity one from the usual suspects, and breakout boards with the proper level converters and regulators can be found for about $25. More expensive sensors have a greater range, naturally; the VL6180 is limited to somewhere between 10cm (on paper) and 25cm (in practice). But this is cheap, and it measures the time of flight of pulses of light. That’s just cool.