LEGO Pole Climbers Are Great Study In What It Takes To Go Vertically Upwards

Climbing a pole with a robot might sound complicated and hard, but it doesn’t have to be. This video from [Brick Experiment Channel] demonstrates multiple methods of doing the job while keeping things simple from a mechanical perspective. (Video, embedded below.)

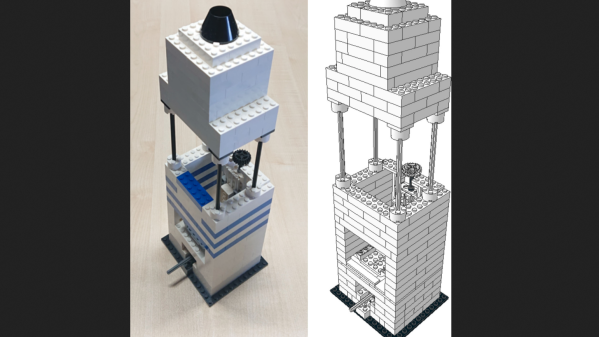
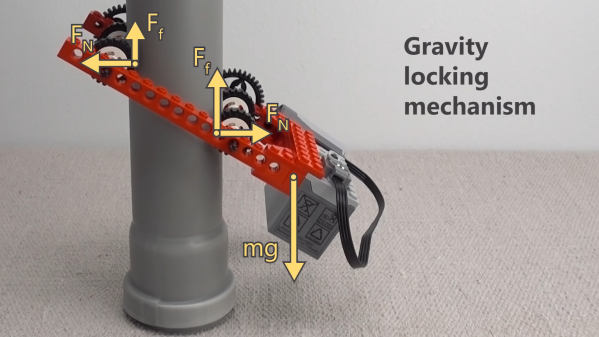
The first method uses a gravity locking design, where the weight of the battery pack is placed on a lever arm to increase the normal force on the wheels gripping the pole. Increasing the length of the lever arm, reducing the angle of the crawler, or adding grippier tyres can all be used to increase the grip with this design. The final design of this type is able to climb most of the way up an 8 meter flagpole without too much trouble.

The next version uses rubber bands to help add tension to grip the pole. This too works well and makes it to the top of the flagpole. The final build is a circulating design that looks truly wild in action, and winds its way to the top of the flagpole as well.

It’s great to see the experimental method of designing these Lego creations, as well as seeing how they do in the wild. [Brick Experiment Channel] has been featured here before, too.

Continue reading “LEGO Pole Climbers Are Great Study In What It Takes To Go Vertically Upwards”

A Simple LEGO Automatic Transmission

The automatic transmission in your average automobile can be a complicated, hydraulic-y thing full of spooky fluids and many spinning parts. However, simpler designs for “automatic” gearboxes exist, like this Lego design from [FUNTastyX].

The build is based around a simple open differential but configured in a unique way. A motor drives what would typically be one of the output shafts as an input. The same motor is also geared what would normally be the main differential input shaft as well. In these conditions, this double-drive arrangement would sum the speed input and lead to a faster rotational speed at the other shaft, which becomes the output.

However, the trick in this build is that the drive going to what would be the usual differential input is done through a Lego slipper clutch. This part, as explained by [TechnicBricks], allows the outer teeth of the gear to slip relative to the shaft once torque demand is exceeded. What this functionally does is that when the output of the “automatic gearbox” is loaded down, the extra torque demand causes the clutch to slip. This then leads to only one input to the differential doing any work, changing the gear ratio automatically.

It’s likely not a particularly efficient gearbox, as there are significant losses through the very simple clutch, we suspect. However, it does technically work, and we’d love to see its performance rated directly against other simple Lego gearbox designs.

It’s a little confusing to explain in text, but the video from [FUNTastyX] does a great job at explaining the principle in just a few minutes. We’ve seen plenty of crazy Lego gearboxes over the years, and we doubt this will be the last. Video after the break.

Continue reading “A Simple LEGO Automatic Transmission”

Lego Microscope Aims To Discover Future Scientists

When it comes to inspiring a lifelong appreciation of science, few experiences are as powerful as that first glimpse of the world swimming in a drop of pond water as seen through a decent microscope. But sadly, access to a microscope is hardly universal, denying that life-changing view of the world to far too many people.

There have been plenty of attempts to fix this problem before, but we’re intrigued to see Legos used to build a usable microscope, primarily for STEM outreach. It’s the subject of a scholarly paper (preprint) by [Bart E. Vos], [Emil Betz Blesa], and [Timo Betz]. The build almost exclusively uses Lego parts — pretty common ones at that — and there’s a complete list of the parts needed, which can either be sourced from online suppliers, who will kit up the parts for you, or by digging through the old Lego bin. Even the illuminator is a stock part, although you’ll likely want to replace the orange LED buried within with a white one. The only major non-Lego parts are the lenses, which can either be sourced online or, for the high-power objective, pulled from an old iPhone camera. The really slick part is the build instructions (PDF), which are formatted exactly like the manual from any Lego kit, making the build process easily accessible to anyone who has built Lego before.

As for results, they’re really not bad. Images of typical samples, like salt crystal, red onion cells, and water fleas are remarkably clear and detailed. It might no be a lab-grade Lego microscope, but it looks like it’s more than up to its intended use.

Thanks for the heads up on this, [Jef].

Lego Wheels And Tracks Benchmarked For Your Pleasure

For many people, Lego is their first entry into the world of engineering. With the Technic line of building blocks complete with all manner of gears and shafts and wheels, there’s a ton of fun to be had while learning about the basic principles of mechanical things. The [Brick Experiment Channel] takes Lego quite seriously in this context, and has collected data concerning the performance of a variety of Lego wheels and tracks.

The testing setup is simple. A small vehicle is fitted with a particular set of Lego wheels or tracks. Then, it’s placed on an inclined wooden board. The angle of inclination is then increased until the vehicle neither climbs the board nor slips down it. This angle can then be used to calculate the coefficient of friction of the given tyre or track set. [Brick Experiment Channel] filmed this testing and collected data on 33 different wheel and track combinations, publishing it in the description of the Youtube video.

Interestingly, the date of release of the various parts is recorded with the data. This is interesting as one would expect older rubber parts to lose grip with age, however, the release date of the parts obviously does not correspond with the manufacturing date, so the utility of this is somewhat unclear. There’s also some surprising results, with what appear to be soft, flat and smooth rubber wheels performing somewhat worse than those with curved profiles that you’d expect to have less contact patch. Regardless, it’s the best data we’ve ever seen in this field and we think it’s great that it was collected and shared with the broader Lego community. We look forward to seeing more of this in future, as it’s obviously something of great use to builders. We can imagine it would have proved handy when [Brick Experiment Channel] built their obstacle climbing rover. Video after the break.

Continue reading “Lego Wheels And Tracks Benchmarked For Your Pleasure”

Large Format Lego Camera Is A Bit Near-Sighted

Photography doesn’t have to be expensive, something that’s especially true in the realm of film photography, where the imperfections of the medium can be half the appeal. There are many DIY plans and kits available for analog cameras, but [bhiga143] had couple spare components and a pile of small, colorful bricks lying around, so he decided to build a functional 4×5″ film camera out of Lego.

Details are light for this build, but with a little knowledge about camera structure we can guess at what’s going on inside. Simplicity makes for robust design, and what we have here is in effect a box with a lens on one side and photographic film on the other. The center section of the front, which actually supports the lens, is capable of sliding in and out to adjust focus. On the far side (not pictured) is a slot just wide enough to insert a standard film holder.

The camera really is a hack. [bhiga143] stayed true to the “Lego” part of Lego camera, so there is no glue, no black paper lining, and no frills. The tripod is whatever stack of books lay underneath it. The lens is, quote, “barely functional”. There are light leaks galore, and it can’t focus beyond about 3 feet (1 meter). But every one of those points just makes us love it more. Every nugget of imperfection is a few words added to the story each picture tells. And we honestly can’t wait to see more pictures.

Other Lego cameras we’ve seen have been smaller and less colorful, but using a simple pinhole lens can reduce the overall cost. Of course, you’re not limited to Lego if you want to build your own pinhole camera. Although, the ubiquitous plastic bricks can also be useful in later stages of the film photography process.

LEGO Lunar Lander Animatronic Movie Released

Retired scientist [Mark Howe] spent the last couple months making an animatronic movie featuring his LEGO lunar lander in a video recreation of the Apollo 11 moon landing (also embedded below). [Mark] is not only the producer, but serves as the technical director, set designer, and cameraman as well. He designed and 3D-printed a custom special effects stage for the scene. It gives motion to the LEM using stepper motors, timing belts, pulleys, and a linear guide rod, all hidden inside a discrete upstage tower. He simulates the Lunar regolith using grout, spray adhesive, and a smattering of small rocks.

[Mark] implements the special effects sequencer in an Arduino Nano, and provides sound effects using an Adafruit audio sound board which he loaded up with sound files from the real Apollo 11 landing. Floor strip lighting is provided by an array of Neopixels, and a back-lit Earth is lowered from the fly space for one cut. He made a custom PCB motherboard to hold the Arduino, sound card and motor drivers.

The resulting production is quite impressive. This isn’t [Mark]’s first attempt to relieve the double boredom of both retirement and coronavirus isolation — back in December he produced a similar animatronic movie recreating a Saturn V launch. Thanks to [jhookie55] for the tip.

Continue reading “LEGO Lunar Lander Animatronic Movie Released”

Building A Continuously Variable Transmission With Lego

The first continuously variable transmission fitted to an automobile actually has its roots in the late 19th century, though the technology has only become popular in the last two decades or so. While a relatively complex technology in its modern automotive form, it’s still possible to illustrate the basic principles with everyone’s favourite mechanical learning toy – Lego.

The transmission as built isn’t great at high torque delivery, as the belt tends to slip on the smooth plastic of the cones. Increasing friction would help.

The build consists of a Lego motor driving the transmission’s input shaft, upon which a cone is mounted. A similar cone is mounted on the output shaft, and a rubber belt stretched between the two. With the cones mounted in opposing directions, the gear ratio can be continually varied by changing where upon the cones the belt rides. By riding on the small diameter section of the input cone, the belt correspondingly rides on the large diameter section of the output cone, leading to a slower, high torque output. By sliding the belt to the other end of the cone, the ratios are reversed, leading to high output speed with less torque.

The demonstration works somewhat differently than modern automotive models, but the basic concept is the same. It’s also limited in its torque transfer ability by the coefficient of friction of the plastic Lego parts. Despite this, it’s a quick way to illustrate the mechanisms at play, and where some of the common losses are in such a system. If you prefer your gearboxes of a more classic sequential design, we’ve seen those too, of course. Video after the break.

Continue reading “Building A Continuously Variable Transmission With Lego”