Building A Continuously Variable Transmission With Lego

The first continuously variable transmission fitted to an automobile actually has its roots in the late 19th century, though the technology has only become popular in the last two decades or so. While a relatively complex technology in its modern automotive form, it’s still possible to illustrate the basic principles with everyone’s favourite mechanical learning toy – Lego.

The transmission as built isn’t great at high torque delivery, as the belt tends to slip on the smooth plastic of the cones. Increasing friction would help.

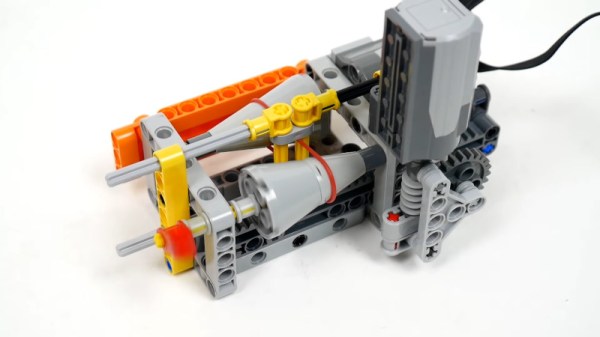
The build consists of a Lego motor driving the transmission’s input shaft, upon which a cone is mounted. A similar cone is mounted on the output shaft, and a rubber belt stretched between the two. With the cones mounted in opposing directions, the gear ratio can be continually varied by changing where upon the cones the belt rides. By riding on the small diameter section of the input cone, the belt correspondingly rides on the large diameter section of the output cone, leading to a slower, high torque output. By sliding the belt to the other end of the cone, the ratios are reversed, leading to high output speed with less torque.

The demonstration works somewhat differently than modern automotive models, but the basic concept is the same. It’s also limited in its torque transfer ability by the coefficient of friction of the plastic Lego parts. Despite this, it’s a quick way to illustrate the mechanisms at play, and where some of the common losses are in such a system. If you prefer your gearboxes of a more classic sequential design, we’ve seen those too, of course. Video after the break.

Continue reading “Building A Continuously Variable Transmission With Lego”

Sequencing DNA For Metagenomics

If someone brought you an odd piece of electronic hardware and you wanted to identify it, you’d probably look for markings on the outside first. If that didn’t work out, you might look under the cover and read some markings on the board or key components. However, in a tough case, you might dump the firmware and try to guess what the device is or what it does by examining the code that makes it run. That’s kind of what [Ciro] did. Wanting to determine the bacteria in a water sample led to using relatively inexpensive DNA sequencing hardware to look at the DNA present in the samples. This would have been a huge undertaking for a well-funded lab just a few short years ago. Now it just takes a USB device and some software.

Of course, inexpensive is in the eye of the beholder. The micropore sequencer costs about $500 and has a one-time use consumable cost of about $500, although that’s enough to process about 10 human genomes. The technology depends on using a small pore only large enough to pass one strand of DNA at a time. Blocks of nucelotides cause different amounts of electrical current to flow through the pore.

Continue reading “Sequencing DNA For Metagenomics”

Custom Ignition For A Citroën Mehari

The 20th century saw a great many cheap, utilitarian vehicles enter the marketplace. Cars like the Mini and the original Jeep offered low-cost, no-frills motoring. However, they were also decidedly low-tech, and not as reliable as modern cars by a long shot. The Citroën Mehari fits into this category neatly, and when [FVFILIPPETTI] grew tired of the unreliable points ignition system, he decided to build a more modern replacement.

The system is based around at ATmega328, the venerable chip many are familiar with from its starring role in the Arduino Uno. The chip tracks engine position with a magnet mounted on the flywheel combined with a hall-effect sensor, passed through an optocoupler to avoid nasty high-voltage spikes from the spark system interfering with the microcontroller. The chip then charges the ignition coil and fires it at the necessary time to ignite the air fuel mixture.

Old-school mechanical ignition systems were, if we’re honest, terrible compared to more modern solutions. This build has rewarded [FVFILIPPETTI] with a far more reliable ride, which we’re sure is very satisfying. If all this hacking has you thirsty for an automotive project of your own, dive into our primer on how to get into cars!

LoRa Messenger Does Its Best BlackBerry Impression

While the de facto smartphone design ultimately went in a different direction, there’s no denying the classic BlackBerry layout offered some compelling advantages. It was a gadget primarily designed to send and receive emails and text messages, and it showed. So is it really any wonder [MSG] would build his pocket-sized LoRa messengers in its image?

Of course, he did have some help. The communicators use the Keyboard FeatherWing by [arturo182], which puts a surplus BlackBerry Q10 keyboard on a custom PCB designed to accept a board from Adafruit’s Feather collection. [MSG] ended up pairing his with a Feather M4 because he wanted to work with CircuitPython, with a 900 MHz LoRa FeatherWing along for the ride. He notes that switching his code over to Arduino-flavored C would allow him to use the Feather M0 that features integrated LoRa; a change that would allow him to make the gadget a bit thinner.

Inside the 3D printed enclosure, He’s made room for a 3.7 V 1800 mAh pouch battery that should provide plenty of runtime. There’s also an external antenna with a uFL pigtail for connecting to the radio. The case is held together with heat-set inserts, which should make it more than robust enough to handle a few adventures.

[MSG] says slight variations in hardware versions means his STLs might need a little tweaking to fit your components, and warns that his code is basically just a mashup of examples he found online, but he’s still sharing the goods for anyone who wants to reach out and touch someone without all that pesky infrastructure in the way.

Continue reading “LoRa Messenger Does Its Best BlackBerry Impression”

Raspberry Pi Takes Over Volvo’s Integrated LCD

As [Luuk Esselbrugge] explains in a recent blog post, his 2002 Volvo S60 had an optional GPS navigation system and backup camera that used a motorized display that would rise out of the dashboard when needed. His particular car didn’t come with the hardware installed, but after getting his hands on a display module and doing some research, he figured out how he could drive it with the Raspberry Pi and a couple of microcontrollers.

Given the age of the display, you probably won’t be surprised to hear that it uses composite video. Not exactly high resolution, but in the demonstration after the break, we have to admit it looks more than up to the task. [Luuk] is running Android Auto on the Raspberry Pi 3 through the openauto project, which gives him a nice big display and access to all the navigation and media applications you’d expect. The display doesn’t support touch, but thanks to an ESP32 plugged into the CAN bus, he’s able to control the software by reading the buttons built into the Volvo’s steering wheel.

Composite video sources are switched with a simple relay.

To actually raise and lower the display, [Luuk] found you just need to fire a few bytes down the 1,200 baud serial bus that’s built into the display’s wiring harness. The ESP32 handles this duty as well, at least partly because it’s already plugged into the CAN bus and can tell when the vehicle is in reverse. This lets it bring up the screen to show the video feed from the newly installed backup camera in the event that the Pi hadn’t already asked to raise the display. Incidentally plugging in the phone normally triggers the system to wake up and raise the screen, and disconnecting it will command the screen to lower back into the stowed position.

The attentive reader or Volvo aficionado may be wondering how [Luuk] got the audio working. Since his car’s sound system doesn’t feature an auxiliary input, he’s using an Arduino to spoof the existence of a CD changer, which allows him to inject an audio signal into one of the pins on the back of the radio. Eventually he wants to move this task over to the ESP32, but he says a big change like that will have to wait until warmer weather.

This isn’t the first time we’ve seen the Raspberry Pi used to add enhanced features to a somewhat older vehicle. While some bemoan the increased complexity of modern vehicles, it seems some hackers can’t get enough of it.

Continue reading “Raspberry Pi Takes Over Volvo’s Integrated LCD”

Using Your Phone As A Microscope On The Electronics Workbench

One aspect of working for Hackaday comes in our regular need to take good quality photographs for publication. I have a semi-decent camera that turns my inept pointing and shooting into passably good images, but sometimes the easiest and quickest way to capture something is to pull out my mobile phone.

It’s a risky step because phone camera modules and lenses are tiny compared to their higher quality cousins, and sometimes the picture that looks good on the phone screen can look awful in a web browser. You quickly learn never to zoom on a mobile phone camera because it’s inevitably a digital zoom that simply delivers grainy interpolated pictures.

That’s not to say that the zoom can’t be useful. Recently I had some unexpected inspiration when using a smartphone camera as a magnifier to read the writing on a chip. I don’t need an archival copy of the image… I just needed a quick magnifying tool. Have I been carrying a capable magnifier for soldering in my pocket or handbag for years without realising it? I decided to give it a try and it worked okay with a few caveats. While I have seen optics turn these cameras into pretty good microscopes, my setup added nothing more than a phone tripod, and will get you by in a pinch.

Continue reading “Using Your Phone As A Microscope On The Electronics Workbench”

Hackaday Podcast 104: Delicous AI, DVD Scanning Microscope, And Battery-Friendly Microcontroller Designs

Hackaday editors Elliot Williams and Mike Szczys spin the wheel of hardware hacking brilliance. We’re enamored with the quest for a root shell on a Nissan Xterra infotainment system, and smitten with a scanning microscope that uses a laser beam and precision positioning from DVD drives. We speculate on the future of artificial intelligence in the culinary arts. And this week turned up a clever way to monitor utility usage while only changing the battery on your sensor once per year.

Take a look at the links below if you want to follow along, and as always, tell us what you think about this episode in the comments!

Direct download (~65 MB)

Places to follow Hackaday podcasts:

Continue reading “Hackaday Podcast 104: Delicous AI, DVD Scanning Microscope, And Battery-Friendly Microcontroller Designs”