Build A File Server Inside An Old External Optical Drive Enclosure

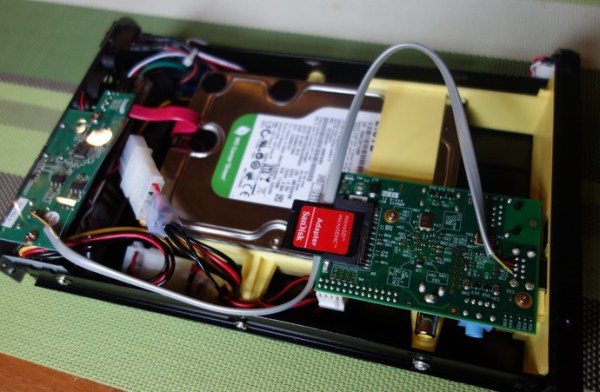
This one nearly ended up in today’s Links post, but on second look we think it deserves a feature of its own. [Profezzorn] designed some mounting brackets to house a file server inside of an external drive enclosure. Click on the instructions tab to get a bit more of the story.

The enclosure that he’s using is meant for a 5.25″ optical drive. It comes with a USB to SATA converter which is how he connects the hard drive to the Raspberry Pi serving the files. His mounting system uses the original holes in the enclosure, the threaded holes of the drive, and the holes in the RPi PCB to mount everything with just ten screws. The enclosure included a Molex power connector. He sacrificed an old connector to make a custom cable for the Pi’s power.

Add a portable power supply, do a little work with the Linux configuration, and you could easily turn this into a pirate box.

3D Printering: The Combo Machines Cometh

There’s only so many ways to squeeze hot plastic out of a nozzle, and eventually witnessing the explosion of 3D printer designs over the past few years gets just a little repetitive. What then, is someone who dreams of a technological utopia, Star Trek replicators, and making a few bucks off a Kickstarter to do?

The answer, of course, is a combo machine. Where the Repraps, Makerbots, and the very high-end Stereolithography machines can only do additive manufacturing by laying down plastic or resin layer by layer, these combo machines can also remove material, be it plastic, wood, or metals such as brass or aluminum.

Continue reading “3D Printering: The Combo Machines Cometh”

Molding Flexible Links

Flexible Links

Need a custom link that’s strong and flexible? [RobotGrrl] came up with a method of molding flexible links using 3D printed parts and Sugru.

The link consists of two 3D printed hubs, connected by a flexible material cast in a 3D printed mold. [RobotGrrl] recommends using Sugru to create the link, but you can use homemade Oogoo as a low cost substitute. Dish soap is used as a release agent, and prevents the Sugru from sticking to the mold.

The tutorial includes a detailed guide to modeling the parts in Autodesk Inventor, which serves as a quick introduction to the CAD tool. If you just want to make some links, the STL files are available for immediate 3D printing.

Why would you want DIY flexible links? [RobotGrrl]’s Baitbot is a good example. This tentacle robot uses the links as its core. Check out a video of the Baitbot wiggling and jiggling after the break.

Continue reading “Molding Flexible Links”

3D Printering: Scanning 3D Models

The Makerbot Digitizer was announced this week, giving anyone with $1400 the ability to scan small objects and print out a copy on any 3D printer.

Given the vitriol spewed against Makerbot in the Hackaday comments and other forums on the Internet, it should be very obvious the sets of Hackaday readers and the target demographic Makerbot is developing and marketing towards do not intersect. We’re thinking anyone reading this would rather roll up their sleeves and build a 3D scanner, but where to start? Below are a few options out there for those of you who want a 3D scanner but are none too keen on Makerbot’s offering.

Continue reading “3D Printering: Scanning 3D Models”

Amazing Flight Of A 3D Printed Rubber Band Powered Ornithopter

We’re actually going to link to an old post from back in February because we think it’s equally as impressive as the most recent work. This is a 3D printed ornithopter powered by a rubber band (translated). The frame is much like a traditional rubber band plane. The difference is that after winding it up it doesn’t spin a propeller. The flapping of the four plastic membrane wings makes it fly like magic. Seriously, check out the demo below… we almost posted this as “Real or Fake?” feature if we hadn’t seen similar offerings a couple of years back.

The flight lasts a relatively long time when considering the quick winding before launch is all that powered it. But the most recent offerings (translated) from the site include the motorized ornithopter design seen above. It carries a small Lithium cell for continuous flight. These designs have a 3D printed gear system which makes them a bit more complicated, but brings steering and remote control to the party. If you want one of your own they’re working on a small run of kits. We figure it’d be a lot more fun to prototype and print your own. Sure, it’s reinventing the wheel. But it’s a really cool wheel!

Continue reading “Amazing Flight Of A 3D Printed Rubber Band Powered Ornithopter”

3D Printed Arc Reactor Replica

3d-printed-arc-reactor-replica

[James] just keeps cranking on the idea of the perfect arc reactor replica. This time around he’s made most of the parts using a 3D printer. His write-up covers the basics of the build, but he also used this opportunity to make some tutorial videos on designing the parts using Autodesk 123D.

This is definitely an improvement on his last prop, which was built out of dollar store parts. When designing the components he tried to be as true to the original movie design as possible, while keeping in mind the limitations of using a home 3D printer; he printed them on a Lolzbot AO-101.

The videos below give you a good idea of what it’s like to model parts using 123D. The tool set is pretty simple compared to something like Blender 3D. But [James] uses them in such a way that the components get complex fairly quickly. The second video includes some footage of the parts being printed, as well as the assembly process that adds wrapped wire for looks, and LEDs for illumination.

Continue reading “3D Printed Arc Reactor Replica”

A Deck Screw Extruder

deck

A lot of great ideas happen in the middle of the night, and for [Werner] it’s no different. One night he came up with an idea for a new 3D printer extruder, and after a very basic prototype, we’d have to say he might be on to something. It’s basically a deck screw acting as a worm gear to drive filament, but this simple idea has a lot of really cool advantages.

There are two really interesting features of this extruder, should [Werner] ever decide to flesh out his idea into a real prototype. First, the stepper motor for this extruder can be extremely small and mounted directly above the extruder. This opens up the doors to easily creating multi-extrusion printers that can handle more than one filament. Secondly, using a deck screw as a worm gear means there is a huge area of contact between the plastic filament and the driver gear.

Whereas the usual extruder setup only makes contact with the plastic filament along one or two splines of a hobbed bolt, [Werner]’s design drives the filament along the entire length of the deck screw worm gear. This could easily translate into much more accurate extrusion without all the fiddling around with springs and hobbed bolts today’s extruders have.

In any event, it’s a very interesting idea, and we’d love to see [Werner] or someone else make a functioning extruder with this design.