Animal Crossing keyboard banner

Making GameCube Keyboard Controller Work With Animal Crossing

[Hunter Irving] is a talented hacker with a wicked sense of humor, and he has written in to let us know about his latest project which is to make a GameCube keyboard controller work with Animal Crossing.

This project began simply enough but got very complicated in short order. Initially the goal was to get the GameCube keyboard controller integrated with the game Animal Crossing. The GameCube keyboard controller is a genuine part manufactured and sold by Nintendo but the game Animal Crossing isn’t compatible with this controller. Rather, Animal Crossing has an on-screen keyboard which players can use with a standard controller. [Hunter] found this frustrating to use so he created an adapter which would intercept the keyboard controller protocol and replace it with equivalent “keypresses” from an emulated standard controller.

Continue reading “Making GameCube Keyboard Controller Work With Animal Crossing”

PLA With PETG Core Filament Put To The Test

The Stronghero 3D hybrid PLA PETG filament, with visible PETG core. (Credit: My Tech Fun, YouTube)

Sometimes you see an FDM filament pop up that makes you do a triple-take because it doesn’t seem to make a lot of sense. This is the case with a hybrid PLA/PETG filament by Stronghero 3D  that features a PETG core. This filament also intrigued [Dr. Igor Gaspar] who imported a spool from the US to have a poke at it to see why you’d want to combine these two filament materials.

According to the manufacturer, the PLA outside makes up 60% of the filament, with the rest being the PETG core. The PLA is supposed to shield the PETG from moisture, while adding more strength and weather resistance to the PLA after printing. Another interesting aspect is the multi-color look that this creates, and which [Igor]’s prints totally show. Finding the right temperatures for the bed and extruder was a challenge and took multiple tries with the Bambu Lab P1P including bed adhesion troubles.

As for the actual properties of this filament, the layer adhesion test showed it to be significantly worse than plain PLA or PETG when printed at extruder temperatures from 225 °C to 245 °C. When the shear stress is put on the material instead of the layer adhesion, the results are much better, while torque resistance is better than plain PETG. This is a pattern that repeats across impact and other tests, with PETG more brittle. Thermal deformation  temperature is, unsurprisingly, between both materials, making this filament mostly a curiosity unless its properties work much better for your use case than a non-hybrid filament.

Continue reading “PLA With PETG Core Filament Put To The Test”

Ceramic Printing Techniques For Plastic

[Claywoven] mostly prints with ceramics, although he does produce plastic inserts for functional parts in his designs. The ceramic parts have an interesting texture, and he wondered if the same techniques could work with plastics, too. It turns out it can, as you can see in the video below.

Ceramic printing, of course, doesn’t get solid right away, so the plastic can actually take more dramatic patterns than the ceramic. The workflow starts with Blender and winds up with a standard printer.

Continue reading “Ceramic Printing Techniques For Plastic”

Careful Design Lets 3D Print Emulate Kumiko

Kumiko is a form of Japanese woodworking that uses small cuts of wood (probably offcuts) to produce artful designs. It’s the kind of thing that takes zen-like patience to assemble, and years to master– and who has time for that? [Paper View] likes the style of kumiko, but when all you have is a 3D printer, everything is extruded plastic.

His video, embedded below, focuses mostly on the large tiled piece and the clever design required to avoid more than the unavoidable unsightly seams without excessive post processing. (Who has time for that?) The key is a series of top pieces to hide the edges where the seams come together. The link above, however, gives something more interesting, even if it is on Makerworld.

[Paper View] has created a kumiko-style (out of respect for the craftspeople who make the real thing, we won’t call this “kumiko”) panel generator, that allows one to create custom-sized frames to print either in one piece, or to assemble as in the video. We haven’t looked at MakerWorld’s Parametric Model Maker before, but this tool seems to make full use of its capabilities (to the point of occasionally timing out). It looks like this is a wrapper for OpenScad (just like Thingiverse used to do with Customizer) so there might be a chance if enough of us comment on the video [Paper View] can be convinced to release the scad files on a more open platform.

We’ve featured kumiko before, like this wood-epoxy guitar,  but for ultimate irony points, you need to see this metal kumiko pattern made out of nails. (True kumiko cannot use nails, you see.)

Thanks to [Hari Wiguna] for the tip, and please keep them coming!

Continue reading “Careful Design Lets 3D Print Emulate Kumiko”

Is Box Turtle The Open Source AMS We’ve Been Waiting For?

Multimaterial printing was not invented by BambuLabs, but love them or hate them the AMS has become the gold standard for a modern multi-material unit. [Daniel]’s latest Mod Bot video on the Box Turtle MMU (embedded below) highlights an open source project that aims to bring the power and ease of AMS to Voron printers, and everyone else using Klipper willing to put in the work.

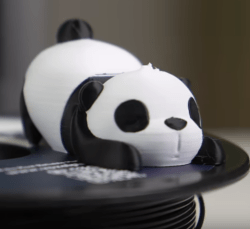
A 3d Printed panda with black and white filament
This isn’t a torture test, but it’s very clean and very cute.

The system itself is a mostly 3D printed unit that sits atop [Daniel]’s Voron printer looking just like an AMS atop a BambuLab. It has space for four spools, with motorized rollers and feeders in the front that have handy-dandy indicator LEDs to tell you which filament is loaded or printing. Each spool gets its own extruder, whose tension can be adjusted manually via thumbscrew. A buffer unit sits between the spool box and your toolhead.

Aside from the box, you need to spec a toolhead that meets requirements. It needs a PTFE connector with a (reverse) boden tube to guide the filament, and it also needs to have a toolhead filament runout sensor. The sensor is to provide feedback to Klipper that the filament is loaded or unloaded. Finally you will probably want to add a filament cutter, because that happens at the toolhead with this unit.  Sure, you could try the whole tip-forming thing, but anyone who had a Prusa MMU back in the day can tell you that is easier said than done. The cutter apparently makes this system much more reliable.

Continue reading “Is Box Turtle The Open Source AMS We’ve Been Waiting For?”

Head To Print Head: CNC Vs FDM

It’s a question new makers often ask: “Should I start with a CNC machine or a 3D Printer?”– or, once you have both, every project gets the question “Should I use my CNC or 3D printer?” — and the answer is to both is, of course, “it depends”. In the video embedded below by [NeedItMakeIt] you can see a head-to-head comparison for one specific product he makes, CRATER, a magnetic, click-together stacking tray for tabletop gaming. (He says tabletop gaming, but we think these would be very handy in the shop, too.)

[NeedItMakeIt] takes us through the process for both FDM 3D Printing in PLA, and CNC Machining the same part in walnut. Which part is nicer is absolutely a matter of taste; we can’t imagine many wouldn’t chose the wood, but de gustibus non disputandum est–there is no accounting for taste. What there is accounting for is the materials and energy costs, which are both surprising– that walnut is cheaper than PLA for this part is actually shocking, but the amount of power needed for dust collection is something that caught us off guard, too.

Of course the process is the real key, and given that most of the video follows [NeedItMakeIt] crafting the CNC’d version of his invention, the video gives a good rundown to any newbie just how much more work is involved in getting a machined part ready for sale compared to “take it off the printer and glue in the magnets.” (It’s about 40 extra minutes, if you want to skip to the answer.) As you might expect, labour is by far the greatest cost in producing these items if you value your time, which [NeedItMakeIt] does in the spreadsheet he presents at the end.

What he does not do is provide an answer, because in the case of this part, neither CNC or 3D Printing is “better”. It’s a matter of taste– which is the great thing about DIY. We can decide for ourselves which process and which end product we prefer. “There is no accounting for taste”, de gustibus non disputandum est, is true enough that it’s been repeated since Latin was a thing. Which would you rather, in this case? CNC or 3D print? Perhaps you would rather 3D Print a CNC? Or have one machine to do it all? Let us know in the comments for that sweet, sweet engagement.

While you’re engaging, maybe drop us a tip, while we offer our thanks to [Al] for this one.

Continue reading “Head To Print Head: CNC Vs FDM”

3D Print Glass, Using Accessible Techniques

When seeing a story from MIT’s Lincoln Labs that promises 3D printing glass, our first reaction was that it might use some rare or novel chemicals, and certainly a super-high-tech printer. Perhaps it was some form of high-temperature laser sintering, unlikely to be within the reach of mere mortals. How wrong we were, because these boffins have developed a way to 3D print a glass-like material using easy-to-source materials and commonly available equipment.

The print medium is sodium silicate solution, commonly known as waterglass, mixed with silica and other inorganic nanoparticles. It’s referred to as an ink, and it appears to be printed using a technique very similar to the FDM printers we all know. The real magic comes in the curing process, though, because instead of being fired in a special furnace, these models are heated to 200 Celsius in an oil bath. They can then be solvent cleaned and are ready for use. The result may not be the fine crystal glass you may be expecting, but we can certainly see plenty of uses for it should it be turned into a commercial product. Certainly more convenient than sintering with a laser cutter.