A 3D-Printed Bass Guitar

A visit to the hardware hacking area of the recent Hacker Hotel hacker camp in the Netherlands would bring plenty of interesting pieces of hardware to delight the eye. Among them though was one to delight the ear, and on hearing it we asked whether its creator could put it online so we could share it with you. [XDr4g0nX]’s bass guitar is 3D printed, and while it still contains some non-3D-printed parts it’s still a very effective musical instrument.

This is not the first model he’s produced, he told us, an earlier guitar was entirely 3D-printed but proved not to be rigid enough. Tuning such an instrument merely resulted in its bowing out of shape and becoming unplayable as well as out of tune. This one has hefty steel bars for rigidity, though it uses a Yamaha neck rather than 3D-printing the whole instrument.  The main body of the instrument has to be printed in multiple parts and epoxied together, which he’s done without some of the ugly seams that sometimes disfigure prints of this nature.

Having heard it, we’d be hard pressed to tell it wasn’t a more traditional guitar, but then again since people have made guitars from all kinds of scrap it’s not the first home build we’ve encountered.

$80 Dual Extrusion Kit Might Work With Your 3D Printer

[Teaching Tech] sprung about $80 or a kit to add dual extrusion to his 3D printer, plus another $20 for an accessory kit. He did get it to work well, but it wasn’t without problems which he covers in the video below.

The design of the head uses a servo to swing two hot ends to — in theory — the same point. Each hot end has an ooze shield, so you don’t need to deal with that in your G-code by building a priming tower. However, there are some requirements for your printer.

Continue reading “$80 Dual Extrusion Kit Might Work With Your 3D Printer”

OpenAstroTracker Turns Your DSLR Into An Astronomy Instrument

If you want to take beautiful night sky pictures with your DSLR and you live between 15 degrees and 55 degrees north latitude you might want to check out OpenAstroTracker. If you have a 3D printer it will probably take about 60 hours of printing, but you’ll wind up with a pretty impressive setup for your camera. There’s an Arduino managing the tracking and also providing a “go to” capability.

The design is over on Thingiverse and you can find code on GitHub. There’s also a Reddit dedicated to the project. The tracker touts its ability to handle long or heavy lenses and to target 180 degrees in every direction.

Continue reading “OpenAstroTracker Turns Your DSLR Into An Astronomy Instrument”

Printing Liquid Concrete

In the world of additive manufacturing, there’s always need materials being added to the list of potential filaments to use for printing objects. A method of rapid liquid printing of concrete designed by [Anatoly Berezkin] of Stoneflower 3D makes it possible to print a large variety of shapes from concrete while avoiding the negative effects of fast dehydration. The technique is based on an approach to printing polyurethanes, developed by MIT in 2017. This technique requires physically drawing a 3D object within a gel suspension using a chemical curing process. The gel allows gravity to not affect the printing process, as well as helping out with the curinng. Berezkin, an engineer and hobbyist working out of his garage, has published other work including print heads, ceramic printing, and micro printing sets.

One might be skeptical of whether the weight of the material could cause potential collapse during the printing process, or whether it is simply unrealistic to print objects given the time needed for the concrete to dry. Their demo shows the process being done in household items – bowls and tupperware – combining affordable items such as clay, concrete, and sand for the matrix and mortar. The viscous clay is strong enough to act as a good scaffold for keeping the concrete structure in place as it is being printed. As their video demonstrates, at least for simply objects, the process seems relatively fast.

RLPC doesn’t require toxic chemicals or proprietary components such as gels and suspensions. Its immersion of the final printed object in a humid environment is also superior to the standard process of liquid deposition for hardening concrete. Moreover, the process simply requires clay or retarded mortar for the matrix and mortar paste for turning into concrete. It’s advertised as eco-friendly, but just the simplicity of the materials needed for the matrix and mortar make this a promising technique.

Continue reading “Printing Liquid Concrete”

Multiple 3D Printers, And One Pi To Rule Them All

If you’ve got a desktop 3D printer, there’s an excellent chance you’ve heard of OctoPrint. This web front-end, usually running on a Raspberry Pi, allows you to monitor and control the printer over the network from any device that has a browser. But what if you’ve got two printers? Or 20? The logistics of each printer getting its own Pi can get uncomfortable in a hurry, which is why [Jay Doscher] has been working on a way to simplify things.

Leveraging the boosted processing power of the Raspberry Pi 4 and some good old fashioned Linux trickery, [Jay] is now controlling multiple printers from a single device. The trick is to run multiple instances of the OctoPrint backend and assign them to virtual network interfaces so they don’t interfere with each other. This takes some custom systemd unit files to get up and running on Raspbian, which he’s been kind enough to include them in the write-up.

But getting multiple copies of OctoPrint running on the Pi is only half the battle. There still needs to be a way to sort out which printer is which. Under normal circumstances, the printers would be assigned random virtual serial ports when the Pi booted. To prevent any confusion, [Jay] explains how you can use custom udev rules to make sure that each printer gets its own unique device node. Even if you aren’t trying to wrangle multiple 3D printers, this is a useful trick should you find yourself struggling to keep track of your USB gadgets.

If you’re wondering why [Jay] needs to have so many 3D printers going at the same time, we hear they’ve been keeping rather busy running off parts for commissioned copies of his popular projects. Something to consider the next time you’re wondering if there’s a way to make a happy buck out of this little hobby of ours, folks.

3D Printed Breadboard Helper Makes Wiring Neater And Easier

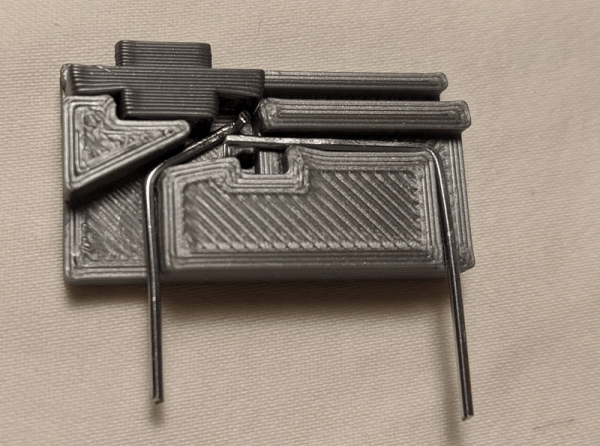
Breadboards make it simple to prototype and test circuits. If you use flexible wires with pins to make connections, it usually results in a rat’s nest. For many of us, using solid wire makes a rat’s nest, too. However, the very neat among us will cut solid wire to just the right length and strip just the right amount of wire and lay the wires very flat and neat along the board. [Moononournation] did a 3D print that makes the latter method much easier. You can find his Breadboard Wire Helper on Thingiverse and see a video, below.

The idea is simple: start with a piece of wire stripped on one side, then count out the number of holes it needs to traverse and push the stripped end through the hole. Trim the wire to fit. To complete the other side, lay the wire flat along the tool to the edge. Now you can see where to strip that side of the wire. After you remove the insulation, you can bend the wire down and cut the wire to fit. Now you have a perfect size and shape wire to place in the actual breadboard.

Granted, this isn’t that hard to do with the existing breadboard if it isn’t too packed. You could even use a spare breadboard. But it is a little easier to trim the wire to the right size with this jig. If you don’t want to 3D print it, you could probably pull the tape off the back of a cheap board and remove the springs to get a similar effect.

So while this little tool probably won’t change your life, it might make it a little easier. What other tools do you use when breadboarding? Let everyone know in the comments.

Continue reading “3D Printed Breadboard Helper Makes Wiring Neater And Easier”

3D Printable Nameplates From Your Web Browser

It’s an unwritten rule that all proper pieces of shop equipment need a nameplate. Otherwise, how are you going to know what name to use when you curse it under your breath? In the old days these would have been made out of something fancy such as brass, but for the modern hacker that doesn’t stand on tradition, you can now easily outfit all your gear with custom 3D printed nameplates using this online tool.

Granted, it wouldn’t be very difficult to throw one of these together in whatever CAD package you happen to have access to. But with the tool [Tobias Weber] has developed, you don’t have to. Simply pick the font, the shape of the border, and fill in a few variables to fine tune things such as padding and base thickness.

Finally, enter your text and marvel at the real-time 3D preview that’s rendered thanks to the magic of modern web technologies. In seconds, you’ll have an STL file that’s ready for the warm liquid goo phase.

The huge collection of fonts are a particularly nice touch, ranging from delicate scripts to military style stencils. Depending on your CAD software, getting arbitrary fonts imported and extruded into a three dimensional shape can be tricky for new players. If we do have one complaint though, it’s that there doesn’t seem to be a clear indicator of how big the nameplate is going to be when exported. First time around, it spit out an STL that would have been 300 mm long if we hadn’t scaled it down in the slicer.

This project is very reminiscent of another web-based tool we featured recently. That one allowed you to make 3D printed QR codes which would whatever entomb in plastic whatever data your cold hacker heart desired.

Continue reading “3D Printable Nameplates From Your Web Browser”