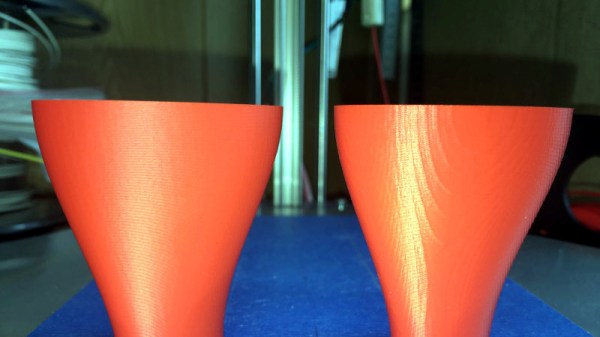
Some 3D printers will give you prints with surfaces resembling salmon skin – not exactly the result you want when you’re looking for a high-quality print job. On bad print jobs, you can usually notice that the surface is shaking – even on the millimeter scale, this is enough to give the print a bumpy finish and ruin the quality of the surface. TL smoothers help with evening out the signal going through stepper motors on a 3D printer, specifically the notoriously noisy DRV8825 motor drivers.
Analyzing the sine wave for the DRV8825 usually shows a stepped signal, rather than a smooth one. Newer chips such as the TMC2100, TMC2208, and TMC2130 do a much better job at providing smooth signals, as do cheaper drivers like the commonly used A4988s.
[Fugatech 3D Printing] demonstrates some prints from a D-Force Mini with an MKS Base 1.4 smoother-based control board, which is easier to use and smarter than Marlin. On the two prints using smoothers, one uses a board with four diodes, while the other was printed with a board with eight diodes. [Mega Making] compares how the different motor drivers work and experimentally shows the stuttering across the different motors before and after connecting to the smoothers.
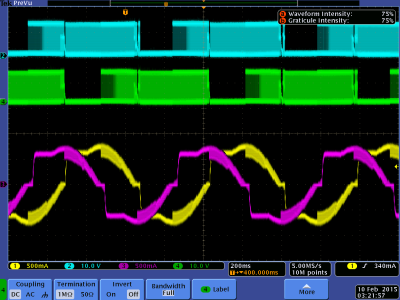
[Schrodinger Z] does a bit of digging into the reason for the missing microsteps, testing out different decay modes in DRV8825s and why subharmonic oscillations occur in the signals from the motor.
The driver consequently has a “dead zone” where it is unable to produce low currents. Modifying the motor by offsetting the voltage by 1.4V (the point where no current flow) would allow the dead zone to be bridged. This also happens to be the logic behind the design for smoothers, although it is certainly possible to use different diodes to customize the power losses depending on your particular goal for the motor.
Debugging signal problems in a 3D printer can be a huge headache, but it’s also gratifying to understand why microstepping occurs from current analysis.