3D Printed — Um — Hook And Loop Fasteners

[Teaching Tech’s] latest video discusses “3D printed Velcro.” But as even he admits, Velcro is a trademark, so we think it is more appropriate to talk about hook and loop fasteners. In fact, you can see the good-natured official video about the trademark below [Teaching Tech’s] video. Regardless, his experiments with several 3D-printed Vel… fastener designs are worth watching.

Some of the designs were rather large, like we would have expected. However, some of the designs were fairly small and looked almost like real Velcro. However, since the pattern is not as random as the fabric portions of the real deal, it seems like alignment between parts is more critical when you are joining the two halves.

Continue reading “3D Printed — Um — Hook And Loop Fasteners”

Developing A 4,500 RPM Twin-Cylinder Air Engine

Compressed air isn’t really a practical form of energy storage for headline uses like transport or heating, but it’s a fun thing to tinker with at the small scale. [Tom Stanton] is plenty experienced in that area, having built a series of compressed air engines over the years. His latest effort is capable of running at up to 4,500 RPM, and delivering a full 0.05 horsepower.

Two-cylinder power!

[Tom’s] ultimate goal is to put his new tiny air engine on a small model aircraft. To enable consistent performance, his engine needs a regulator, but off-the-shelf models for industrial use were too hefty for his use. Thus, he set about equipping his engine with a lightweight regulator of his own 3D-printed design.

His latest ball-valve air engine was then designed to run on this lower regulated pressure of approximately 30 psi. It initially proved less efficient than his previous designs, but some engineering analysis revealed the problem. [Tom] does a great job of stepping through his process of understanding how these engines perform, and how he uses these findings to guide his design choices going forward.

It’s also great to see a YouTuber not just building fun things, but taking measurements and doing some real engineering. [Tom’s] air engines keep getting better, and we can’t wait to see where he takes his designs next.

Continue reading “Developing A 4,500 RPM Twin-Cylinder Air Engine”

Hackaday Prize 2023: Gen5X A Generatively Designed 5-Axis 3D Printer

[Ric Real] is entering the 2023 Hackaday Prize with the Gen5X, a generatively designed 3D printed five-axis 3D printer. The concept is not a new one, with the type of construction being seen a few times here and there. In addition to the usual three directions of motion, we’re familiar with, with the cartesian bot design, these types of machines add an additional two rotation axes, one which can swing the build platform front and back around the X-axis, and a second that provides rotation around the Z-axis. These combined motions give rise to some very interesting capabilities, outside of our familiar 3D printing design constraints.

As for the generative side of things, this is a largely theoretical idea. Essentially the concept is that the machine’s design can be iteratively updated and optimised for performance to fit into the constraints of available hardware such as motors and other ‘vitamins’ needed to create the next generation of machines. The design files should be parameterised enough such that this optimisation process can be automated, potentially via input from AI, but we suspect we’re a way off from that yet. Whether this project as yet satisfies any of these lofty goals remains to be seen, but do keep an eye on it if you’re so inclined. There is a Fusion 360 project here to dig into, but if you’re not interested in the research side of the project, but just want to build a 5-axis machine to play with, then you can find the project source on the GitHub Page.

If this feels familiar, you’d be on the right track, as we covered at least one other 5D printer recently. We have also touched upon generative design at least once. We’re sure we will see more on this topic in the future.

Continue reading “Hackaday Prize 2023: Gen5X A Generatively Designed 5-Axis 3D Printer”

Solar Powered Flower Chases The Light

Many plants are capable of tracking the sun in order to get the most possible light. [hannu_hell] built a solar powered sculpture that replicates this light sensitivity for the benefit of better charging its own batteries, allowing it to run theoretically indefinitely where suitable light was available.

The 3D-printed flower features six movable petals mounted on an articulated stem. The flower’s leaves themselves bear solar panels that collect energy, analogous to leaves on a plant. A Raspberry Pi Pico is at the heart of the show, which is outfitted with a DS1307 real-time clock and a ST7735 TFT display for displaying date and time information. It’s also responsible for controlling servos that aim the flower’s solar panels towards the brightest light source available. This is achieved by using the Pico to read several photoresistors to determine light levels and adjust the leaves accordingly.

It’s a fun build, and one that could teach useful lessons relevant to even large-scale solar arrays. Video after the break.

Continue reading “Solar Powered Flower Chases The Light”

Art of 3D printer in the middle of printing a Hackaday Jolly Wrencher logo

Make Better 3D Printed Molds, For Thermoforming Plastics

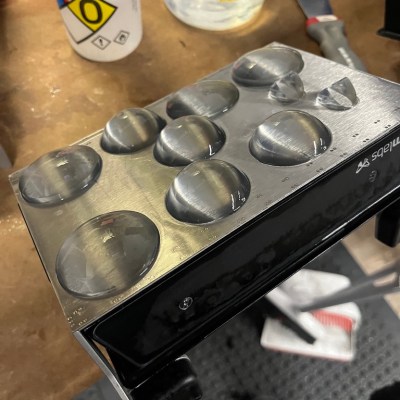
Thermoforming — which includes vacuum-forming — has its place in a well-rounded workshop, and Mayku (makers of desktop thermoforming machines) have a short list of tips for getting the best results when 3D printing molds on filament-based printers.

A mold is put into direct, prolonged contact with a hot sheet of semi-molten plastic. If one needs a mold to work more than once, there are a few considerations to take into account. The good news is that a few simple guidelines will help get excellent results. Here are the biggest ones:

  1. The smoother the vertical surfaces, the better. Since thermoforming sucks (or pushes) plastic onto and into a mold like a second skin, keeping layer heights between 0.1 mm and 0.2 mm will make de-molding considerably easier.
  2. Generous draft angles. Aim for a 5 degree draft angle. Draft angles of 1-2 degrees are common in injection molding, but a more aggressive one is appropriate due to layer lines giving FDM prints an inherently non-smooth surface.
  3. Thick perimeters and top layers for added strength. The outside of a mold is in contact with the most heat for the longest time. Mayku suggests walls and top layer between 3 mm to 5 mm thick. Don’t forget vent holes!
  4. Use a high infill to better resist stress. Molds need to stand up to mechanical stress as well as heat. Aim for a 50% or higher infill to make a robust part that helps resist deformation.
  5. Ensure your printer can do the job. 3D printing big pieces with high infill can sometimes lift or warp during printing. Use enclosures or draft shields as needed, depending on your printer and material.
  6. Make the mold out of the right material. Mayku recommends that production molds be printed in nylon, which stands up best to the heat and stress a thermoforming mold will be put under. That being said, other materials will work for prototyping. In my experience, even a PLA mold (which deforms readily under thermoforming heat) is good for at least one molding.

Thermoforming open doors for an enterprising hacker, and 3D printing molds is a great complement. If you’re happy being limited to small parts, small “dental” formers like the one pictured here are available from every discount overseas retailer.  And of course, thermoforming is great for costumes and props. If you want to get more unusual with your application, how about forming your very own custom-shaped mirrors by thermoforming laminated polystyrene?

Hefty 3D Printed Quadcopter Meets Nasty End

You can readily buy all kinds of quadcopters off the shelf these days, but sometimes it’s more fun to build your own. [Michael Rechtin] did just that, with a hefty design of his own creation.

The build is an exploration of all kinds of interesting techniques. The frame itself uses generative design techniques to reduce weight while maintaining strength, while the motors themselves make heavy use of 3D-printed components. The design is modular and much of it slots together, too, and it uses a homebrewed flight controller running dRehmflight. It draws 2.5 kW from its lithium polymer batteries and weighs over 5 kg.

The DIY ethos led to some hurdles, but taught [Michael] plenty along the way. Tuning the PID control loop posed some challenges, as did one of the hand-wound motors being 5% down on thrust.  Eventually, though, the quad flew well enough to crash into a rectangular gate, before hitting the ground. Any quad pilot will tell you that these things happen. Drilling into the quad with a battery still inside then led to a fire, which did plenty of further damage.

[Michael’s] quad doesn’t appear to be specifically optimized to any one task, and it’s easy to see many ways in which it could be lightened or otherwise upgraded. However, as a freeform engineering thinking exercise, it’s interesting to watch as he tackles various problems and iteratively improves the design. Video after the break.

Continue reading “Hefty 3D Printed Quadcopter Meets Nasty End”

IKEA’s Billy Bookshelf Is A Useful 3D Printing Enclosure

The results from your 3D printer may be improved if you use a dedicated enclosure for the job. This is particularly helpful for printing certain materials which are more sensitive to cold drafts or other thermal disruptions to the working area.  If you want an elegant solution to the problem, consider getting yourself an IKEA Billy bookshelf, says [wavlew].

The Billy makes a remarkably elegant 3D printing workstation, overall. It’s got a nifty slide-out drawer that makes a perfect mounting point for a 3D printer. It lets you slide out the printer for maintenance, using the controls, or extracting finished prints. It also naturally features plenty of storage for your filament, tools, and other accoutrements. When it comes to the business of actually printing though, you just slide the printer inside and shut the door. Its thermal and noise isolating performance can also be further improved by adding a silicone door seal.

We love this idea. Too often, 3D printers are left chugging away on messy desks, where they’re subject to blasts from AC vents and other disruptions. Having everything tidily tucked away in a cupboard neatens things significantly, and could also prove helpful if you pursue fume extraction, too.

If you’ve identified any other nifty maker applications for IKEA furniture, be sure to let us know!