Think laying down molten plastic on a 3D printer is as easy as squeezing plastic filament out of a hot tube? It’s not, and anyone who had a 3D printer in 2009 would tell you as such. There were hobbed bolts that stripped the plastic into a gooey paste, extremely large x carriages that made everything wobbly, and nothing worked as well as it does today.
Technology marches on, and this year’s Midwest RepRap Festival had people showing off the latest advances in pushing plastic, and something that hasn’t seen much use yet – dissolvable filament.
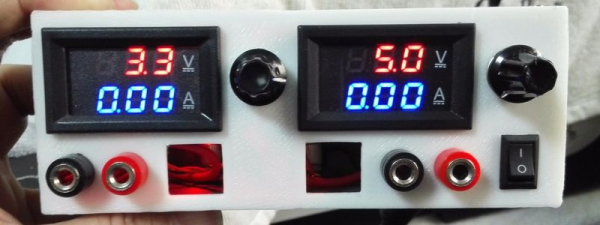
You can never have too many power supplies around your workbench. It is easy to buy them or cobble something together for most purposes. But once in a while you see one that is simple and also looks good, like this one from [RegisHsu].
The project is simple since it uses off-the-shelf DC-to-DC converter modules, and good-looking LED meters to measure voltage and current. The dual supply can accept 5 to 16 V in (presumably from a wall transformer) and deliver 1.3 V to 15.5 V out at 2 amps. [RegisHsu] removed an adjustment pot from the converter board and replaced it with a 10-turn pot to allow voltage adjustment.
Given the parts, you probably don’t even need a wiring diagram. However, the part that brings it together is the 3D-printed case, which [RegisHsu] has on Thingiverse. We’ve looked at muti-turn pot replacements before, and this is hardly the first power supply project we’ve posted.
[Bunnie Huang] recently had the opportunity to do a thorough teardown of the new Formlabs Form 2 printer. It’s a long read, so just head over there and immerse yourself in every detail. If you want the cliff notes, though, read this but still go look at all the pretty pictures.
First, it’s a major upgrade with pretty much every component. The CPU is a huge step up, the interface went from monochrome to full color touch screen, the connectivity has been upgraded with WiFi and Ethernet, the optics are much better and safer, the power supply is integrated, there are lots of little improvements that handle things like bed leveling, calibration, resin stirring, pausing jobs, and resin refilling during a print. Bunnie practically gushes at all the features and impressive engineering that went into the Form 2.
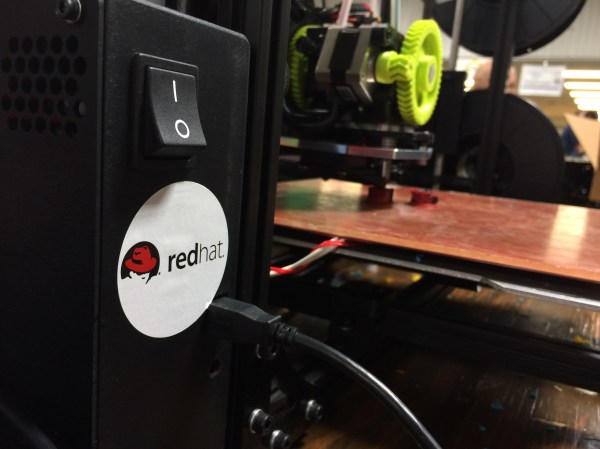
Red Hat is the world’s largest open source company. Run as a for profit company, it manages to give every line of code away and still rake in a cozy 1.5 to 2 billion US dollars a year. So, quite provably, Red Hat knows how to run an open source business. Despite being a software company, as a corporation, Red Hat has hopes for the future of open hardware, and they put their money where their ethos is.
[Tom Callaway] is Red Hat’s full time 3d Printer guy. He works at Red Hat headquarters in Raleigh, North Carolina. We had a chance to talk to him at MRRF and figure out what it is that Red Hat does for 3D printing anyway.
Red Hat’s first interest is that anyone who uses their software to run a 3D printer or interacts with the files involved has an easy time of it in Linux. To that end Tom regularly tests the latest versions of the software we regularly use. He makes sure that the software is nicely packaged for Red Hat. On top of that he also contributes to the projects themselves. He has submitted patches for Cura and Slic3r to name a few.
To run the software through its paces, and as a nice perk for Red Hat employees, [Tom] runs Red Hat’s 3D printing lab. Employees can print anything they like in it, but it also gives Red Hat an opportunity to test the software for failure points. If you are a 3D printer manufacturer (open or closed) you can send them a printer and they’ll make sure it has a profile and runs faultlessly with each version update, not bad!
The face of 3D printing at Red Hat.
[Tom] also participates in the Red Hat Fedora 3D printing special interest group. This lets Red Hat Fedora users come together and work out problems they find in the wild. It’s also one of the best ways for him to stay ahead of the new software packages that come out as 3d printing develops.
The coolest thing about all this, is Red Hat’s support for manufacturers. Red Hat will make sure any software that supports a printer will run, for free. So if you’ve written a custom driver for your printer that only runs on windows. As long as you give Red Hat access to the source code, they’ll make sure it can run on Linux as well. Though, apparently none of the closed source printer manufacturers have taken them up on the offer. Red Hat does have a partnership with open manufacturers such as Lulz Bot.
Being primarily a software company, Red Hat has no personal interest in entering the open hardware market at this time. They do want to see it succeed, and to that end, their last and most interesting service is their willingness to talk about what has and hasn’t worked in running an open source business. People in the open hardware business can reach out to people like [Tom] and ask for advice on the every day aspects of the open source business. Red Hat has undoubtedly learned many lessons over the years, and like their software, they’re willing to share every line.
Edit: Lastly, thanks to [Miro] in the comments, who also works for Red Hat and contributes to 3d Printing. Cool! I just wanted to be clear that most of these things translate into the Fedora Project, which oversees Fedora Linux, a very popular distro (Apparently Linus Torvald’s preferred.) If you’d like to participate in any of this the Fedora Linux 3d Printer SIG (I mistakenly called it Red Hat SIG, which implies that it is only for paying customers of Red Hat Enterprise Linux, which is not true) is the place to go. It makes Fedora better and helps the 3d printing community as a whole:)
3D printing is obviously best used in printing three-dimensional objects. Laser cutters, jig saws, and CNC routers are obviously well-equipped to machine flat panels with intricate shapes out of plastic sheets, plywood, or metal, but these devices have one drawback: they’re subtractive manufacturing, and 3D printers add material. What good is this? [Jason Preuss] demonstrated a very interesting 3D printing technique at this year’s Midwest RepRap Festival. He’s producing 2D paintings with a 3D printer, with results that look like something between very intricate inlay work and a paint by numbers kit.
[Jason Preuss]’ multicolor 2D print. Notice the toolpaths in the reflection of the upper left hand corner. Click to embiggen.[Jason] is using a 3D printer, a series of very specialized techniques, and a software stack that includes a half-dozen programs to print multicolor 2D scenes. This isn’t pigment, paint, dye, or ink; the artwork becomes a single piece of plastic with individual colors laid down one at a time.
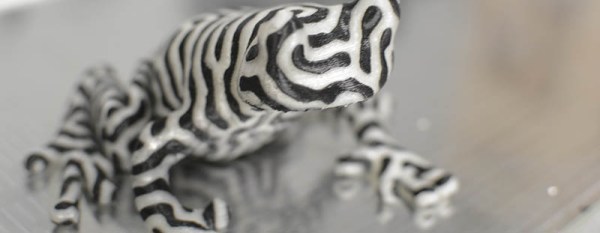
The best example of [Jason]’s work is a copy of a paint by numbers scene. Here, [Jason] makes an outline of all the shapes, separates onto different layers by color, and prints each color, one layer at a time. It’s an incredibly labor-intensive process to even get models into a slicer. Actually printing the model is even more difficult. [Jason]’s paint by numbers scene uses about twelve different colors.
[Jason]’s 3D printed paint by numbers scene. About a dozen different colors were used for this print.We’ve seen [Jason]’s work at MRRF before, including last year’s exhibition of a fantastic chocolate clock that was a 3D printed version of an old scroll saw pattern. Taking what is normally a 2D design and translating that into something that can be built with a 3D printer seems to be [Jason]’s forte, and the results are remarkable. If you don’t know what you were looking at, you would just think these art pieces are a strange industrial fabrication process. Once you look closer, you have an immediate respect for the artistry and craftsmanship that went into a sheet of plastic only a few millimeters thick and no bigger than a piece of paper.
[Jason] hasn’t documented his build process for these 2D pictures on a 3D printer quite yet. There’s a reason for that: it’s supposedly very complicated, and it’s going to take a while to get all the documentation together. Eventually, the process will be documented and a tutorial will pop up on [Jason]’s website. He’s also on Thingiverse, with a few semi-related designs available for download.
From what we’ve seen at MRRF, in the next few years, a dual extrusion printer will be a necessity. While dual extrusion won’t be able to recreate such colorful pictures, it will make the creation of these 2D plastic panels much easier, and they will surely be popular. We can’t wait to see what [Jason] comes up with next.
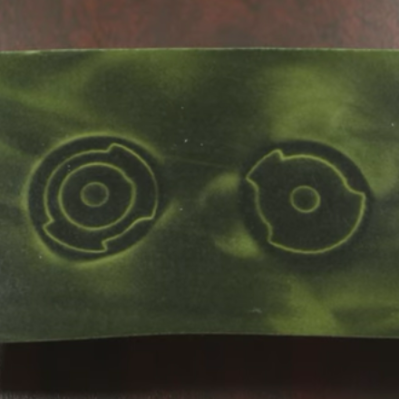
This is magic, big news, both, or neither. It’s so exciting to see magnets behave in this bizarre and wonderful way that we think it’s hard to forecast where this will go. Shown above is a pair of magnets that have several modes of operation. They attract each other, but repel when less than a centimeter apart. However, give one a twist and the two will strongly attract.
The behavior is thanks to a new process of 3D printing magnets to manipulate where the fields occur. With the behavior just described, they would function well as a cabinet latch which has soft close and positive lock, all built into two magnets.
This comes from one of our favorite YouTube channels, [SmarterEveryDay], who just toured Polymagnet — a company that has figured out how to actually print magnetic fields.
So how the heck does it work? Well, your standard magnet has a north face on one side, and a south face on the other — creating a magnetic loop between the two. But what if you could put north and south on the same side of the magnet, and vary their position and size? It means you can control the magnetic field down to the magnetic pixel, or as Polymagnet calls them — a Maxel.
Here you can see some magnetic film (which reacts visually to magnetic fields) put on top of the two parts of the demo magnet. The printed design is very similar to a mechanical mechanism. We’d explain more, but [Destin] does a great job teaching about the tech in the video found below.
Is this the dawn of magnetic mechanisms? We certainly have never seen anything like it.
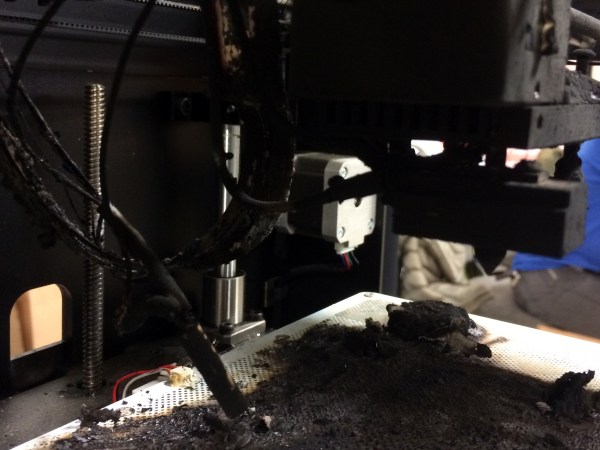
[Jay] out of the River City Labs Hackerspace in Peoria, IL cleared out a jam in his printer. It’s an operation most of us who own a 3D printer have performed. He reassembled the nozzle, and in a moment forgot to tighten down the grub nut that holds the heater cartridge in place. He started a print, saw the first layer go down right, and left the house at 8:30 for work. When he came back from work at 10:30 he didn’t see the print he expected, but was instead greeted by acrid smoke and a burnt out printer.
The approximate start time of the fire can be guessed by the height of the print before failure.
As far as he can figure, some time at around the thirty minute mark the heater cartridge vibrated out of the block. The printer saw a drop in temperature and increased the power to the cartridge. Since the cartridge was now hanging in air and the thermistor that reads the temperature was still attached to the block, the printer kept sending power. Eventually the cartridge, without a place to dump the energy being fed to it, burst into flame. This resulted in the carnage pictured. Luckily the Zortrax is a solidly built full metal printer, so there wasn’t much fuel for the fire, but the damage is total and the fire could easily have spread.
Which brings us to the topics of discussion.
How much can we trust our own work? We all have our home-builds and once you’ve put a lot of work into a printer you want to see it print a lot of things. I regularly leave the house with a print running and have a few other home projects going 24/7. Am I being arrogant? Should I treat my home work with a lesser degree of trust than something built by a larger organization? Or is the chance about the same? Continue reading “Ask Hackaday MRRF Edition: 3D Printers Can Catch Fire”→

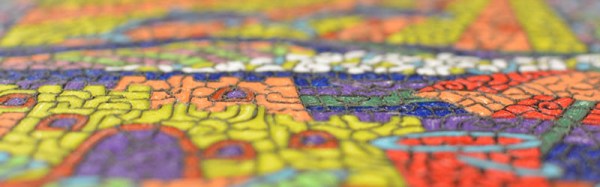
![[Jason Preuss]' multicolor 2D print. Notice the toolpaths in the reflection. Click to embiggen.](https://hackaday.com/wp-content/uploads/2016/03/p2pchristmastree.jpg)
![[Jason]'s 3D printed paint by numbers scene. About a dozen different colors were used for this print.](https://hackaday.com/wp-content/uploads/2016/03/pppaintbynumber.jpg)
 So how the heck does it work? Well, your standard magnet has a north face on one side, and a south face on the other — creating a magnetic loop between the two. But what if you could put north and south on the same side of the magnet, and vary their position and size? It means you can control the magnetic field down to the magnetic pixel, or as Polymagnet calls them — a Maxel.