New Part Day: SPI RAM And A Video Controller

Generating video signals with a microcontroller or old CPU is hard if you haven’t noticed. If you’re driving even a simple NTSC or PAL display at one bit per pixel, you’re looking at a minimum of around 64kB of RAM being used as a frame buffer. Most microcontrollers don’t have this much RAM on the chip, and the AVR video builds we’ve seen either have terrible color or relatively low resolution.

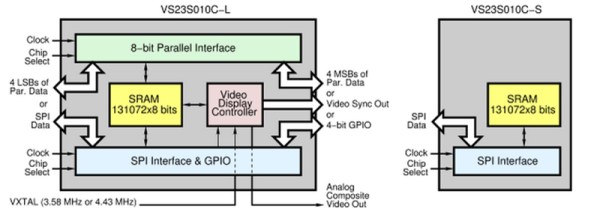
Here’s something interesting that solves the memory problem and also generates analog video signals. Yes, such a chip exists, and apparently this has been in the works for a very long time. It’s the VLSI VS23s010C-L, and it has 131,072 bytes of SRAM and a video display controller that supports NTSC and PAL output.

There are two chips in the family, one being an LQFP48 package, the other a tiny SMD 8-pin package. From what I can tell from the datasheets, the 8-pin version is only an SPI-based SRAM chip. The larger LQFP package is where the action is, with parallel and SPI interfaces to the memory, an input for the colorburst crystal, and composite video and sync out.

After looking at the datasheet (PDF), it looks like generating video with this chip is simply a matter of connecting an RCA jack, throwing a few commands to the chip over SPI, and pushing bits into the SRAM. That’s it. You’re not getting hardware acceleration, you’re going to have to draw everything pixel by pixel, but this looks like the easiest way to generate relatively high-resolution video with a single part.

Thanks [antibyte] for the tip on this one.

Bread slicer turned tool sharpener

Sharpening Knives Using A Bread Slicer?

[Joekutz] wrote in to tell us about his very interesting creation — a knife whetting machine, built from an automated bread slicer. Confused? So were we when we read the subject line!

Tired of sharpening knives by hand, [Joe] wanted to speed up the process. He recently saw our post on making a tool sharpening turntable out of a bread maker and figured, why not make one out of a bread slicer? We have no idea how you guys came up with these — finally some real hacks!

First he took apart the bread slicer and salvaged the motor, gears, and some of the electronics. He created an enclosure for it out of some laminate wood he had laying about and created a bearing axle for the disc from an old VCR. To control the speed he’s using a plain old light switch dimmer; not the most efficient but does the trick!

It uses sanding discs you can buy from any hardware store, and as you can see in the following video — it works pretty good according to the paper cutting test!

Continue reading “Sharpening Knives Using A Bread Slicer?”

We Have A Problem: Shower Feedback Loop

Hackaday, we have a problem. Clean water is precious and we want to come up with some ideas to help conserve it. Today’s topic is water wasted while showering. Let’s kick around some ideas and prompt some new builds for The Hackaday Prize.

We’ve all done it; your mind wanders and before you know it you’ve been standing in the shower for far too long. How much water have you wasted? Who know’s, there’s no feedback loop in the shower. But we think adding a little bit of feedback is a fantastic avenue to help combat wasteful habits.

Color Changing Showerheads

shower-feedback-color-idea

What if the showerhead changed colors based on how much water had flowed through it? We’ve already seen consumer showerheads that have the LEDs inside of them, and flow meters are readily available. Start your shower off in the green, as you lather up the suds it moves through blue, purple, orange, red, and finally to flashing red. It doesn’t have to be annoying, but just enough to help quantify how much is pouring down the drain.

Shower Beats

We were big fans of the game SSX Tricky back in the day. The better you were at tricks, the better the music was. If you crashed hard, you’d be listening to nothing more than hi-hat and subdued bass. Apply this to shower time. What if that flow meter you installed on your shower head was connected to a shower radio? Start it off with the best music in the world and progress to the lamest as you run the reservoir dry (ymmv on these selections of course).

Now You Try

If you shave off 5 seconds from your shower it will have a tiny impact in your household. But imagine the aggregate of every household in the world doing so.

This is part of what the 2015 Hackaday Prize is all about. Get the idea machine rolling. Tell us your riff on the shower feedback loop in the comments below. Put up a new project on Hackaday.io, write down an idea, and tag it “2015HackadayPrize”. We’re on the lookout for the best seed ideas and will be giving away shirts and stickers to the ones that show real promise. We’ll be featuring some of these in future installments of “Hackaday, We Have Problem” and if we choose yours it’ll land you with some swag of your own.


The 2015 Hackaday Prize is sponsored by:

Adding Recycling Codes To 3D Prints

Every little plastic bauble you interact with has some sort of recycling code on it somewhere. Now that we’re producing plastic 3D printed parts at home, it would be a good idea to agree on how to recycle all those parts, and [Joshua Pearce]’s lab at Michigan Tech has the answer; since we’re printing these objects, we can just print the recycling code right in the object.

The US system of plastic recycling codes is particularly ill-suited for identifying what kind of plastic the object in question is made of; there are only seven codes, while China’s system of plastic identification uses 140 identification codes. This system for labeling 3D printed parts borrows heavily from the Chinese system, assigning ABS as ‘9’, PLA as ’92’, and HIPS as ‘108’.

With agreed upon recycling codes, the only thing left to do is to label every print with the correct recycling code. That’s an easy task with a few OpenSCAD scripts – the paper shows off a wrench made out of HIPS labeled with the correct code, and an ABS drill bit handle sporting a number nine. 3D printing opens up a few interesting manufacturing techniques, and the research team shows this off with a PLA vase with a recycle code lithophane embedded in the first few layers.

Crazy Whirlwind Pre-Hackaday Prize Launch Tour

The Hackaday Prize was about to launch but the date wasn’t public yet. I decided to do a pre-launch tour to visit a few places and to drop in on some of the Hackaday Prize Judges. It started in Chicagoland, looped through San Francisco for a hardware meetup and Hardware Con, then finished with visits to [Ben Krasnow’s] workshop, [Elecia White’s] studio, and the Evil Mad Scientist Laboratories.

The Prize is now running and it’s time for you to enter. Look at some of the awesome hacking going on at the places I visited and then submit your own idea to get your entry started. Join me after the break for all the details of the adventure.

Continue reading “Crazy Whirlwind Pre-Hackaday Prize Launch Tour”

How To Directly Program An Inexpensive ESP8266 WiFi Module

The ESP8266 is the answer to “I want something with Wifi.” Surprisingly, there are a number of engineers and hobbyists who have not heard of this chip or have heard of it but don’t really understand what it is. It’s basically the answer to everything IoT to so many engineering problems that have plagued the hobbyist and commercial world alike.

The chip is a processor with integrated RAM, some ROM, and a WiFi radio, and the only external components you will need are 4 capacitors, a crystal and an external flash! It’s CHEAP, like $4/ea cheap! Or $5 if you want it on a nice, convenient carrier board that includes all these components. The power consumption is reasonable (~200mA)1, the range is insane ~300m2 without directional equipment, and a PCB trace antenna and ~4km if you want to be ridiculous.

One place thing that more people need to know about is how to program directly for this chip. Too many times projects use it as a crutch via the AT commands. Read on and find out how to hello world with just this chip.

Continue reading “How To Directly Program An Inexpensive ESP8266 WiFi Module”

An Experiment In Shift Registers And Multiplexed LEDs

[Kratz] is working on a WiFi controlled scoreboard, but before building the full-scale version, he thought it would be wise to test out the multiplexing technique for the display. The experiment worked, but unless this scoreboard is for a foosball table, he still has a lot of work ahead of him.

The design of this prototype display is pretty simple, with just two ‘595 shift registers feeding bits to the display. Sixteen NPN transistors are being used to sink and source current to the display. It’s a relatively simple circuit, allowing [Kratz] to fit nine seven-segment displays on a small board with only six wires – ground, two V+ for the logic and LEDs, clock, data, and latch – going to the microcontroller.

There were a few snags in the design; the data is clocked in on a rising edge, but an extra falling edge was required before latching. [Kratz] can’t figure out the reason for this, and it might just be a timing issue.