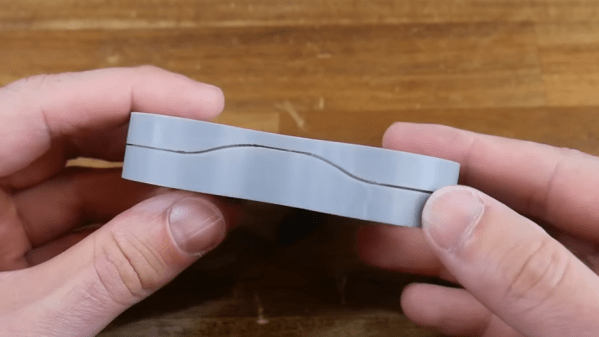
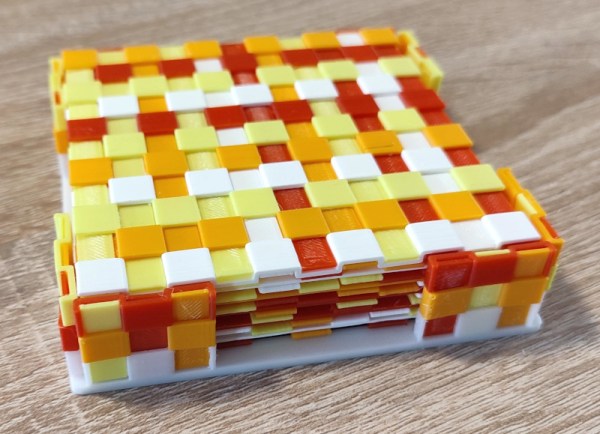
Advanced 3D Printing Tips

One of the best things about hanging around with other hackers is you hear about the little tricks they use for things like 3D printing. But with the Internet, you can overhear tips from people you’ll probably never meet, like [3D Printer Academy]. His recent video has a little bit of a click-bait title (“10 Secret 3D Printing Tricks…“) but when we watched it, we did see several cool ideas. Of course, you probably know at least some of the ten tips, but it is still interesting to see what he’s been up to, which you can do in the video below.

At one point he mentions 11 tips, but the title has 10 and we had to stretch to get to that number since some of them have some overlap. For example, several involve making printed threads. However, he also shows some C-clips, a trick to add walls for strength, and printing spur gears. Of course, some of these, like the gears, require specific tools, but many of them are agnostic.

Some of the tips are about selecting a particular infill pattern, which you’d think would be pretty obvious, but then again, your idea of what’s novel and what’s old hat might be different than ours. The explanation of how a print-in-place hinge works is pretty clear (even if it isn’t really a live hinge) and also applies to making chains to transfer power. We also thought the threaded containers were clever.

So if you can overlook the title and you don’t mind seeing a few tips you probably already know, you can probably take something away from the video. What’s your favorite “expert” trick? Let us know in the comments.

A lot of what we print tends to be enclosures and there are some good tips for those floating around. Of course, the value of tips vary based on your experience level. But if you are just starting out, you should check out [Bald Engineer]’s video of things he wished someone had told him when he started 3D printing.

Continue reading “Advanced 3D Printing Tips”

Power Tool Battery Fume Extractor

A solder fume extractor is something we could probably all use. While there isn’t much to them, [Steven Bennett] put a lot of thought into making one that was better for him, and we admired his design process, as well as the extractor fan itself. You can see the finished result in the video below.

The electrical design, of course, is trivial. A computer fan, a switch, and a battery — in this case, a Makita power tool battery. But the Fusion 360 design for the 3D printed parts got a lot of thought to make this one of the best fume extractor fans we’ve seen.

Continue reading “Power Tool Battery Fume Extractor”

Assessing The Micromirror Device From A DLP Printer For Maskless Lithography Duty

Inspired by the idea of creating a maskless lithography system using a digital micromirror device (DMD), [Nemo Andrea] tore into an Anycubic Photon Ultra, DLP & resin-based 3D printer to take a look at its projector system. Here Anycubic isn’t the maker of what is called the ‘optical engine’, which would be eViewTek’s D2 projector and its siblings. This projector assembly itself is based around the Ti DLP300s, which we covered a while back when it was brand new. Since that time Anycubic has released the Photon Ultra and Photon D2 3D printers based around these optical engines.

Using DMD for lithography isn’t a new thing, as [Nemo] points out, referencing the μMLA system by Heidelberg Systems. What would be new is using a freely available and rather affordable DMD (even if it requires sacrificing a 3D printer) to obtain its optical engine in order to create an open and more affordable lithography platform than commercial ‘contact us for a quote’ option.

No doubt it’s a challenging project, but perhaps the nice side effect of having affordable DLP 3D printers out and about is that their DMDs are now also significantly more accessible than they were previously.  We wish [Nemo] all the best in this endeavor, as a maskless lithography machine would be just that addition to any hobbyist’s toolset that we are no doubt waiting for.

(Thanks to Jerry for the tip)

FDM Printing With Resin Update

[Proper Printing] is at it again. He’s trying to perfect his hybrid printer that works like an FDM printer but uses UV-curable resin gel instead of filament. You can see the latest update video below. If you missed our take on his early attempts, you might want to catch up with those earlier videos first.

The latest update brings a new nozzle, an improved light source, and changes to the formula of the resin. The nozzle and light source improvements hinge on conical lenses that convert the laser beams from a spot to a ring. The initial nozzles looked like the business end of a syringe, but this wasn’t very stable. The new video shows a conventional nozzle which also had some issues. This resulted in a custom-made nozzle that solved all the issues with the conventional nozzle and the syringe tips.

The resin formula is particularly crucial. The second attempt used resin with glass beads to give thickness. That wasn’t without problems, though, so it was switched this time with fused silica, as suggested by some comments on a previous video. They also used aggressive mixing and air removal. The consistency of the previous resins was that of a paste, but according to the video, the new mixture is more like a gel.

At some point, things started going badly. There were several equipment failures. Exasperated, he was ready to give up and was editing the video when he had an epiphany. We’re glad he didn’t give up because the new results are pretty impressive.

These printers remind us of some strange laser CNC. It also reminds us a little of people curing resin outside of the normal print process.

Continue reading “FDM Printing With Resin Update”

Will Carmakers Switch Clay For Computers?

The 3D printing revolution has transformed a lot of industries, but according to [Insider Business] the car industry still uses clay modeling to make life-sized replicas of new cars. The video below shows a fascinating glimpse of the process of taking foam and clay and making it look like a real car. Unlike the old days, they do use a milling machine to do some rough work on the model, but there’s still a surprising amount of manual work involved. Some of the older film clips in the video show how hard it was to do before the CNC machines.

The cost of these models isn’t cheap. They claim that some of the models have cost $650,000 to create. We assume most of that is in salaries. Some models take four years to complete and a ton of clay.

Continue reading “Will Carmakers Switch Clay For Computers?”

Arc Overhangs In PrusaSlicer Are A Simple Script Away

Interested in the new hotness of printing previously-impossible overhangs? You can now integrate Arc Overhangs into PrusaSlicer and give it a shot for yourself. Arc overhangs is a method of laying filament into a pattern of blossoming concentric rings instead of stringing filament bridges over empty space (or over supports).

These arcs are remarkably stable, and result in the ability to print overhangs that need to be seen to be believed. We covered this clever technique in the past and there are now two ways for the curious hacker to try it out with a minimum of hassle: either run the Python script on a G-code file via the command line, or integrate the functionality into PrusaSlicer directly by adding it as an automatic post-processing script. The project’s GitHub repository has directions for both methods.

Here’s how it works: the script looks for layers with a “bridge infill” tag (which PrusaSlicer helpfully creates) and replaces that G-code with that for arc overhangs. It is still a work in progress, so keep a few things in mind for best results. Arc overhangs generally work best when the extruded plastic cools as fast as possible. So it is recommended to extrude at the lowest reliable temperature, slowly, and with maximum cooling. It’s not fast, but it’s said to be faster than wrestling with supports and their removal.

A few things could use improvement. Currently the biggest issue is warping of the arc overhangs when new layers get printed on top of them. Do you have a solution or suggestion? Don’t keep it to yourself; discuss in the comments, or consider getting involved in the project.

Compact Ultrasonic Holographs For Single Step Assembly Of Matter In 3D

Creating three-dimensional shapes from basic elements or even cells is an important research topic, with potentially many applications in the fields of medicine and general research. Although physical molds and scaffolding can be used, the use of ultrasonic holographs is in many ways preferable. Using ultrasonic sound waves into a liquid from two or more transducers shaped to interact in a predetermined manner, any particulates suspended in this liquid will be pushed into and remain in a specific location. Recent research by [Kai Melde] and colleagues has produced some fascinating results here, achieving recognizable 3D shapes in a liquid medium.

These are some of the most concrete results produced, following years of research. What distinguishes ultrasonic holography from light-based xolography is that the latter uses photon interference between two light sources in order to rapidly 3D print an object within the print medium, whereas ultrasonic holography acts more as a ultrasonic pressure-based mold. Here xolography is also more limited in its applications, whereas ultrasonic holography can be used with for example biological tissue engineering, due to the gentle pressure exerted on the suspended matter.

For ongoing medical research such as the growing of organs (e.g. for transplantation purposes), scaffolding is required, which could be assembled using such a technique, as well as the manipulation and assembly of biological tissues directly.