Circuit-less PCB Featured As Faceplate For A Digital Clock

If there’s no circuitry on a printed circuit board, does it cease being a “PCB” and perhaps instead become just a “PB”?

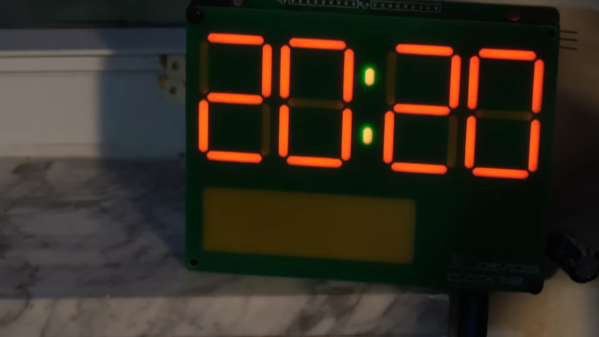
Call them what you will, the fact that PCBs have become so cheap and easy to design and fabricate lends them to more creative uses than just acting as the wiring for a project. In this case, [Jeremy Cook] put one to work as the faceplate for his “742 Clock,” a name that plays on the fact that his seven-segment display is 42 mm tall, plus it’s “24/7” backward.

In addition to the actual circuit board that holds the Wemos ESP32 module and the LEDs, a circuit-less board was designed with gaps in the solder mask to act as light pipes. Sandwiched between the boards is a 3D printed mask, to control the light and direct it only through the light pipes. [Jeremy] went through a couple of iterations of diffuser and mask designs, finally coming up with a combination that works well and looks good. He mentions a possible redesign of the faceplate board to include a copper backplane for better opacity, which we think is a good idea. We’d also like to see how different substrates work; would boards of different thickness or using FR-4 with different glass transition temperatures work better? Check out the video below and see what you think.

We’re seeing more and more PCBs turn up as structural elements, from enclosures to control panels and even tools, and we approve of this trend. But what we really approve of is what [Jeremy] did here by making this clock just a dumb display that gets network time over NTP. Would that all three digital clocks in our kitchen did the same thing — maybe then they wouldn’t each be an infuriating minute out of sync with the others.

Continue reading “Circuit-less PCB Featured As Faceplate For A Digital Clock”

An EMMC Gives Up Its Secrets

An increasing phenomenon over the years since mobile phones morphed from simply telephones into general purpose pocket computers has been that of the dead device taking with it some treasured digital resource. In most cases this means the device has died, but doesn’t necessarily mean that that the data has completely gone. Inside the device will be an eMMC flash chip, and if that can be read then the data is safe. This applies to some single board computers too, and thus [Jeffmakes]’ adventures in recovering an eMMC from a dead Raspberry Pi CM4 are particularly interesting.

The whole thing relies on the eMMC presenting the same interface as an SD card, so while it comes in a multi-pin BGA package it can be addressed with surprisingly few wires. Using the PCB from another dead CM4 he traced the relevant connections from eMMC to SoC pads, and was thus able with some very fine soldering to construct an interface for an SD card reader. The disk could then be imaged in its entirety.

This work will be of huge use to experimenters who’ve fried their Compute Modules, but of course the information it contains will also be of use to retrieve those photos from the phone that fell in the bath. It’s not the first time we’ve taken a look at someone’s efforts in this area.

Art of 3D printer in the middle of printing a Hackaday Jolly Wrencher logo

PrusaSlicer Now Imports STEP Files, Here’s Why That’s A Big Deal

PrusaSlicer has a new feature: the ability to import a CAD model for 3D printing. Starting in version 2.5.0-beta1, PrusaSlicer can import STEP format 3D models. An imported STEP file is converted to a triangle mesh on import (making it much like a typical .stl or .3mf file) which means that slicing all happens as one would normally expect. This is pretty exciting news, because one is not normally able to drop a CAD format 3D model directly into a slicer. With this change, one can now drag .stp or .step files directly into PrusaSlicer for printing.

First, a brief recap. In the world of 3D models there are two basic kinds: meshes and CAD models. The two work very differently, especially when it comes to editing. 3D printing has a long history of using .stl files (which are meshes) but making engineering-type changes to such files is difficult. Altering the size of a thread or changing mounting holes in a CAD model is easy. On an STL, it is not. This leads to awkward workarounds when engineering-type changes are needed on STLs. STEP, on the other hand, is a format widely supported by CAD programs, and can now be understood by PrusaSlicer directly. Continue reading “PrusaSlicer Now Imports STEP Files, Here’s Why That’s A Big Deal”

RollBack Breaks Into Your Car

Rolling codes change the signal sent by car keyfobs unpredictably on every use, rendering them safe from replay attacks, and we can all sleep well at night. A research team lead by [Levente Csikor] gave a presentation at Black Hat where they disclose that the situation is not pretty at all (PDF).

You might know [Samy Kamkar]’s RollJam attack, which basically consists of jamming the transmission between fob and car while the owner walks away, fooling the owner into clicking again, and then using one of the two rolling codes to lock up the car, keeping the other in your back pocket to steal it once they’re getting coffee. This is like that, but much, much worse. Continue reading “RollBack Breaks Into Your Car”

Chips Remembered: The Scenix/Ubicom/Parallax SX

If you are a bibliophile, going to a used bookstore is a distinctly pleasant experience. Sure, you might discover an old book that you want to read. But at least some of the endorphin rush comes from seeing old friends. Not humans, but books you read years or even decades ago. Most often, you don’t buy the book — you probably have one stashed in a box somewhere. But it is a happy feeling to see an old friend and maybe thumb through it reading a passage or two among shelves of musty books. I wish we had something like that for chips. Outside of a few notable exceptions, chips tend to have a short life span of popularity and then give way to other chips. This is especially true of CPUs. One that I especially miss is the Scenix/Ubicom/Parallax SX chip.

I had a bookstore-like experience with this processor the other day. I produced a few products based around these chips and I have a small stash of them left. I jealously guard the hardware needed to program them “just in case.” Well, naturally, someone needed a few for some reason so I had to dig it all up. Knowing these might be some of the last of the unprogrammed SX chips in the world made me a little nostalgic.

The Story

In the late 1990s, a company called Scenix started producing a microcontroller called the SX in a few footprint sizes. So the SX18 was, for example, an 18-pin part. By 1999, they were already in full swing with the SX18 and SX28 and they introduced the SX52.

Of course, a lot of companies produced microcontrollers. The Scenix offering was a bit special. In those days, the Microchip PIC was the king of the hill. The PIC is an odd beast that evolved from a very limited controller made to be small and inexpensive. Notably, while it could support relatively high clock frequencies — 20 MHz was common — each normal instruction took 4 clock cycles. So when your crystal said 20 MHz, you were running instructions at 5 MHz.

Continue reading “Chips Remembered: The Scenix/Ubicom/Parallax SX”

We’re Hiring: Come Join Us!

You wake up in the morning, and check Hackaday over breakfast. Then it’s off to work or school, where you’ve already had to explain the Jolly Wrencher to your shoulder-surfing colleagues. And then to a hackspace or back to your home lab, stopping by the skull-and-cross-wrenches while commuting, naturally. You don’t bleed red, but rather #F3BF10. It’s time we talked.

The Hackaday writing crew goes to great lengths to cover all that is interesting to engineers and enthusiasts. We find ourselves stretched a bit thin and it’s time to ask for help. Want to lend a hand while making some extra dough to plow back into your projects? We’re looking for contributors to write a few articles per week and keep the Hackaday flame burning.

Contributors are hired as private contractors and paid for each article. You should have the technical expertise to understand the projects you write about, and a passion for the wide range of topics we feature. You’ll have access to the Hackaday Tips Line, and we count on your judgement to help us find the juicy nuggets that you’d want to share with your hacker friends.

If you’re interested, please email our jobs line (jobs at hackaday dot com) and include:

  • One example article written in the voice of Hackaday. Include a banner image, at least 150 words, the link to the project, and any in-links to related and relevant Hackaday features. We need to know that you can write.
  • Details about your background (education, employment, interests) that make you a valuable addition to the team. What do you like, and what do you do?
  • Links to your blog/project posts/etc. that have been published on the Internet, if any.

What are you waiting for? Ladies and Gentlemen, start your applications!

Back To The Future Prop Can Tell When It Hits 88 MPH

Obviously, the most iconic piece of fictional hardware from the Back to the Future films is Doc Brown’s DeLorean DMC-12 time machine. But we’d have to agree with [Jason Altice] of CodeMakesItGo that the second-most memorable gadget is the modified Futaba remote control used to control the DeLorean from a distance. Now, thanks to his detailed build guide, you can build your own version of the time machine’s controller — complete with working speed readout.

Now to be clear, [Jason] isn’t claiming that his build is particularly screen accurate. It turns out that the actual transmitter used for the prop in the film, the Futaba PCM FP-T8SGA-P, has become difficult to find and expensive. But he argues that to the casual observer, most vintage Futaba transmitters are a close enough match visually. The more important part is recreating the extra gear Doc Brown bolted onto his version. Continue reading “Back To The Future Prop Can Tell When It Hits 88 MPH”