Hide Capacitive Touch Buttons In Your Next 3D Print

Capacitive touch sensors are entirely in the domain of DIY, requiring little more than a carefully-chosen conductive surface and a microcontroller. This led [John Phillips] to ask why not embed such touch buttons directly into a 3D print?
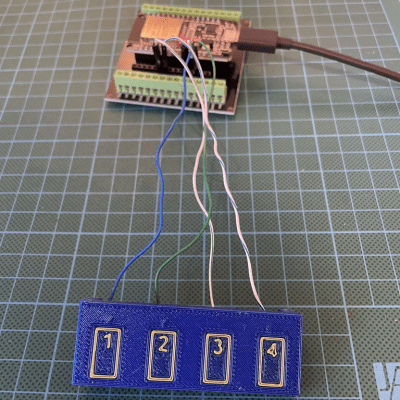
Button locations and labels can be made as part of the 3D print, which is handy.

The process is not much different from that of embedding hardware like magnets or fasteners into 3D prints: one pauses the print at convenient spot, drops in the necessary hardware, then resumes printing. It’s more or less the same for embedding a touch-sensitive button, but [John] has a few tips to make things easier.

[John] suggests using a strip of copper tape, one per touch pad, and embedding it into the print near the surface. His preference is three layers in, putting the copper tape behind 0.6 mm of plastic when using standard 0.20 mm layer heights.

Copper tape makes a good capacitive touch sensor, and the adhesive on the tape helps ensure it stays in place as the 3D printer seals it in on subsequent passes.

Copper tape is also easy to solder to, so [John] leaves a small hole over the copper — enough to stick in a wire and tack it down with the tip of a soldering iron and a blob of solder after the print is complete. It might not be ideal soldering conditions, but if things get a little melty on the back side it’s not the end of the world.

On the software side capacitive touch sensors can be as simple as using an Arduino library for the purpose but [John] rolled his own code, so give it a peek.

This reminds us a bit of another way to get a capacitive touch sensor right up against some plastic: a simple spring can do the trick.

I, 3D Printer

Like many of us, [Ben] has too many 3D printers. What do you do with the old ones? In his case, he converted it into a robotic camera rig. See the results, including footage from the robot, in the video below. In addition to taking smooth video, the robot can spin around to take photos for photogrammetry.

In fact, the whole thing started with an idea of building a photogrammetry rig. That project didn’t go as well as planned, but it did lead to this interesting project.

Continue reading “I, 3D Printer”

Should You Try Printing With Polypropylene?

Of all the plastics that surround us on the daily, the one we hear least about in the 3D printing world is probably polypropylene (PP). Given that this tough, slightly flexible thermoplastic has characteristics you might want for your prints, the question is: why? [Lost in Tech] is not answering that question in a recent video; instead he’s showing us what we’re missing out on with a review of the material.

A look at the Material Safety Data Sheet and available material has [Lost in Tech] suggesting it won’t be (much) more toxic for you than PLA, but you still wouldn’t want to huff the fumes. The biggest issue printing PP is getting it to stick — glass beds and PEI are not your friend, but polypropylene tape is easy to find and makes a fine print surface. He reviews a few other options, but it looks like plain old tape is still your best bet if you can’t get a hold of a Prusa PP bed. The other big issue is shrinkage, but that’s hardly unique to PP and can be accounted for in the model.

Just because it can be used, that doesn’t mean it should be. [Lost in Tech] does make a good case for why you might want to use PP — for one thing, it doesn’t string much, in part because it’s not hygroscopic. That makes it great for those of us in humid climes who don’t want to always faff around with dry boxes, but also wonderful for parts that will be in touch with water. Polypropylene also has great chemical resistance for even scarier chemicals than dihydrogen monoxide. The “killer app” though, at least as far as [Lost in Tech] is concerned, is to use polypropylene with compliant mechanisms: it’s incredibly resilient to bending, and doesn’t fatigue easily. You might even call it a “flexible” filament, but unlike with TPU, you get a nice hard plastic to go with that flexibility.

If you’re interested in this somewhat-forgotten filament, we featured a “getting started” guide last year. You can even make your own polypropylene filament using non-medical “COVID” masks, but do be sure to wash them first. What do you think? Is it time to give PP another chance, or has the 3D printing world moved on? Continue reading “Should You Try Printing With Polypropylene?”

MorPhlex: The TPU Filament That Goes Soft After You Print It

In FDM 3D printing cycles TPU is a bit of a special filament. Not so much because of its properties, but because it’s rather stretchy even as a filament, which makes especially printing certain hardness grades of TPU into somewhat of an nightmare. An interesting new contender here comes from a company called BIQU, who reckon that their ‘MorPhlex’ TPU solves many of those problems. Recently the [ModBot] channel on YouTube got sent a spool of the filament for testing.

The BIQU MorPhlex TPU filament being turned into squishy slippers. (Credit: ModBot, YouTube)

The ‘magic’ here is that this TPU claims to be a 90A TPU grade while on the spool, but after printing it becomes 75A, meaning a lot softer and squishier. Perhaps unsurprisingly, a big selling point on their product page is that you can print squishy shoes with it. Beyond this is claims to be compatible with ‘most FDM printers’, and the listed printing parameters are typical for TPU in terms of extruder and bed temperature.

After drying the filament as recommended for TPU in general, test prints were printed on a Bambu Lab H2D. Here BIQU recommends not using the AMS, but rather the dedicated TPU feeding channel. For the test prints some slippers were printed over the course of two days. In hindsight glue stick should have been applied to make parts removal easier.

The slippers were indeed squishy, but the real test came in the form of a Shore A hardness meter and some test cube prints. This showed an 80 – 85A for the BIQU MorPhlex test cube depending on whether to test the side or top. As the product datasheet indicates a final hardness of 75A +/- 3A, one could argue that it’s kind-of in spec, but it mostly raises questions on how parameters like temperature and extrusion speed affect the final result.

Josef Prusa Warns Open Hardware 3D Printing Is Dead

It’s hard to overstate the impact desktop 3D printing has had on the making and hacking scene. It drastically lowered the barrier for many to create their own projects, and much of the prototyping and distribution of parts and tools that we see today simply wouldn’t be possible via traditional means.

What might not be obvious to those new to the game is that much of what we take for granted today in the 3D printing world has its origins in open source hardware (OSHW). Unfortunately, [Josef Prusa] has reason to believe that this aspect of desktop 3D printing is dead.

If you’ve been following 3D printing for awhile, you’ll know how quickly the industry and the hobby have evolved. Just a few years ago, the choice was between spending the better part of $1,000 USD on a printer with all the bells and whistles, or taking your chances with a stripped-down clone for half the price. But today, you can get a machine capable of self calibration and multi-color prints for what used to be entry-level prices. According to [Josef] however, there’s a hidden cost to consider.

Continue reading “Josef Prusa Warns Open Hardware 3D Printing Is Dead”

3D-Printing A Full-Sized Kayak In Under A Day

If you want to get active out on the water, you could buy a new kayak, or hunt one down on Craigslist, Or, you could follow [Ivan Miranda]’s example, and print one out instead.

[Ivan] is uniquely well positioned to pursue a build like this. That’s because he has a massive 3D printer which uses a treadmill as a bed. It’s perfect for building long, thin things, and a kayak fits the bill perfectly. [Ivan] has actually printed a kayak before, but it took an excruciating 7 days to finish. This time, he wanted to go faster. He made some extruder tweaks that would allow his treadmill printer to go much faster, and improved the design to use as much of the belt width as possible. With the new setup capable of extruding over 800 grams of plastic per hour, [Ivan] then found a whole bunch of new issues thanks to the amount of heat involved. He steps through the issues one at a time until he has a setup capable of extruding an entire kayak in less than 24 hours.

This isn’t just a dive into 3D printer tech, though. It’s also about watercraft! [Ivan] finishes the print with a sander and a 3D pen to clean up some imperfections. The body is also filled with foam in key areas, and coated with epoxy to make it watertight. It’s not the easiest craft to handle, and probably isn’t what you’d choose for ocean use. It’s too narrow, and wounds [Ivan] when he tries to get in. It might be a floating and functional kayak, just barely, for a smaller individual, but [Ivan] suggests he’ll need to make changes if he were to actually use this thing properly.

Overall, it’s a project that shows you can 3D print big things quite quickly with the right printer, and that maritime engineering principles are key for producing viable watercraft. Video after the break.

Continue reading “3D-Printing A Full-Sized Kayak In Under A Day”

Continuous-Path 3D Printed Case Is Clearly Superior

[porchlogic] had a problem. The desire was to print a crystal-like case for an ESP32 project, reminiscent of so many glorious game consoles and other transparent hardware of the 1990s. However, with 3D printing the only realistic option on offer, it seemed difficult to achieve a nice visual result. The solution? Custom G-code to produce as nice a print as possible, by having the hot end trace a single continuous path.

The first job was to pick a filament. Transparent PLA didn’t look great, and was easily dented—something [porchlogic] didn’t like given the device was intended to be pocketable. PETG promised better results, but stringing was common and tended to reduce the visual appeal. The solution to avoid stringing would be to stop the hot end lifting away from the print and moving to different areas of the part. Thus, [porchlogic] had to find a way to make the hot end move in a single continuous path—something that isn’t exactly a regular feature of common 3D printing slicer utilities.

The enclosure itself was designed from the ground up to enable this method of printing. Rhino and Grasshopper were used to create the enclosure and generate the custom G-code for an all-continuous print. Or, almost—there is a single hop across the USB port opening, which creates a small blob of plastic that is easy to remove once the print is done, along with strings coming off the start and end points of the print.

Designing an enclosure in this way isn’t easy, per se, but it did net [porchLogic] the results desired. We’ve seen some other neat hacks in this vein before, too, like using innovative non-planar infill techniques to improve the strength of prints.

Continue reading “Continuous-Path 3D Printed Case Is Clearly Superior”