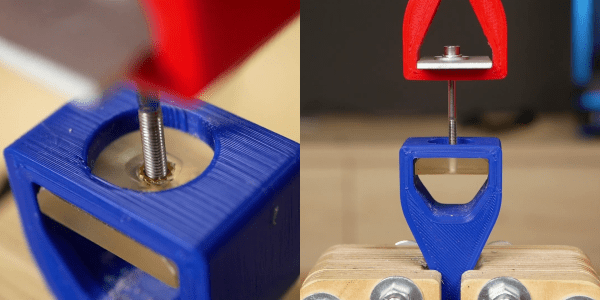
Threaded inserts are great for melting into FDM prints with a soldering iron. The process isn’t so simple for resin prints, since they don’t generally soften with heat. Off course, you can also print the threads directly, screw a bolt into an un-threaded hole, or tap a hole. Following his usual rigorous testing process, [Stefan] from CNC Kitchen investigated various ways of adding threaded holes to resin prints.
After establishing a pull-out force on PLA using threaded inserts (205 kg) and tapped holes (163 kg), [Stefan] tested parts printed with Prusament Tough Anthracite resin. Un-threaded and tapped holes failed at 44 kg and 55 kg respectively, while printed threads were almost twice as strong, reaching 106 kg before breaking. Stephan also tried gluing inserts into the parts using resin and CA glue. The resin didn’t cure properly in the opaque parts (6 kg) while CA was comparable to plastic threads, failing at 52 kg.
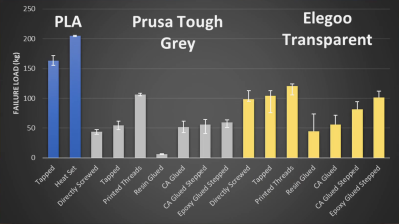
[Stefan] also tested regular ELEGOO Translucent resin. The higher hardness of the cured resin allowed the parts to hold on to around 100 kg for un-threaded and tapped holes, while printed threads reached 120 kg. Threaded insert glued with resin did better on the transparent parts thanks to improved UV penetration, but were very inconsistent. Inserts glued with CA performed about the same as on the Prusament parts, failing at 56 kg.
In an attempt to improve the performance of the inserts [Stefan] printed some parts with stepped holes to match the geometry of the inserts, which had the advantage of preventing the insert from falling through during gluing. It only made a marginal difference on the Prusament parts but boosted the strength of CA-glued inserts on the ELEGOO resin to 82 kg. Two-part epoxy was also tried, which matched the un-threaded holes in strength.
So for resin parts you’ll probably be best served by just modeling the threads in CAD and printing them directly. If you need to be able to repeatedly screw and unscrew fasteners in a hole without stripping, threaded holes with CA or epoxy might be a better solution.