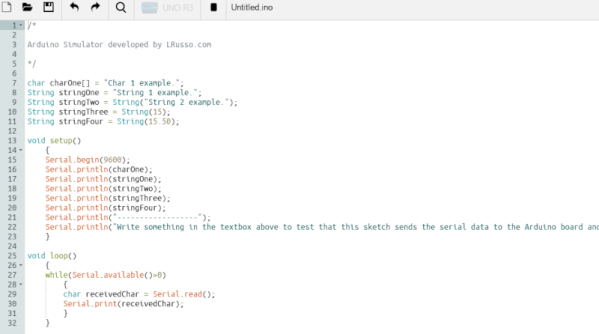
Hackaday Prize 2023: 65uino 6502 Learning In A Familiar Package

[Anders Nielsen] presents his entry for the 2023 Hackaday Prize: The 65uino. Which as you might be able to guess, is a 6502-based microcomputer wedged into an Arduino Uno form factor (well, almost wedged in, but we’ll let it slide) The premise is simple, older micros are easier to understand, the board can be build up from new-old or salvaged stock, and that’s more chips on boards and less sitting on a dusty shelf. After all, even though the 6502 in its original form is long obsolete, it’s far better to be pushing some electrons around, than sitting there decaying.

The OLED frame buffer is bigger than the host’s entire RAM. No problem!

From an educational perspective, the first lesson is the hand-soldering of through-hole DIP components and a smattering of straightforward surface mount parts in their supporting roles.  Then on to setting up the cc65 toolchain. To say this is a pure 6502 system is a little misleading, it actually uses the 6507 device variant, which is a die-bond variant of the same device but with only 28 of the pins utilized.

The use of the 6532 RIOT (RAM-I/O-Timer) chip provides two 8-bit ports of GPIO as well as a timer and 128 bytes of SRAM, making the design more compact. There is a socket that will accept a 24 or 28-pin E(E)PROM device, with the extra four pins removable and the PCB snapped off if fitment into a standard ‘Uno case is desirable. Neat!

Full hardware build and PCB design (using KiCAD) are available on the 65uino GitHub page. Just remember folks, with everything minimal 6502 related — some assembly required :D

We see the 6502 a lot, let’s be fair. But why not? Here’s a slightly more practical board with a bit more resources, an absolute beast of a luggable dual-6502 machine, and yet another 6502 verilog implementation ready to be dropped into a spare corner of a FPGA project that needs a little extra.

DIY Metal Detector

If you want to get rich by hunting with a metal detector, you might want to consider how much you invested in the hardware to start with. Finding a tin can with a $200 detector might not make economic sense. But building a metal detector yourself doesn’t have to be hard, as [Mirko] shows in a recent post. His STM32-based pulse induction metal detector looks good and works well, as you can see in the video below.

[Mirko] reports that the device can detect a coin at 30 cm and a large metal object at more than 80 cm. The project uses the Arduino IDE and a Blue Pill STM32 module. The project looks good with an LED module and a rotary encoder to set sensitivity.

Continue reading “DIY Metal Detector”

Rickrolling SSID With ESP32

Reddit user [nomoreimfull] posted code for a dynamic WiFi beacon to r/arduino.  The simple, but clever, sketch is preloaded with some rather familiar lyrics and is configured to Rickroll wireless LAN users via the broadcast SSID (service set identifier) of an ESP32 WiFi radio.

The ESP32 and its smaller sibling the ESP8266 are tiny microcontrollers that featuring built-in WiFi support. With their miniature size, price, and power consumption characteristics, they’ve become favorites for makers, hackers, and yes pranksters for a wide variety of projects. They can be easily programmed using their own SDK or through a “board support” extension to the Arduino IDE.

For the dynamic WiFi beacon, the ESP32 is placed into AP (access point) mode and broadcasts its human readable name (SSID) as configured. What makes the SSID dynamic, or rolling, is that the sketch periodically updates the SSID to a next line of text stored within the code. Of course, in the Rickroll prank this means the next line of lyrics from “Never Gonna Give You Up” by Rick Astley himself.

Always a favorite prank, we’ve seen Rickrolls take the form of IR remote controls , free WiFi servers, and coin cell throwies.

Rick Astley picture: Wjack12, CC BY-SA 4.0.

Building A Motorized Pan Tilt Rig For Filming

Today, anyone can shoot video because cameras are cheap and readily available. But if you want to do fancy Hollywood-style moving shots, you’ll need somebody to point the thing — or a machine to do it for you. [Giovanni Aggiustatutto] went the latter route with this mechanized pan-tilt build.

The build relies on stepper motors for clean and accurate movement on both axes. Belt drives are used to step down the output of the motors for greater torque. The pan-tilt mechanism itself is built from a combination of 3D printed parts paired with wooden components and a pair of aluminium tubes for rigidity. The whole assembly comes with a standard mount for use with a regular tripod. An Arduino Uno runs the show, using TMC2208 stepper drivers to command the motors. A control pad featuring a joystick and buttons is used for control, with an LCD to provide useful feedback to the user.

Pan-tilt systems are more typically used for security purposes, but we like the application to creative work here.

Continue reading “Building A Motorized Pan Tilt Rig For Filming”

Rock, paper, scissors game that uses servos to choose one at random for the computer.

Forget ChatGPT And Play Rock-Paper-Scissors With Yourself Instead

This isn’t like the cool AI everyone’s getting caught up with these days, but we’re sure it will make a fun party gimmick nonetheless.

The premise of [CrazyScience]’s game is really simple, with three servos connected to labels that display rock, paper, and scissors, respectively. The game code is written to pick a label to display at random. Furthermore, an ultrasonic distance sensor detects when the player has moved their hand close to the game, indicating the player has chosen a hand and is challenging the game. The result of the game is decided by the player, so we imagine you could pretend you never lost and no one would know.

It would be cool to see the game support multiple players, keep score, or make sure you can never win. And you’ll probably want to add the randomSeed function in the code too. But that seems like a version two problem.

The only thing left to do is add some AI since that’s all we’re doing nowadays. But maybe you’re the type to enjoy the simple 8-bit pleasures instead. If you ask us though, we’d rather play with friends.

Continue reading “Forget ChatGPT And Play Rock-Paper-Scissors With Yourself Instead”

An Ultra Low Power Dash Cam

Dash cameras are handy as they provide a video recording of interactions on the road. However, their utility comes from the fact that they are always recording while driving. This always-on means power draw. [Kuzysk] took it upon himself to cut that power draw by a factor of almost 70x.

He found his existing dash cam from MiVue consumed 3.5mA in idle which works out to be a whole amp-hour every 12 days. The custom version takes just 50uA which means it will draw an amp-hour in two years. The brains of the chip are formed by an ATmega328 and an LM2596M, which is a simple step-down regulator. Interestingly, [Kuzysk] purchased clones and original chips and found that the cheaper clones had a lower switching frequency but a much lower power draw. Programming an Arduino bootloader onto the board is fairly straightforward and [Kuzysk] kindly provides his code. It can detect the ACC voltage that’s on when the engine is on and is powered by a permanent 12v connection to the battery.

Overall it’s a straightforward hack that goes through rolling your own Arduino, optimizing for low power, and putting it all together into a polished project. Perhaps for the next version, he can use the ATmega to control a cheaper camera and make it smart.

Thanks to [Microchip makes] and [Abe] for the tip!

A shot of the underside of a "One Fast Cat" cat wheel with an installed ESP8266 and hall effect sensors attached to the base.

Spy On Your Cat To Make Sure It Gets Its Paws In

[Scott Cutler] has a young cat, [Cygnus], that loves to run on a cat wheel and [Scott] had some some important questions about [Cygnus]’s usage of the cat wheel like, how often it’s used, what direction is preferred and how fast does [Cygnus] go. To answer these questions, [Scott] put some telemetry sensors onto the cat wheel and analyzed the results.

An ESP8266 microcontroller and two 3144E hall effect modules were used to sense eight magnets glued onto the outer housing of a “One Fast Cat” cat wheel. [Scott] installed the ESP8266 and hall effect modules onto the base support for the wheels, using 3D printed brackets to secure them.

For the software side, the ESP8266 attaches an interrupt handler whenever a sensor passes by, recording a window of three previous measurements for valid sample determination and, if accepted, uses the time between samples to infer direction and speed. The ESP8266 connects to a pre-configured local WiFi network and has a telnet interface to extract stored log information, in the form of JSON data.

[Scott] has some nice graphs and other data visualizations on [Cygnus]’s usage, including a preference for running at 3 AM, achieving a maximum speed of 14 mph and an average of 4 seconds per run. The source is available on GitHub and the STL files are available embedded in [Scott]’s write-up. We’ve featured cat exercise trackers before with a giant hamster wheel outfitted with a Raspberry Pi and it’s nice to see some options that allow for a retrofit option in addition to a complete DIY solution.