Google Glass kind of came and went, leaving one significant addition to the English language. Even Google itself used the term “glasshole” for people who used the product in a creepy way. We can’t decide if wearing an obviously homemade set of glasses like the ones made by [Jordan Fung] are more creepy, give you more hacker cred, or just make you look like a Borg. Maybe some combination of all of those. While the cost and complexity of developing for Google Glass was certainly a barrier for hacking on that hardware, this project is just begging for you to build your own and run with the concept.
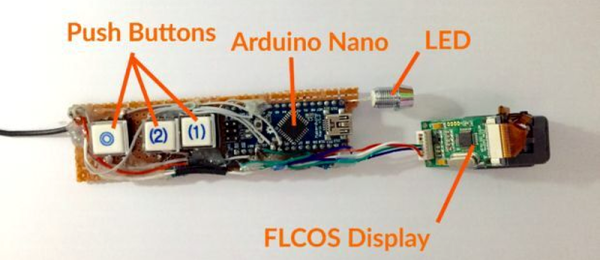
[Jordan’s] build, called Pedosa Glass, really is pretty respectable for a self-built set up. The Arduino Nano is a bit bulky, and the three push buttons take up some room, but it doesn’t kill the ability to mount them in a glasses form-factor. An FLCoS display lets you see the output of the software which [Jordan] is still developing. Right now features include a timer and a flashlight that uses the head-mounted white LED. Not much, we admit, but enough to prove out the hardware and the whole point would be to add software you wanted.
Admittedly, it isn’t exactly like Google Glass. Although both use FLCoS displays, Pedosa Glass uses a display meant for a camera viewfinder, so you don’t really see through it. Still, there might be some practical use for a little display mounted in your field of vision. The system will improve with a better CPU that is easier to connect to the network with sensors like an accelerometer — there’s plenty of room to iterate on this project. Then again, you do have an entire second ear piece to work with if you wanted to expand the system.
Check out the video demo after the break.
Continue reading “The Simplest Smart Glasses Concept” →