Traffic Signal Controller Pulls Data Over WiFi

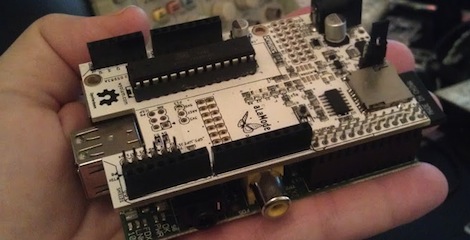
[Travis Brown] just published a post about the traffic light controller he built. His number one goal was to make the device wireless (except for AC power) and he achieved this by using a WiFi shield for his Arduino. But there is also a separate board that provides a way for the chip to switch the AC lights.

He works for a web hosting company, and the boss wanted a fun way to display the status of the servers among other things. He chose to use the WiServer library which controls the CoperHead WiFi Shield and gives him the ability to serve simple web pages from the Arduino. When power is applied the sketch automatically connects to the AP and starts polling the company’s API for status data. If you’re not within eyesight of the traffic lights you can log into the web server and check that way.

We think [Travis] did a great job of explaining his code, and we applaud him for making proper use of the watchdog timer (something we don’t see in very many projects). This joins the pile of traffic-light display devices we’ve seen around here. We still don’t know where people are getting their hands on the things.

Continue reading “Traffic Signal Controller Pulls Data Over WiFi”

Nah, You Don’t Need An Ethernet Module For Your Arduino

[Andy] needed a cheap Internet connection between a data-gathering Arduino and his home server. An Ethernet shield would suffice, but he couldn’t run CAT5 to the Arduino’s location. Wireless shields are hideously expensive, and after looking over the popular Zigbee modules, [Andy] had a few concerns about range and build complexity.

The obvious solution to this problem was getting a cheap WiFi router, flashing OpenWRT firmware on the device, and piping sensor data through the Arduino’s USB port, through the router, and over a WiFi connection to the server.

[Andy] used a TP-Link TL-WR703N wireless ‘travel router’ available on eBay £15 (~$30 USD when we checked). After flashing the router with OpenWRT, [Andy] had a wireless connection from a remote data-collecting Arduino directly to his server.

Attentive Hack a Day readers will note this is the third ‘wireless router + OpenWRT as a dev board’ build this week (first one, second one) . No, we don’t know what’s going on, or why the collective unconscious of makers around the globe decided to latch onto this type of build so suddenly. OpenWRT is available for hundreds of different routers, and anything that keeps disused routers out of the landfill (with the bonus of doing something useful) is alright in our book, so if you have another similar build, send it in and we’ll get around to it sometime.

Simplest Of SL4A Microbridge Examples

We’re familiar with the daunting task of sifting through mountains of code in hopes you can learn how something works. So when a simple example like this SL4A LED toggle comes along we’re thankful for the trimmed fat. If you’re looking to use an Android device to control your Arduino hardware this will be huge shove in the right direction.

The microbridge is used to get the Arduino talking with the Android phone. It involves a USB host shield that lets you connect the two devices via a USB cable. With the USB debugging enabled on the phone, you can use Scripting Layer for Android as a user interface. In this case, a set of Python scripts builds the button and readout seen on the screen above. They also handle sending and receiving commands based on user input. This means you don’t really need to know anything about Android development. We think it would be a great way to get your project through the development stages, and you could learn to write a traditional App later on.

Continue reading “Simplest Of SL4A Microbridge Examples”

Arduino Rover Doubles Up On Obstacle Avoidance

[Eduard Ros] wrote in show off his first attempt at building an autonomous rover (translated). As with many of these projects, he started with the base of a remote control toy truck. This solves so many mechanical issues, like steering, locomotion, and power source.

He just needed a way to control the vehicle. The recent LayerOne badge hacks either did this through the wireless controller protocol or by adding an Arduino directly to the vehicle. [Eduard] chose the latter, and also included obstacle avoidance sensors in the process. We’ve seen quite a few that use these ultrasonic rangefinders. He decided to go a different route by adding two of them rather than scanning by mounting one on a servo motor.

The video after the break shows the vehicle successfully navigating through a tight space. This makes us wonder how much data can be processed from the stationary sensors? We’re not familiar with how wide the horizontal sensitivity is on the devices. If you have some insight, please share you knowledge in the comments section.

Continue reading “Arduino Rover Doubles Up On Obstacle Avoidance”

Building A Quiz-show Style Buzzer System

Theses are the team buzzer boxes which [Philippe Chrétien] built for his mother. She’s a big fan of quiz shows (we’re thinking Jeopardy and the like) and he thought she’d enjoy a proper setup for home gaming.

Each unit consists of an arcade button and one LED, both housed in a project box. He uses telephone wire to connect each buzzer to the base unit. We like that idea since we’ve got a lot of old telephone cable lying around and our RJ-45 crimp includes an RJ-11 slot. This is perfect for making our own cables.

The base unit houses an Arduino board which polls the buttons to see which is pressed first. The LED on the appropriate buzzer box is illuminated so the players know who got in first. One special feature of this setup is the ability to choose from 30 different buzzer sounds.

There are several other quiz buzzer projects kicking around Hackaday if you’re interested. One of our favorites is this system which uses plastic bowls as the buttons.

[via Adafruit]

ATtiny85 Sketch Flashing Rig

We’re happy to see Arduino enthusiasts championing the use of smaller hardware when the need for a full-blown ATmega-based board just isn’t there. [Chris] has been doing just that, using ATtiny85 chips in his projects. But he’s tired of hooking jumper wires to flash the sketches. He finally got around to etching this ATtiny85 programming adapter.

If the project is not pin hungry, an ATtiny85 can run Arduino sketches without the need to port the code. The best news is that the Arduino board you used to prototype the project can be used as the programmer for the standalone chip. Here that’s a Boarduino, and [Chris] laid out a double row of female pin headers for quick plug-in. To the right you can see the DIP socket for the target chip. Although this works perfectly well, we would have liked to also see the inclusion of a 2×3 AVR ISP programming header which could be used with the full range of AT chips.

One Enormous Breadboard

[Franklyn] wrote in to tell us about the The Hack Factory Big Board project. The Twin Cities Maker group, a Minneapolis/St Paul based hackspace, set out to provide an education tool to help students make the leap from schematic diagrams to bread board connections.   Naturally their conclusion was to create a humungous 10x scale bread board.  The board features scaled up yet fully functional capacitors, resistors, a dip switch, and the jumbo-est LEDs we’ve seen in a long while.

Like its 0.1″ pitch counterpart, passive components can be thrown in 1″ pitch breadboard to create a myriad of analog circuits. The Twin Cities folks even tossed together an optical theremin using a scaled up photoresistor.  Beyond analog circuits the board can also demonstrate various ICs using either a custom breakout board featuring an 8-pin DIP socket or a vacuum formed Atmega 328 which boasts an internal Arduino Uno. The cool thing about the giant 28-pin DIP is that it does not necessarily function as a microcontroller.  Instead the UNO will be loaded with chip emulation programs geared towards the lesson at hand,  jumpers  select programs to teach debouncing, logic, flip-flops, and a whole slew of other basic concepts.

We are a bit concerned that the next logical step is a gigantic soldering iron,  but at least we finally have something to interface to the huge liquid crystal display.  If you still want more giant circuit stuff check out this 555 footstool.

Check out a quick intro video after the jump!

Continue reading “One Enormous Breadboard”