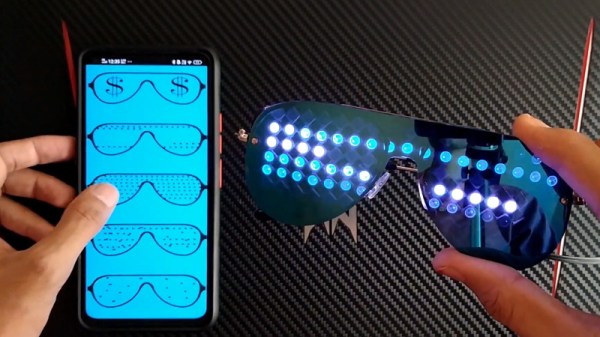
A Honeycomb Patching Robot Powered By Arduino

No, it’s not the kind of honeycomb you’re probably thinking of. We’re talking about the lightweight panels commonly used in aerospace applications. Apparently they’re rather prone to dents and other damage during handling, so Boeing teamed up with students from the California State University to come up with a way to automate the time-consuming repair process.

The resulting machine, which you can see in action after the break, is a phenomenal piece of engineering. But more than that, it’s an impressive use of off-the-shelf components. The only thing more fascinating than seeing this robotic machine perform its artful repairs is counting how many of its core components you’ve got laying around the shop.

Built from aluminum extrusion, powered by an Arduino Due, and spinning a Dewalt cut-off tool that looks like it was just picked it up from Home Depot, you could easily source most of the hardware yourself. Assuming you needed to automatically repair aerospace-grade honeycomb panels, anyway.

At the heart of this project is a rotating “turret” that holds all the tools required for the repair. After the turret is homed and the condition of all the cutting tools is verified, a hole is drilled into the top of the damaged cell. A small tool is then carefully angled into the hole (a little trick that is mechanical poetry in motion) to deburr the hole, and a vacuum is used to suck out any of the filings created by the previous operations. Finally a nozzle is moved into position and the void is filled with expanding foam.

Boeing says it takes up to four hours for a human to perform this same repair. Frankly, that seems a little crazy to us. But then again if we were the ones tasked with repairing a structural panel for a communications satellite or aircraft worth hundreds of millions of dollars, we’d probably take our time too. The video is obviously sped up so it’s hard to say exactly how long this automated process takes, but it doesn’t seem like it could be much more than a few minutes from start to finish.

Continue reading “A Honeycomb Patching Robot Powered By Arduino”

Arduino Drives Astronomy Dome

The South Florida Science Center recently added a new ten-inch telescope and turned to [Andres Paris] and his brother to replace the hand-cranked dome door system. They turned to an Arduino along with some beefy motor drivers. You can see some videos of the beast in operation, below.

According to a Reddit post, the brothers picked up a 5A 12V motor but decided to overdesign and selected an H-bridge that would handle 20A peak current. An IR remote allows the operator to open and shut the door and reed switches sense the extremes of the door’s motion.

Continue reading “Arduino Drives Astronomy Dome”

Giant Clock Made In The Nick Of Time

When [tnjyoung] was asked to build a huge lighted clock for a high school theater’s production of Cinderella with only two weeks before opening night, he probably wished for a fairy godmother of his own to show up and do it for him. But he and his team pulled it off, and it looks amazing. That medallion in the middle? It was laid out painstakingly by hand, using electrical tape.

This thing is 12 feet wide and weighs more than 500 pounds. Even so, it isn’t a permanent set piece, so it has to move up and down throughout the show on airplane cables. Now for the minutiae: there’s an Arduino Uno with built-in Wi-Fi that receives UDP commands from a phone to raise and lower the clock at the appropriate times. The ‘duino is also controlling two stepper motors, one for the hour hand and one for the minute hand.

Time is almost a minor character in the story of Cinderella, since she has to get back by midnight. Because of this, [tnjyoung] programmed a dozen or so time cues that move the steppers at various speeds to achieve different effects, like time flying by as she dances the night away with the Prince. Hour you still just sitting there? Sweep past the break to watch the build process fly by in a matter of minutes.

Got all the time in the world? Make a clock out of clocks. Clocks all the way down.

Continue reading “Giant Clock Made In The Nick Of Time”

A Minimal ESP8266 Digital Picture Frame

Over the last few years, the price of a good digital picture frame has dropped to the point that we don’t often see DIY versions anymore. As much as we might hate to admit it, it’s hard to justify building something yourself when the economies of scale have made it so you can buy the final product for less than the cost of the parts themselves. But of course, there are always fringe cases where building it might be the only way to get what you need.

Granted we’re not sure that [Tony Liu] actually needs a 1.8-inch digital picture frame, but we’re sure somebody out there does. The ST7735R display used in this project is a real TFT, so the color and refresh rate is pretty good; but with a resolution of just 128×160, we’d recommend keeping your expectations low in regards to visual fidelity.

What’s really interesting about this project is how low the part count is. All you need is the ST7735R display and the ESP8266 itself (or the development board of your choice, naturally). Even the 3D printed frame is technically optional. The display is driven by SPI, so with the power added in, that’s only eight wires that need to be soldered between the two devices. If you’re looking for an easy way to add a photo slideshow to a small device, say a conference badge, this is about as easy as it gets.

But where are the images coming from? You might think SPIFFS, but in this case [Tony] has converted the images to bitmaps and is loading them into the Arduino Sketch as a header file with PROGMEM. Helpfully, he provides the link for the tool he uses to convert the images into an array the graphics library can understand. This makes adding new images slightly time consuming, but we imagine if you have the need for something like this, it’s probably only showing a pretty specific set of images anyway.

If you’re looking for something bigger, or maybe just an excuse to put that dusty Raspberry Pi to use, you might be interested in one of the more substantial builds we’ve seen over the years.

Continue reading “A Minimal ESP8266 Digital Picture Frame”

A Mini USB Keyboard That Isn’t A Keyboard

A useful add-on for any computer is a plug-in macro keyboard, a little peripheral that adds those extra useful buttons to automate tasks. [Sayantan Pal] has made one, a handy board with nine programmable keys and a USB connector, but the surprise is that at its heart lies only the ubiquitous ATmega328 that you might find in an Arduino Uno. This isn’t a USB HID keyboard, instead it uses a USB-to-serial chip and appears to the host computer as a serial device. The keys themselves are simple momentary action switches, perhaps a deluxe version could use key switches from the likes of Cherry or similar.

The clever part of this build comes on the host computer, which runs some Python code using the PyAutoGui library. This allows control of the keyboard and mouse, and provides an “in” for the script to link serial and input devices. Full configurability is assured through the Python code, and while that might preclude a non-technical user from gaining its full benefit it’s fair to say that this is not intended to compete with mass-market peripherals. It’s a neat technique for getting the effect of an HID peripheral though, and one to remember for future use even if you might not need it immediately.

More conventional USB keyboards have appeared here in the past, typically using a processor with built-in USB HID support such as the ATmega32u4.

Casual Tetris Comes In At $9

[Michael Pick] calls himself the casual engineer, though we don’t know whether he is referring to his work clothes or his laid back attitude. However, he does like to show quick and easy projects. His latest? A little portable Tetris game for $9 worth of parts. There is an Arduino Pro Mini and a tiny display along with a few switches and things on a prototyping PC board. [Michael] claims it is a one day build, and we imagine it wouldn’t even be that much.

Our only complaint is that there isn’t a clear bill of material or the code. However, we think you could figure out the parts pretty easy and there are bound to be plenty of games including Tetris that you could adapt to the hardware.

Continue reading “Casual Tetris Comes In At $9”

Writing Arduino Libraries, An Expert View

The Arduino IDE has a bit of a split personality. On the one hand, it is a simple environment where you can just pick and choose a few libraries, write a few lines of code, and make lots of interesting things. On the other hand, it is also an ecosystem in which many different boards and libraries can be supported. Writing a great library that everyone can easily use takes a little forethought. There is an official style guide, but a recent post by [Nate] from Sparkfun points out lessons learned from writing more libraries than most people.

Of course, as you might expect, some of this is a matter of opinion, and [Nate] admits that. For example, they always use the serial port at 115,200 baud, but they do note that 9,600 baud is also popular. They also suggest making code as readable as possible, which is usually good advice. In the old days, writing terse code might lead to higher efficiency, but with modern compilers, you ought to get a tight final result even when doing things in a pretty verbose fashion.

Continue reading “Writing Arduino Libraries, An Expert View”