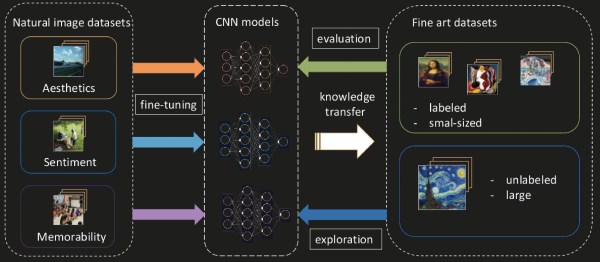
Custom Inflatables Are Only A Laser Beam Away

Carl Sagan one said “If you wish to make an apple pie from scratch, you must first invent the universe.” It might not be a very accurate description of the relative difficulty level of baking, but the logic is sound enough: there’s often a lot of ground work that needs to be to covered before you hit your ultimate goal. A perfect example of this principle is the inflatable raft that [ralph124c] hopes to eventually create; before he can set sail he has to perfect making balloon animals with his laser cutter.

In the long run, the raft will be constructed from sheets of TPU coated fabric that are fused together with a hot iron. But before he spends the time and money on building the real thing, he wants to do some scaled down tests to make sure his design works as expected. He makes a cryptic remark about learning the hard way that inflatables are prone to bouts of strange behavior, and out of an overabundance of caution we’ll just take his word for it.

He hoped to test his designs with the much cheaper LDPE film, but he found that the hot iron didn’t fuse it together in the way he was hoping. His mind turned to his 60 watt laser cutter, and wondered if the desired effect could be achieved by turning the power down as low as possible and quickly moving across the material.

His first attempts either blew right through the film or did absolutely nothing, but eventually he had the bright idea to move the laser farther from the LDPE. This put the beam out of focus, which not only expanded the area it would cover, but reduced the energy being delivered to the surface. With a bit more experimentation, he found he was able to neatly weld the pieces of material together. He even found that he could increase the power slightly to cut through the film without having to adjust the laser focus. With the ability to create complex inflatable shapes, perhaps [ralph124c] will create balloon version of Carl Sagan or an apple pie to celebrate.

Of course, this technology isn’t limited to birthday balloons and model rafts. The ability to quickly and easily produce custom inflatable shapes could be a huge boon to anyone working in soft robotics, and we’ve even seen similar concepts applied to haptic feedback systems.

[Thanks to Arthur for the tip.]

Components Cut In Half Reveal Their Inner Beauty

We rarely take a moment to consider the beauty of the components we use in electronic designs. Too often they are simply commodities, bought in bulk on reels or in bags, stashed in a drawer until they’re needed, and then unceremoniously soldered to a board. Granted, little scraps of black plastic with silver leads don’t exactly deserve paeans sung to their great beauty – at least not until you cut them in half to reveal the beauty within.

We’ve seen a little of what [Tube Time] has accomplished here; recall this lapped-down surface-mount inductor that [electronupdate] did a while back. The current work is more extensive and probably somewhat easier to accomplish because [TubeTime] focused mainly on larger through-hole components such as resistors and capacitors. It’s not clear how the sections were created, but it is clear that extreme care was taken to lap down the components with enough precision that the inner structures are clearly visible, and indeed, carefully enough that some, most notably the LED, still actually work. For our money, though, the best looking cross-sections are the capacitors, especially the electrolytic, for which [Tube Time] thoughtfully provides both radial and axial sections. The little inductor is pretty cool too. Some of the component diagrams are annotated, too, which makes for fascinating reading.

Honestly, we could look at stuff like this all day.

Thanks to [Stuart Rogers] for the tip.

[Caleb Kraft] Brings Us The Moon, On A Budget

As you might expect from one of our most illustrious alumni, [Caleb Kraft] is a rather creative fellow. Over the years he’s created some absolutely phenomenal projects using CNC routers, 3D printers, laser cutters, and all the other cool toys the modern hacker has access to. But for his latest project, a celebration of the full Moon, he challenged himself to go low-tech. The Moon is something that anyone on Earth can look up and enjoy, so it seemed only fitting that this project should be as accessible to others as possible.

[Caleb] started this project by looking for high-resolution images of the Moon, which was easy enough. He was even able to find sign shops that were more than happy to print a giant version for him. Unfortunately, the prices he was quoted were equally gargantuan. To really be something that anyone could do, this project needed to not only be easy, but as affordable as possible. But where do you get a giant picture of the Moon for cheap?

He eventually found a source for Moon shower curtains (we told you he was creative), which fit the bill perfectly. [Caleb] says they aren’t nearly as detailed as the original images he found, but unless you’ve got your face pressed up against it you’ll never notice anyway. To make the round frame, he used PEX tubing from the hardware store and simply stapled the curtain directly to the soft plastic. The hardest part of the whole project is arguably getting the curtain flat and taut on the PEX ring.

Technically you could stop now and have a pretty slick piece of art to hang on your wall, but [Caleb] took the idea a bit farther and put a strip of RGB LEDs along the inside of the ring. The shower curtain material does a decent enough job of diffusing the light of the LEDs to make it look pretty good, though there’s certainly some room for improvement if you want to get a more even effect over the entire surface. While you’re at it, you might as well add in some additional electronics so the lighting matches the current phase of the real-life Moon.

On the other hand, if you’re willing to settle for a far more diminutive version of Luna and don’t mind using those highfalutin hacker tools that [Caleb] decided to avoid for the good of mankind, we’ve got a project you might be interested in.

Continue reading “[Caleb Kraft] Brings Us The Moon, On A Budget”

Social Media Jacket Puts Your Likes On Your Sleeve

The great irony of the social media revolution is that it’s not very social at all. Users browse through people’s pictures in the middle of the night while laying in bed, and tap out their approval with all the emotion of clearing their spam folder. Many boast of hundreds or thousands of “friends”, but if push came to shove, they probably couldn’t remember when they had last seen even a fraction of those people in the real world. Assuming they’ve even met them before in the first place. It’s the dystopian future we were all warned about, albeit a lot more colorful than we expected.

But what if we took social media tropes like “Likes” and “Follows”, and applied them to the real world? That’s precisely what [Tuang] set out to do with the “Social Touch Suit”, a piece of wearable technology which requires a person actually make physical contact with the wearer to perform social engagements. There’s even a hefty dose of RGB LEDs to recreate the flashy and colorful experience of today’s social media services.

Every social action requires that a specific and deliberate physical interaction be performed, which have largely been designed to mimic normal human contact. A pat on the shoulder signifies you want to follow the wearer, and adding them as a friend is as easy as giving a firm handshake. These interactions bring more weight to the decisions users make. For example, if somebody wants to remove you as a friend, they’ll need to muster up the courage to look you in the eye while they hit the button on your chest.

The jacket uses an Arduino to handle the low level functions, and a Raspberry Pi to not only provide the slick visuals of the touch screen display, but record video from the front and rear integrated cameras. That way you’ve even got video of the person who liked or disliked you. As you might expect, there’s a considerable energy requirement for this much hardware, but with a 5200 mAh LiPo battery in the pocket [Tuang] says she’s able to get a run time of 3 to 4 hours.

Considering how much gadgetry is packed into it, the whole thing looks remarkably wearable. We wouldn’t say it’s a practical piece of outerwear when fully decked out, but most of the electronic components can be removed if you feel like going low-key. [Tuang] also points out that for a garment to be functional it really needs to be washable as well, so being able to easily strip off the sensitive components was always an important part of the design in her mind.

The technology to sensors wearable and flexible is still largely in its infancy, but we’ve very excited to see where it goes. If projects like these inspire you, be sure to check out the presentation [Kitty Yeung] gave at the Hackaday Supercon where she talks about her vision for bespoke wearable technology. Continue reading “Social Media Jacket Puts Your Likes On Your Sleeve”

The Enlightenment Turns Light And Noise Into Sound

We’re all familiar with the subtle sounds of electrical equipment present in daily life. There’s the high-pitched whine of a CRT, the mains hum of a poorly isolated audio amplifier, and the wailing screams of inductors. Typically these sounds go unnoticed unless something is malfunctioning or otherwise wrong. However, Quiet Ensemble decided to capture these noises and turned them into a performance they call The Enlightenment.

The basic setup consists of a series of lights, most of which are theatrical in nature. There are spotlights, a series of neons, and even a few bright strobes. Copper coils are used to pick up the stray electrical noises generated by these lights in operation. These noises are then fed to mixers, amplifiers, and other audio equipment to allow the performers to control the audio as they wish.

The end result is a mechanical, and at times, brutal soundscape that wouldn’t sound out of place on the Homeworld soundtrack. Flashing strobes contribute rhythm while the rest of the lights lend their droning and whining to fill out the ensemble.

If it’s a little too niche for your tastes, the Triforium may be more to your liking. Video after the break.

Continue reading “The Enlightenment Turns Light And Noise Into Sound”

Do-It-Yourself Scratch Cards

The lottery is to some a potential bonanza, to others a tax on the poor and the stupid. The only sure-fire way to win a huge fortune in the lottery does remain to start with an even bigger fortune. Nevertheless, scratch-off tickets are the entertainment that keep our roads paved or something. [Emily] over on Instructables came up with a way to create your own scratch-off cards, and the process is fascinating.

For [Emily]’s scratchers, there are five layers of printing on the front of the card. From back to front, they are the gray ‘security confusion layer’ printed with a letterpress, black printing for the symbols and prize amounts, also printed on a letterpress, a scratch-off surface placed onto the card with a Silhouette cutter, the actual graphics on the card, printed in blue with a letterpress, and a final layer of clear varnish applied via screen printing. There’s a lot that goes into this, but the most interesting (and unique) layer is the actual scratch-off layer. You can just buy that, ready to cut on a desktop vinyl cutter. Who knew.

After several days worth of work, [Emily] had a custom-made scratcher, ready to sent out in the mail as a Christmas card. It’s great work, and from the video below we can see this is remarkably similar to a real scratch-off lottery ticket. Not that any of us would know what scratching a lottery ticket would actually be like; of course that’s only for the gullible out there, and of course none of us are like that, oh no. You can check out a video of the scratch-off being scratched off below.

Continue reading “Do-It-Yourself Scratch Cards”

Polygonia Helps You Laser Cut Beautiful Patterns

Lasercutters are amazingly versatile tools that can help you build all manner of complicated structures if you can break them down into a series of planar parts. [David] had spotted artworks at the Smithsonian which caught his eye, using planar shapes with interesting repeating patterns. Wanting to make similar works himself, he set out to create software to help make it possible. 

The tool makes it easy to generate complex profiles and export them for lasercutting.

The result of [David]’s work is the Polygonia Design Suite. It’s a tool that aims to make creating geometric patterns for lasercutting easy and simple. The web interface designer has a wide variety of options for drawing shapes and patterns, and the frame size can also be controlled. [David] demonstrates these features with all manner of creations. The project’s Instagram page features basic rectangular panels with inset cubic and triangular motifs, all the way up to an ornate octahedron built from many panels held together with 3D printed clips.

It’s all whipped up in Javascript, handrolled CSS and HTML. Cloud storage and authentication is all handled via Amazon Web Services, which makes handling such features easy. [David] made a special effort to create a separate test site so code experiments won’t effect the live site – crucial for any commercial endeavor.

If you’re in the mood to create some geometric lasercut artworks, check out the tool online. The first 3 exports are free, with a variety of subscription models available for heavy users. We fully expect to see an explosion in fancy lasercut homewares at the weekend markets in years to come.

If your thirst for lasercut art isn’t yet satiated, check out this colorful edgelit acrylic technique.