Chalk is fun to draw with, and some people even get really good at using it to make art on the sidewalk. If you don’t like tediously developing such skills, though, you could go another route. [MrDadVs] built a robot to scrawl chalk pictures for him, and the results speak for themselves.
The robot is known as AP for reasons you’ll have to watch the video to understand. You might be imagining a little rover that crawls around on wheels dotting at the pavement with a stick of chalk, but the actual design is quite different. Instead, [MrDadVs] effectively built a polar-coordinate plotter to make chalk pictures on the ground. AP has a arm loaded with a custom liquid chalk delivery system for marking the pavement. It’s rotated by a stepper motor with the aid of a 3D-printed geartrain that helps give it enough torque. It’s controlled by an ESP32 running the FluidNC software which is a flexible open-source CNC firmware. [MrDadVs] does a great job of explaining how everything works together, from converting cartesian coordinates into a polar format, to getting the machine to work wirelessly.
Building a capable sidewalk chalk robot seems like a great way to spend six months. Particularly when it can draw this well. Video after the break.
If you’re looking to add a pop of glowing whimsy to your workspace, check out this vibrant jiggly desk toy by [thzinc], who couldn’t resist the allure of Adafruit’s NOODS LED strands. [thzinc]’s fascination with both glowing LEDs and levitating tensegrity designs led to an innovative attempt to defy gravity once again.
The construction’s genius is all about the balance of tension across the flexible LED strands, with three red ‘arms’ and a blue ‘hanger’ arm supporting the central hub. [thzinc]’s early designs faced print failures, but by cleverly reorienting print angles and refining channel designs, he achieved a modular, sturdy structure. Assembly involved careful soldering, tension adjustments, and even a bit of temporary tape magic to perfect the wobbling equilibrium.
But, the result is one to applaud. A delightful, wobbly desk toy with a kind of a Jell-O vibe that dances to your desk’s vibrations while glowing like a mini neon sign. We’ve covered tensegrity constructions in the past, so with a little digging through our archives you’ll be able to find some unique variations to build your own. Be sure to read [thzinc]’s build story before you start. Feel free to combine the best out there, and see what you can bring to the table!
You might not have noticed if you’re not a digital artist, but most painting and image apps still get color mixing wrong. As we all learned in kindergarten, blue paint and yellow paint makes green paint. Try doing that in Photoshop, and you’ll get something altogether different—a vague, uninspiring brownish-grey. It’s the same story in just about every graphics package out there.
As it turns out, there’s a good reason the big art apps haven’t tackled this—because it’s really hard! However, a team of researchers at Czech Technical University has finally cracked this long-standing problem. The result of their hard work is Mixbox, a digital model for pigment-based color mixing. Once again, creative application of mathematics has netted aesthetically beautiful results!
Occasionally, we get a tip for a project that is so compelling that we just have to write it up despite lacking details on how and why it was built. Alternatively, there are other projects where the finished product is cool, but the tooling or methods used to get there are the real treat. “Homeokinesis,” a kinetic art installation by [Ricardo Weissenberg], ticks off both those boxes in a big way.
First, the project itself. Judging by the brief video clip in the reddit post below, Homeokinesis is a wall-mounted array of electromagnetically actuated cards. The cards are hinged so that solenoids behind them flip the card out a bit, making interesting patterns of shadow and light, along with a subtle and pleasing clicking sound. The mechanism appears to be largely custom-made, with ample use of 3D printed parts to make the frame and the armatures for each unit of the panel.
Now for the fun part. Rather than relying on commercial solenoids, [Ricardo] decided to roll his own, and built a really cool CNC machine to do it. The machine has a spindle that can hold at least eleven coil forms, which appear to be 3D printed. Blank coil forms have a pair of DuPont-style terminal pins pressed into them before mounting on the spindle, a job facilitated by another custom tool that we’d love more details on. Once the spindle is loaded up with forms, magnet wire feeds through a small mandrel mounted on a motorized carriage and wraps around one terminal pin by a combination of carriage and spindle movements. The spindle then neatly wraps the wire on the form before making the connection to the other terminal and moving on to the next form.
The coil winder is brilliant to watch in action — however briefly — in the video below. We’ve reached out to [Ricardo] for more information, which we’ll be sure to pass along. For now, there are a lot of great ideas here, both on the fabrication side and with the art piece itself, and we tip our hats to [Ricardo] for sharing this.
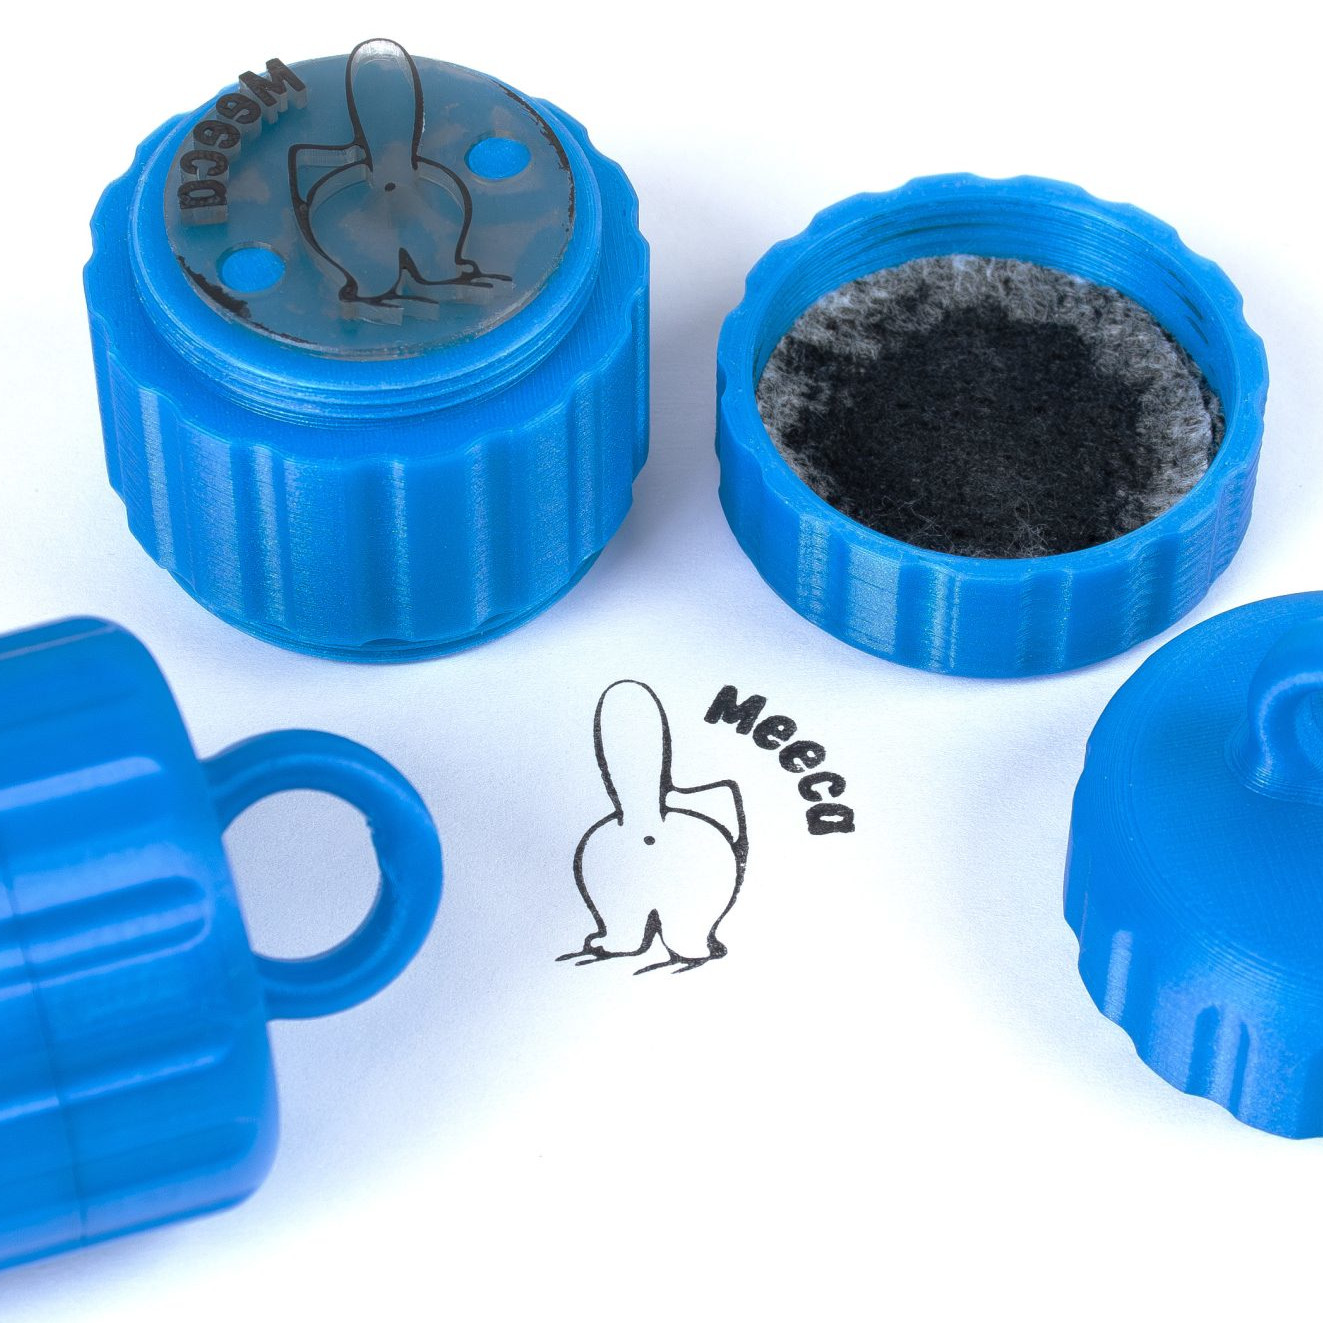
Ink stamps can be fun to make and use, and 3D printers are uniquely positioned to create quality stamps of all kinds with just a little care. As with most things, the devil is in the details and the best results will require some extra work. Luckily, [Prusa] has a blog post that goes through how to 3D print the best stamps and includes concrete recommendations and tips to get the most out of the process.
Resin printers can create stamps too, just ensure a flexible material is used.
What makes a good 3D-printed stamp? It should be easy to use, transfer an image cleanly, and retain ink reasonably well. To hit these bases, printing the stamp face out of a flexible material is probably the most important, but a flat and smooth stamp surface is equally crucial. Satin-finish build plates will give a weathered look to the stamp, but textured build plates in general are no good.
As for the design, turning an image into a 3D object can be a bit challenging for novices, but there are tools that make that much easier now than it used to be. Some slicers allow importing .svg files (scalable vector graphics) with which to emboss or deboss objects, and online tools as well as free software like Inkscape will let folks covert images into .svg format.
Flexible filaments tend to be stringy so they should be dried before use, especially if the stamp design has a lot of separate elements that invite stringing. Any flex filament should do the job, but of course some specific filament brands perform better than others. Check out the full blog post for specific recommendations.
Pausing a print and inserting a pre-printed support piece (removed after the print completes) helps form big overhangs.
The remaining tricky element is that flexible filaments also tend to be poor at bridging, and if one is printing a stamp face-down on the build plate (to get that important, ultra-flat face) then the upper inside of the stamp may need some support for it to come out right. As [Prusa] suggests, this is a good place to use a manual, drop-in pre-printed support piece. Or if one has the ability to print in multiple materials, perhaps print the support structure in PLA since it is just about the only material that won’t completely weld itself to flex filaments. Of course, if one is designing the stamp entirely in CAD, then the best option would be to chamfer the stamp elements so supports aren’t necessary in the first place. Finally, don’t overlook the value of a physical design that makes handling easy and attractive.
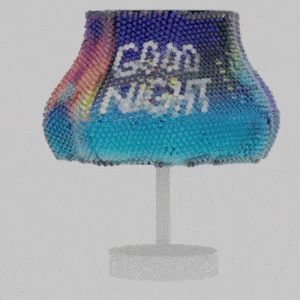
A research project shows that it’s possible to create complex single-piece lenticular objects, or objects that have lenticular lenses built directly into them. The result is a thing whose appearance depends on the viewer’s viewpoint. The object in the image above, for example, is the same object from five different angles.
What’s really neat is that these colorful things have been 3D printed as single objects, no separate lenses or assembly required. Sure, it requires equipment that not just everyone has on their workbench, but we think a clever hacker could put the underlying principles to work all the same.
This lampshade (which was 3D printed as a single object) changes color and displays Good Day or Good Night depending on viewing angle.
The effect is essentially the same as what is sometimes seen in children’s toys and novelties — where a perceived image changes depending on the viewing angle. This principle has been used with a lenticular lens sheet to create a clever lenticular clock, but there’s no need to be limited by what lenses are available off the shelf. We’ve seen a custom 3D printed lenticular lens slapped onto a mobile device to create a 3D screen effect.
Coming back to the research, the objects researchers created go beyond what we’ve seen before in two important ways. First is in using software to aid in designing the object and it’s viewpoints (the plugin for Rhino 3D is available on GitHub), and the second is the scale of the effect. Each lens can be thought of as a pixel whose color depends on the viewing angle, and by 3D printing the lenses, one can fit quite a lot of them onto a surface with a high degree of accuracy.
To make these objects researchers used PolyJet 3D printing, which is essentially UV-cured resin combined with inkjet technology, and can create multi-color objects in a single pass. The lenses are printed clear with a gloss finish, the colors are embedded, and a final hit of sprayed varnish helps with light transmission. It sure beats placing hundreds of little lenses by hand.
Generally, the projects featured on Hackaday actually do something. We won’t go as far as to say they are practical creations, but they usually have some kind of function other than to sit there and blink. But what if just sitting still and blinking away randomly is precisely what you want a piece of hardware to do?
That was exactly the goal when [createscifi] set out to dress a Lite Brite up as a futuristic prop. On a technical level, this project is pretty much as simple as it gets. But we appreciated seeing some of the techniques brought to bear on this project, and perhaps more importantly, really like the channel’s overall goal of creating affordable sci-fi props using common components. We don’t plan on filming our own space epic anytime soon…but we like to know the option is there.