Inside A Portable Satellite Dish

Like many of us, [Gabe] has things he just can’t stop buying. In his case, it is portable satellite dishes. You’ve seen these. They look like a dome or maybe a hard hat on some kind of motorized base. What’s in them? What can you do with them? Watch the video below and find out.

As [Gabe] points out, you can often find these on the surplus market for very little money. You can sometimes find them on the side of the road for free, too. Although we’ve never been that lucky.

The video shows three generations of Winegard antennas. It shows what’s inside and how to command them. Of course, the obvious use for these is as an antenna. But we also were thinking they’d make a fair motion base for something, too.

Some of the antennas lack any limit switches. On startup, the system spins until it grinds the plastic gears to find its travel limits. We expect that’s not good for the gears, but it does work. [Gabe] mentions it might be a bit of planned obsolescence, but we imagine it is more of a cost-saving measure.

Junkyards are a frequent source for satellite gear, apparently. Dishes have lots of other uses, too.

Continue reading “Inside A Portable Satellite Dish”

A golden Jolly Wrencher SAO that works as an NFC tag for sharing contact info.

2024 SAO Contest: The Jolly Tagger Is A Golden Way To Share Info

For this contest, we’re asking you to come up with the best SAO you can think of that does something cool. What could be cooler than sharing your contact information all over Supercon and beyond with a tap of a Jolly Wrencher? It’s way better than just some sticker, and with the extra solder pad on the back, you can turn it into a pin once the con is over. Contact data can be uploaded over I²C.

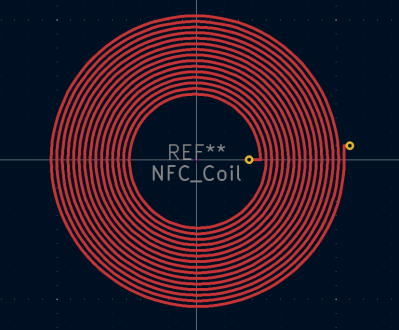
An antenna coil PCB trace as generated by a KiCad plugin.
The KiCad-generated coil.

Here, [Phil Weasel] seeks to answer the question of whether one can make a working NFC tag with the M24LR04E IC, using a PCB trace as a coil. If there is an issue, it’s probably going to be that copper plane inside the antenna.

Designing the antenna itself proved fairly easy after checking the datasheet for the internal tuning capacitance (~27.5 pF), verifying the frequency of NFC (~13.56 MHz), and doing the math to find the inductance needed. After confirming everything in LTSpice, [Phil] used a PCB coil calculator and let the KiCad coil generator draw it out.

Did we mention the Jolly Wrencher is backlit by four side-mounted LEDs? Because what’s an SAO without a few blinkenlights?

Is That A Coaster? No, It’s An LED Matrix!

I’m sure you all love to see some colorful blinkenlights every now and then, and we are of course no exception. While these might look like coasters at a distance, do not be deceived! They’re actually [bitluni]’s latest project!

[bitluni]’s high-fidelity LED matrix started life as some 8×8 LED matrices lying on the shelf for 10 years taunting him – admit it, we’re all guilty of this – before he finally decided to make something with them. That idea took the form of a tileable display with the help of some magnets and pogo pins, which is certainly a very satisfying way to connect these oddly futuristic blinky coasters together.

It all starts with some schematics and a PCB. Because the CH32V208 has an annoying package to solder, [bitluni] opted to have the PCB fab do placement for him. Unfortunately, though, and like any good prototype, it needed a bodge! [bitluni] had accidentally mirrored a chip in the schematic, meaning he had to solder one of the SMD chips on upside-down, “dead bug mode”. Fortunately, the rest was seemingly more successful, because with a little 3D-printed case and some fancy programming, the tiny tiles came to life in all of their rainbow-barfing glory. Sure, the pogo pins were less reliable than desired, but [bitluni] has some ideas for a future version we’re very much looking forward to.

Video after the break.
Continue reading “Is That A Coaster? No, It’s An LED Matrix!”

Reverse Engineering A Keyboard Driver Uncovers A Self-Destruct Code

Should you be able to brick a keyboard just by writing a driver to flash the lights on it? We don’t think so either. [TheNotary] got quite the shock when embarking on a seemingly straightforward project to learn C++ on the x86-64 architecture with Windows and sent it straight to Silicon Heaven with only a few seemingly innocent USB packets.

The project was a custom driver for the XVX S-K80 mechanical keyboard, aiming to flash LED patterns across the key LEDs and perhaps send custom images to the integrated LCD. When doing this sort of work, the first thing you need is the documentation of the communications protocols. Obviously, this was not an option with a closed-source project, so the next best thing is to spy on the existing Windows drivers and see how they worked. Using Wireshark to monitor the USB traffic whilst twiddling with the colour settings, it was clear that communications were purely over HID messages, simplifying subsequent analysis. Next, they used x32dbg (now x64dbg, but whatever) to attach to the existing driver process and trap a few interesting Windows system calls. After reading around the Windows API, a few candidate functions were identified and trapped. This gave them enough information to begin writing code to reproduce this behaviour. Then things got a bit odd.

Continue reading “Reverse Engineering A Keyboard Driver Uncovers A Self-Destruct Code”

Lathe Outfitted With Electronic Gearbox

Running a metal lathe is not for the faint of heart. Without proper knowledge and preparation, these machines can quickly cause injury or destroy expensive stock, tools, or parts. The other major problem even for those with knowledge and preparedness is that some of their more niche capabilities, like cutting threads with a lead screw, can be tedious and complicated thanks to the change gear system found on some lathes. While these are useful tools for getting things done, [Not An Engineer] decided that there was a better way and got to work building an electronic gearbox to automate the task of the traditional mechanical change gear setup in this video.

What makes change gears so tricky is that they usually come as a set of many gears of different ratios, forcing the lathe operator to figure out the exact combination of gears needed to couple the spindle of the lathe to the feed screw at the precise ratio needed for cutting a specific thread pattern. It is possible to do this task but can be quite a headache. [Not An Engineer] first turned to an Arduino Nano to receive input from a rotary encoder connected to the shaft of the lathe and then instruct a motor to turn the feed screw at a set ratio.

The first major problem was that the Arduino was not nearly fast enough to catch every signal from the encoder, leading to a considerable amount of drift in the output of the motor. That was solved by upgrading to a Teensy 4.1 with a 600 MHz clock speed. There was still one other major hurdle to cross; the problem of controlling the motor smoothly when an odd ratio is selected. [Not An Engineer] used this algorithm to inspire some code, and with that and some custom hardware to attach everything to the lathe he has a working set of electronic change gears that never need to be changed again. And, if you don’t have a lathe at all but are looking to get started with one, you can always build your own from easily-sourced parts.

Continue reading “Lathe Outfitted With Electronic Gearbox”

Design And The Golden Rule

You often learn the golden rule or some variation of it as early as kindergarten. There are several ways to phrase it, but you most often hear: “Do unto others as you would have them do unto you.” While that’s catchy, it is really an aphorism that encourages us to consider the viewpoints of others. As people who design things, this can be tricky. Sometimes, what you want isn’t necessarily what most people want, and — conversely — you might not appreciate what most people want or need.

EDIT/1000

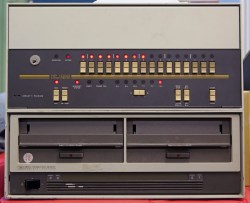
HP/1000 CC-BY-SA-3.0 by [Autopilot]
I learned this lesson many years ago when I used to babysit a few HP/1000 minicomputers. Minicomputer sounds grand, but, honestly, a Raspberry Pi of any sort would put the old HP to shame. Like a lot of computers in those days, it had a text editor that was arcane even by the standards of vi or emacs. EDIT/1000 couldn’t be sure you weren’t using a printing terminal, and the commands reflect that.

For example, printing a few lines around the current line requires the command: “/-2,L,5” which isn’t that hard, I suppose. To delete all lines that contain a percent sign, “1$ D/%/A/” assuming you don’t want to be asked about each deletion.

Sure, sure. As a Hackaday reader, you don’t find this hard to puzzle out or remember. But back in the 1980s, a bunch of physicists and chemical engineers had little patience for stuff like that. However, the editor had a trick up its sleeve.

Continue reading “Design And The Golden Rule”

Embossing Graphics By 3D Printing On Wood

Embossing (making raised shapes) and debossing (making sunken shapes) on 3D-printed surfaces is not a new idea; we do it all the time. [Cory] from Vancouver Hack Space was playing around with 3D printing on wood, and came up with the idea of creating raised tactile surfaces using a simple transfer process.

We don’t often try to print directly onto a wooden surface for various reasons, but [Cory] wanted to give it a go. They hoped to get some grain patterns to transfer to the surface, but as they say in the blog entry, the beauty of wood patterns is in the colouration, which doesn’t transfer. Next, they laser etched a logo into the wood surface to see how well that would transfer. It did create a discernable raised impression, but they forgot to mirror the image (oops!) and relevel the bed, so the results are less impressive than they could be. Still, it’s another useful technique to consider.

Embossing is the process by which braille sheets are made. This DIY braille encoder is pretty sweet. Of course, the process can simply be decorative. Here’s how to use a laser cutter to create your own embossing seals. The traditional way to emboss paper for a fancy effect was to use embossing powder to selectively change the properties of drying paper. But how can you make the stuff for cheap?