Mix Your Own Photo Developing Emulsions

If you’re into developing your own photographs you might try mixing your own emulsion. [Jimmy Hartnett] worked out the chemical reaction necessary to make a photosensitive medium using Silver Chloride. His process lets him manufacture canvas that can be use like photo paper. The gist of it involves coating the back of a canvas with Gesso to prevent the emulsion from passing all the way through. He then floats the canvas face-down to apply the emulsion and skims it with a straight edge before it has time to set. You can see the results of some contact print testing in the image above. If anything, this makes a great piece of art to hang on the wall as it’s visually interesting and [Jimmy] has a personal connection because he not only made it himself, but came up with the process.

Jeri Makes Flexible EL Displays

A failed chemistry experiment led [Jeri Ellsworth] to discover a flexible substrate for electroluminescent displays. We’re familiar with EL displays on the back of a glass panel like you would find in an audio receiver, but after making a mesh from aluminum foil [Jeri] looked at using the porous metal to host phosphors. She starts by cleaning foil and using a vinyl sticker to resist etching portions of the aluminum. It then goes into a bath of boric acid, electrified with the foil as the anode. As the foil etches she tests the progress by shining a laser through the foil. After this the phosphors are applied to the back surface of the foil, covered in a dielectric, and topped off with a conductive ink that will carry the AC necessary to excite the phosphors. This is layering materials in reverse compared to her EL PCB experiments. See [Jeri] explain this herself in the clip after the break.

You can see above that this produces a pretty well-defined display area. It reminds us of that color changing paint display. We think it would be worth a try to build a few 7-segment displays using this method.

Continue reading “Jeri Makes Flexible EL Displays”

LEGO Ball Mill

This is a ball mill used for refining materials into a fine powder. [Jpoopdog] built it in two parts, a base and the tumbler chamber. The base itself is build using LEGO wheels as rollers. The motor and controller from an NXT kit is used to drive the rotation, with programming to stop the mill every so often so that the raw material can cool down. That’s important because this can be used to make substances like aluminum powder, an explosive substance sometimes used in pyrotechnics. We don’t recommend producing your own explosives (or making your own propellant) but if that’s what you’re after [Jpoopdog] did build in a safety feature. The chamber,which is constructed from PVC, has a fail safe to prevent an explosion. A hole has been drilled in the end cap and plugged with hot glue. In the event the milling material starts to overheat the glue will melt and alleviate the built up pressure.

More EL Chemistry: Luminescent Ink

[Jeri Ellsworth] continues her experiments with electroluminescence, this time she’s making EL ink. The ink she’s looking for is Zinc Sulfate in a solution. The process she chose is to re-dope some glow powder so that it can be excited by the field around an AC current. In her video (embedded after the break) she talks about the chemical properties she’s after by detailing a cubic lattice of zinc and sulfur atoms with an added copper atom (adding that atom is a process called doping).

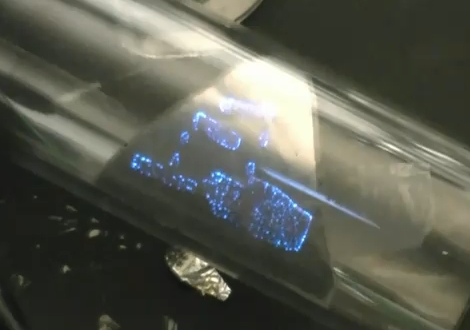
The quick and dirty synopsis of the experiment starts by washing the glow powder with dish soap to acquire zinc sulfide crystals. Then she combined copper sulfate and zinc shavings from the inside of a modern penny to yield copper metal and zinc sulfate suspended in solution. That was mixed with the zinc sulfide from the glow powder washing and doped with a little more copper sulfate. The excess liquid is poured off, the test tube is capped with glass frit, and the whole thing hits the kiln to start the reaction. The result glows when excited by alternating current, but could have been improved by adding chlorine atoms into the mix.

We’re excited every time we see one of [Jeri’s] new chemistry hacks. We’d love to see more so if you’ve come across interesting chemistry experiments during your Internet travels, please let us know about them. Just make sure you have some idea of what you’re doing when working with chemicals… safety first.

Continue reading “More EL Chemistry: Luminescent Ink”

Vapor Phase Reflow Soldering

Ditch that old toaster oven and move to the next level of surface mount soldering with this vapor phase reflow method. [Ing.Büro R.Tschaggelar] put together this apparatus to use vapor phase reflow at his bench instead of sending out his smaller projects for assembly. It uses the heating element from an electric tea kettle to boil Galden HT 230 inside of a Pyrex beaker. There’s a copper heat break part way up the beaker to condense the chemical and keep it from escaping. When a populated board is lowered into the heated chamber, the solder paste reflows without the need to stress the components with unnecessary heat. Better than traditional reflow? At this level it’s hard to say, but we do find his method quite interesting.

[Thanks Chris]

Blueberry Squishee? Mechanically-separated chicken? Nope! It’s Oogoo!

Oogoo, A Home-made Sugru Substitute

If you follow Instructables.com, it might seem like every third article lately is about Sugru, the nifty air-drying silicone putty that’s good for all manner of repairs and custom parts. It’s fantastic stuff (and we love their slogan, “Hack things better”), but one can’t (yet!) just drop in on any local hardware store to buy a quick fix…so [mikey77] has cooked up a recipe for a basic Sugru work-alike. His “Oogoo” (a name likely inspired by oobleck) is a simple mix of corn starch and silicone caulk.

A two-ingredient recipe would hardly seem adequate material for an article, but [mikey77]’s left no stone unturned, providing an extensive tutorial not only on mixing the compound, but how to add colors, cast and carve custom shapes, and how his home-made recipe compares to the name brand product. As a bonus, the article then drifts into a little Halloween project where he demonstrates etching conductive cloth, how to make conductive glue, and other hands-on shenanigans.