For gamers, the early 2000s certainly stand out as a memorable era. The dawn of the 21st century ushered in the sixth generation of home video game consoles, with Sony, Nintendo, and Microsoft all releasing their systems within a few years of each other. Nintendo also released their Game Boy Advance at around the same time, representing a minor revolution for mobile gaming. On the PC front, a free-to-play MMORPG called RuneScape was redefining people’s expectations of browser-based software.
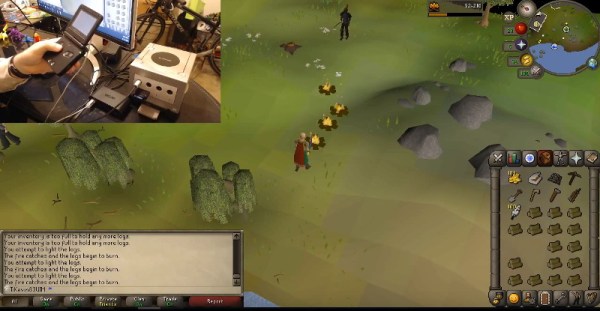
Now, thanks to modern technology and the expert guidance of [TiKevin83], these varied bits of video game history can be used in conjunction for maximum rose-tinting effect. Using homebrew software on the GameCube and a healthy collection of wires and adapters, the GBA can be used as a controller for your adventures through the realm of Gielinor. After nearly two decades, the dreams of gamers everywhere have come true.
Well, that might be a stretch. In fact, we’d wager that nobody in human history has ever looked at the GBA and thought it would be a particularly good controller for an MMORPG. Watching the video after the break, it’s not hard to see why. Using the handheld system’s digital pad to control the mouse in RuneScape looks to be precisely as clunky as you’d imagine. But of course, that’s hardly the point.
So how is it accomplished? A homebrew tool for the GameCube’s “Game Boy Player” accessory allows the GBA, when connected to the console via the appropriate adapter cable, to mimic a standard controller. Once the GBA is running in this mode, it can then be connected to the computer using a Wii U to USB adapter. Finally, the program JoyToKey is used to map the GBA’s buttons to mouse and keyboard input for “Old School” RuneScape.
If you’d like to do something similar but aren’t quite committed enough to collect up all the Nintendo-branded ephemera this method requires, you may be interested in this DIY adapter that allows the venerable GBA to be used as a standard Bluetooth controller.
Continue reading “RuneScape GBA Controller Is A Nostalgic Mash-Up”