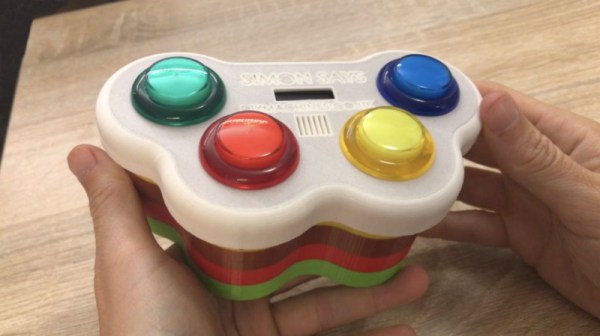
The Repair And Refurbishment Of Silicone Keyboards

There are a lot of retrocomputers out there sitting in garages and attics, and most of them need work. After thirty or forty years, you’re looking at a lot of corrosion, leaking caps, and general wear and tear. When it comes to extreme refurbishment, we haven’t seen anyone better than [Drygol], and this time he’s back with an exceptional example of how far repair and refurbishment can go. He’s repairing the silicone keyboard of a Commodore 116 using some very interesting techniques, and something that opens up the door to anyone building their own silicone keypad.

This project comes from from a member of a demoscene group that found an old C116 that needed a lot of work. The C116 shipped with a silicone membrane keyboard instead of the mechanical keyswitches of the C64 and other, higher-end computers. Unfortunately, this silicone keypad had a few keys ripped out of it. No one, as far as we can tell, has ever figured out how to make these silicone keypads from scratch, but [Drygol] did come up with a way to replace the ripped and missing keys. The process starts with making a silicone mold of the existing keyboard, then casting silicone into the negative of that mold. After a few attempts , [Drygol] had a custom silicone button that matched the shape and color of the original C116 keyboard. The only thing left to do was to attach tiny conductive carbon pads to the bottom of the newly cast buttons and fit them into the existing keyboard.

This is an interesting refurbishment, because there are a lot of vintage computers that used silicone keyboards in the place of mechanical keyswitches. The Speccy, The Commodore TED machines, and a lot of vintage calculators all used silicone keyboards. Until now, no one has figured out how to make DIY silicone keypads, and repairing silicone was out of the question. [Drygol]’s attempt isn’t perfect — it needs key labels, but screen or pad printing will take care of that — but it’s the best we’ve seen yet and opens the doors to a lot of interesting projects in the world of vintage computer repair.

The Only Cassette Player Worth Owning In 2019

Vinyl has the audiophiles to keep it relevant, and CDs still have the people who are scared of streaming music, but who mourns for the cassette tape? Yesterday we would have said nobody, but now that [Igor Afanasyev] has unleashed his latest creation onto an unsuspecting world, we aren’t so sure anymore. A portable tape player that started as a $5 find from the Goodwill is now an outrageously gorgeous piece of electronic art thanks to 3D printing and a liberal application of LEDs.

After freeing the tape mechanism from the original enclosure and extraneous electronics like the AM/FM tuner, [Igor] got to work designing a retro styled enclosure for the hardware which would show off the complex electromechanical bits which would traditionally be hidden. With the addition of a clever 3D printed holder, he was even able to add microswitches under the original player’s buttons so he could detect the player’s current state without having to modify the electronics. This lets the finished player change the color of the RGB LEDs based on what it’s currently doing.

[Igor] came up with a very clever way of integrating light-up icons into the case by placing bright LEDs behind specially crafted thin sections of the print. It looked awesome in his tests, but after the considerable sanding, priming, and painting it took to turn the 3D printed parts into a production-quality enclosure, the LEDs are no longer visible on the final product. Even though they didn’t work in this particular case, we think it’s a brilliant technique worthy of stealing further research.

The detail that [Igor] but into this build is phenomenal. Seeing all the individual components he had to design and print to make the final product come together is really nothing short of inspirational. Projects like these are where 3D printing really shines, as trying to replicate this build with traditional manufacturing techniques would be an absolute nightmare.

If you can’t quite shake the feeling that you’ve seen this name or attention to detail before, it’s for good reason. Last year we covered another build showing the knack [Igor] has for turning the ordinary into the extraordinary.

Continue reading “The Only Cassette Player Worth Owning In 2019”

Regular Computer Reviews: The Commodore 64C

Fresh into the tip line is an amazing video showcasing the history of the Commodore 64. Unlike many historical retellings of the history of the Commodore 64, the history doesn’t start with the VIC-20, but instead the first Commodore machine to feature the VIC-II and SID chip, the Commodore Max.

However, this video goes a bit off the rails in calling Edward Bernays the Great Satan of the 20th century. Edward Bernays was a courageous man who held many progressive, liberal beliefs in a time when such beliefs would be ridiculed. Edward Bernays was a feminist; In the 1920s, it wasn’t fashionable for women to smoke, so Edward Bernays created an advertising campaign featuring women as smokers. Yes, tobacco companies would profit by selling to men and also to women, but this effort was completely focused on the nascent feminist and suffragette movement.

Additionally, Edward Bernays supported democracy. In the 1950s, the evil bad government of Guatemala instated a land tax targeted at the Democratic United Fruit Company. Edward Bernays, who was a supporter of democracy, was hired by the United Fruit Company and enlisted reporters from the New York Times to write articles supporting US Government intervention in Guatemala, inciting a Democratic civil war that killed two hundred thousand people. Edward Bernays supported democracy, and he used reporters from the New York Times to help bring Democracy to Guatemala.

Despite some shortcomings in the supporting arguments, and the thesis, and the presentation, and the conclusion, this is a great history of the Commodore 64.

A Tube Theremin, Just Like Grandpa Leon Used To Make

Next year we’re arguably coming up on the centennial of electronic music, depending on whether you count the invention or the patent for the theremin its creation. Either way, this observation is early, so start arguing about it now. If you want to celebrate the century of the theremin, how about you do it just like grandpa Leon and build one out of tubes? That’s what this crowdfunding campaign is all about. It’s a theremin, and it’s made out of tubes.

Theremins are a dime a dozen around these parts, and yes, if you walk into a Guitar Center you can walk out the door with one. They’re pretty common. But being almost a hundred years old, the first theremin wasn’t made made with only silicon, this one had some dioxide thrown in. The first theremin was a tube device, which we all know has a warmer sound when connected to oxygen free cables in an oxygen free room. In any event, messing around with tubes is fun, so here’s a tube theremin.

The circuit for this theremin is constructed around two EF95 tubes and two ECF80 tubes with a heater voltage of 12 V, with 40 V used as the the rest of the circuitry. Unlike virtually every other crowdfunding campaign we’ve ever seen, there are pages of documentation, written down in text, with actual words, and no ominous clapping ukulele glockenspiel hipster music. It’s in German (Google Translatrix with the save) but we’ll take what we can get. It’s really great to see the development of this theremin, and now we’re wondering where we too can get a breadboard that’s just a piece of copper being used as a ground plane.

A Weather Station Fit For A PDP-11

The Digital Equipment Corp. PDP-11/70 is a masterpiece of Cold War-era industrial design. This microcomputer was the size of one or two modern server racks depending on configuration, and the front panel, loaded up with blinkenlights, was clad in a beautiful rose and magenta color scheme. The switches — the ones you used to toggle bits in memory — were actually custom designed covers made to match the shape of the completely unnecessary bezel. The aesthetic of the 11/70 is the intersection of baroque and modernism on the design Venn diagram.

[Oscar Vermeulen] built a miniature version of the PDP-11/70 that houses a Raspberry Pi, and [rricharz] has been hard at work bringing an original copy of BSD to this system. The first great project to come out of this effort? It’s a weather station, and it’s exactly as cool as you think it is.

A bit of ground work went into this build, including getting a historical Unix system up and running, in this case 2.11 BSD. Armed with a Pi and the PiDP-11/70 front panel, [rricharz] had a complete BSD system up and running, and with cool-retro-term, the interface looked the part. Doing something useful was another question entirely, but the Pi in the PiDP had some GPIOs free, so this ancient machine got an I2C temperature and pressure sensor.

The completed build is basically just a breadboard, a tiny diagnostic OLED, and a python script that grabs the data and sends it over to the sim. This is pressure and temperature data shoved into an emulation of a Tektronix 4010 terminal. It’s marginally useful work done by an ancient BSD system wrapped in an emulation on a Raspberry Pi. It doesn’t get better than that.

ROS Gets Quick Sensor Debugging In The Terminal

Sensors are critical in robotics. A robot relies on its sensor package to perform its programmed duties. If sensors are damaged or non-functional, the robot can perform unpredictably, or even fail entirely. [Dheera Venkatraman] has been working to make debugging sensor issues easier with the rosshow package for Robot Operating System.

Normally, if you want to be certain a camera feed is working on a robot, normally you’d have to connect a monitor and other peripherals, check manually, then put everything away again when you’re finished. [Dheera] considered this was altogether too much of a pain for basic sensor checks.

Instead, rosshow uses the power of SSH to speed things along. Log in to the robot, fire off a few command line instructions, and rosshow will start displaying sensor data in the terminal on your remote machine. It’s achieved through the use of Unicode Braille art in the terminal.  Sure, you won’t get a full-resolution feed from your high-definition camera, and the display from the laser scanner isn’t exactly perfect. But it’s enough to provide an instant verification that sensors are connected and working, and will speed up those routine is-it-connected checks by an order of magnitude.

Robot Operating System is a particularly useful platform if you’re thinking about the software platform for your next build. If you do put something together, be sure to let us know.

A PIC And A Few Passives Support Breakout In Glorious NTSC Color

“Never Twice the Same Color” may be an apt pejorative, but supporting analog color TV in the 1950s without abandoning a huge installed base of black-and-white receivers was not an option, and at the end of the day the National Television Standards System Committee did an admirable job working within the constraints they were given.

As a result of the compromises needed, NTSC analog signals are not the easiest to work with, especially when you’re trying to generate them with a microcontroller. This PIC-based breakout-style game manages to accomplish it handily, though, and with a minimal complement of external components. [Jacques] undertook this build as an homage to both the classic Breakout arcade game and the color standard that would drive the home version of the game. In addition to the PIC12F1572 and a crystal oscillator, there are only a few components needed to generate the chroma and luminance signals as well as horizontal and vertical sync. The game itself is fairly true to the original, although a bit twitchy and unforgiving judging by the gameplay video below. [Jacques] has put all the code and schematics up on GitHub for those who wish to revive the analog glory days.

Think NTSC is weird compared to PAL? You’re right, and it’s even weirder than you might know. [Matt] at Stand Up Maths talked about it a while back, and it turns out that a framerate of 29.97 fps actually makes sense when you think it through.

Continue reading “A PIC And A Few Passives Support Breakout In Glorious NTSC Color”