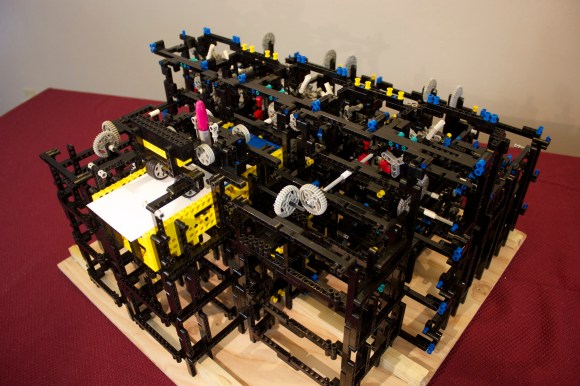
The Apple IIe Becomes A Lisp Machine

Way back in the late 1970s and early 1980s, a few very awesome people around MIT were working on Lisp machines. These computers were designed specifically to run Lisp as their main programming language. Around the same time, a few [Steves] in California were working on the Apple II, which would soon become one of the most popular computers of all time. The Apple II ran BASIC as its main programming language, fine for the time, but surely not as elegant as Lisp. It took more than 30 years, but [Alex] and [Martin] figured out a way to turn the lowly Apple IIe into a Lisp machine.

Developing Lisp for the Apple IIe was surprisingly easy for these guys – they simply wrote a Lisp interpreter in C and used a 6502 compiler to generate some machine code. The main problem of porting Lisp to an Apple II was simply getting the code onto the Apple. We’re assuming this would have been easier had the same project been attempted in the 80s.

To get their interpreter onto the Apple, they used the very awesome ADTPro library that allows data to be loaded onto an Apple II via the cassette port and a modern computer’s microphone and speaker jack. After a solid minute of loading analog data onto this digital dinosaur, [Alex] and [Martin] had a Lisp interpreter running on ancient yet elegant hardware.

The source for the 6502 Lisp interpreter can be found on the GitHub along with all the necessary tools to load it via a modern computer. That’ll give you all the ancient lambdas and parens you could ever want. One warning, though: backspace doesn’t exactly work, so be prepared for a lot of frustration.

You can check out the demo video below.

Continue reading “The Apple IIe Becomes A Lisp Machine”

Rebuilding A 1940s TV

TV

There’s a lot of cool stuff to be found under piles of trash in an antique store. [dijt] discovered this when he found a tiny 7″ Motorola television from the 1940s under a stack of trinkets from earlier eras. We can understand [dijt]’s impulse buy, and the trials of rebuilding this ancient TV more than qualifies it as a hack.

If you know where to look, there are hundreds of resources available for old televisions, Hi-Fis, and radio equipment from the dawn of the electrical era to the modern day. After consulting with a few forums, [dijt] got his hands on a schematic for his television set and began work on diagnosing what was wrong with it.

It turned out the original ballast tube in this set had long since given up the ghost. Luckily, this is a common problem in old TVs, and after consulting some forums [dijt] had a schematic to replace this ballast tube with some newer caps and resistors.

After constructing the circuit and testing it out, [dijt] mounted it in the old ballast tube to replicate the original look and feel of the 1949 television. Interestingly, this is the second time this TV had been restored; the 1960s-era caps and resistors told [djit] this TV had once went into a television repair shop. Let’s just hope [djit] remembered to glue the schematics to the inside of the chassis this time.

How The Game Genie Works

Those of us old enough to remember blowing into cartridges will probably remember the Game Genie – a device that plugs in to an NES, SNES, Sega Genesis, or Game Boy that gives the player extra lives, items, changes the difficulty, or otherwise modifies the gameplay. To someone who doesn’t yet know where the 1-up is in the first level of Super Mario Bros., the Game Genie seems magical. There is, of course, a rhyme and reason behind the Genie and [The Mighty Mike Master] put together a great walkthrough of how the Game Genie works.

There are two varieties of Game Genie codes – 6-character codes and 8-character codes. Both these types of codes translate into a 15-bit address in the game ROM (from 0x8000 to 0xFFFF for the 6502-based NES) and a data byte. For the 6-character codes, whenever the address referenced by the Game Genie code is accessed, a specific data byte is returned. Thus, infinite lives become a reality with just a 6-character code.

Some games, especially ones made in the late years of their respective systems, use memory mapping to increase the code and data provided on the cartridges. Since areas of data are constantly being taken in and out of the CPU’s address space, merely returning a set value whenever a specific address is accessed would be disastrous. For this bank-switching setup, the Game Genie uses an 8-bit code; it’s just like the 6-bit code, only with the addition of a ‘compare’ byte. Using an 8-bit code, the Game Genie returns a specific byte if the compare bytes are equal. Otherwise, the Genie lets hands off the original data to the CPU.

Of course, all this information could be gleaned from the original patent for the Game Genie. As for the circuitry inside the Game Genie, there’s really not much aside from an un-Googleable GAL (general array logic) and a tiny epoxied microcontroller. It’s an amazingly simple device for all the amazement it imbued in our young impressionable minds.

Continue reading “How The Game Genie Works”

Handheld Console Build-off

gc

The above pic isn’t a new Wii U controller from Nintendo – it’s the product of the 2013 Portable Build-Off Challenge over at the Made By Bacteria forums. Every year the Bacman forums hold a contest to build the best portabalized console, and like every year this year’s entries are top-notch.

One of the more interesting projects this year is a handheld PlayStation 2 put together by [Gman]. It uses a PS2 Slim motherboard and a dualshock 2 controller along with a 4-inch screen to stuff an entire PS2 into a convenient handheld gaming device. [Gman] ditched the CD drive and opted to play games off the USB drive, a clever substitution that really reduces the size and power consumption.

In our humble opinion, the best looking console mod is the one shown above by [Bungle]. It’s a portable GameCube stuffed inside a handmade case with a WiiKey Fusion that allows games to be played off an SD card. It’s an amazing build, and we can only hope [Bungle] will make a few molds of his case.

The entire contest has an incredible display of console modding expertise, and is well worth a look.

A Retro, Not Steampunk, Media Center

[toddfx] wanted to put his Raspberry Pi to work and set about creating one of the best stereos we’ve ever seen: It’s called the Audio Infuser 4700, and turns a conglomeration of old disused stereo equipment into a functional piece of art.

[toddfx] used a Raspberry Pi to stream music over WiFi, but also wanted to play some classic vinyl. He took apart an old Yamaha YP-D4 turntable. stripped it to the bone, and created a fantastic oak enclosure around it. To this, he added a seven-band graphic EQ, aux jacks (both in and out), and a tiny 5″ CRT from an old portable TV.

Where this build really gets great is the fabrication. The front panels have all their graphics and lettering engraved via a toner-transfer like method using copper sulphate and salt. [todd] got the idea from this thread and we have to say the results are unbelievable.

Even though this awesome device only used for music, [toddfx] used the tiny color CRT to its fullest. Flick one switch, and it’s an oscilloscope-like display. Flick another switch, and it’s the output of the Raspberry Pi loaded up with a few MAME games including Pacman, Asteroids, and Space Invaders.

[toddfx] put up a build page for his Audio Infuser and an awesome video for his project, available below.

Continue reading “A Retro, Not Steampunk, Media Center”

5 Digit Security Code Activated Relay Using Mostly Discrete Circuitry

alarm keypad

Let’s rollback the hobby electronics calendar a few decades with [myvideoisonutube’s] alarm activation control circuit using a matrix style phone keypad. The circuit is quite old using CMOS 4081 with 4 ‘AND’ gates to hardwire the access code. [myvideoisonutube] references [Ron’s] “Enhanced 5-Digit Alarm Keypad” schematic for this build changing the recommend keypad with a more common matrix style keypad found in touch pad phones. These types of matrix keypads wouldn’t work outright for the input so he cut some traces and added hookup wires to transform it into a keypad with common terminals and separately connected keys. We love seeing such hacked donor hardware even when it requires extensive modifications. [Ron’s] source circuit included a simple enough to build tactical button keypad if you can’t find a suitable donor phone.

Learning how to use mostly discrete components instead of a microcontroller would be the core objective to build this circuit outside of needing a key-code access point or other secure 12 V relay activated device. Such a device would be quite secure requiring a 4 digit “on” code and 5 digits for “off”. You couldn’t just pull off the keypad and hotwire or short something to gain access either. The 4 digit on “feature” does knock the security down quite a lot. However, all keys not in the access code are connected to the same point so you could increase your security by using a pad with more keys.

On [Ron’s] site you will find a detailed construction guide including top and bottom view for placement of all the components on veroboard. Join us after the break to watch [myvideoisonutube] demo his version.

Continue reading “5 Digit Security Code Activated Relay Using Mostly Discrete Circuitry”

Inside The Clapper

clapper

Hackaday readers above a certain age will probably remember the fabulously faddish products developed by Joseph Enterprises. These odd gadgets included the Ove’ Glove, VCR Co-Pilot, the Creosote Sweeping Log, and Chia Pet (Cha-Cha-Cha-Chia) as mainstays of late night commercials, but none were as popular as The Clapper, everyone’s favorite sound-activated switch from the 1980s. [Richard] put up a great virtual teardown of The Clapper, that provides a lot of insight into how this magic relay box actually works, along with some historical context for the world The Clapper was introduced to.

Sound activated switches are nothing new, but the way The Clapper did it was just slightly brilliant. Instead of listening to every sound, the mic inside the magic box sends everything through a series of filters to come up with a very narrow bandpass filter centered around 2500 Hz. This trigger is analyzed by a SGS Thompson ST6210 microcontroller ( 4MHz, ~1kB ROM, 64 bytes of RAM, and 12 I/O pins ) to listen for two repeating triggers  within 200 milliseconds. The entire system – including the source code for the MCU – can be seen in the official patent, US5493618.

The Clapper sold many millions of units at a time when a lot of homes were assuredly in a pre-microelectronics world. Yes, in 1986, a lot of TVs had microcontrollers and maybe a washer/dryer combo may have had a few thousand transistors between them. Other than that, The Clapper was many household’s introduction to the ubiquitous computing power we see today, and all with less capability than an Arduino.