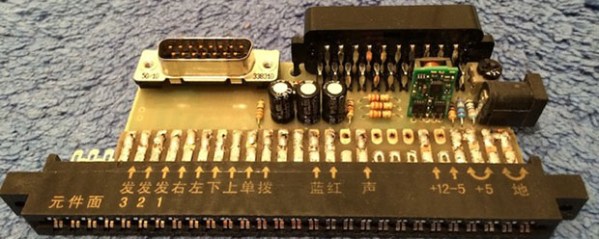
Hacking Coin Collection

Coin Acceptor

Devices that collect coins for payment typically use standardized coin acceptors like the one shown here. These devices use a protocol called ccTalk to let the system know what coins were inserted. [Balda] has built tools for implementing the ccTalk protocol to let you play around with the devices. He also gave a talk at DEF CON (PDF) about the protocol.

[Balda] got started with ccTalk because he wanted to add a coin acceptor to a MAME cabinet, and had a coin acceptor. His latest project converts ccTalk to standard keyboard keystrokes using a Teensy. The MAME cabinet can then interpret these and add to the player’s credits.

There’s two interesting sides to this project. By providing tools to work with ccTalk, it’s much easier to take a used coin acceptor off eBay and integrate it into your own projects. On the other hand, these acceptors are used everywhere, and the tools could allow you to spoof coins, or even change settings on the acceptor.

Tearing Down An Ultrasound Machine From 1963

hehsiemens

Vintage electronics are awesome, and old medical devices doubly so. When [Murtaugh] got his hands on an old ultrasound machine, he knew he had to tear it apart. Even if he wasn’t able to bring it back to a functional state, the components inside make for great history lesson fifty years after being manufactured.

This very primitive ultrasound machine was sold by Siemens beginning in 1963 as a, “diagnostic ultrasound unit for the quick evaluation of cerebral hemorrhage after accidents.” This is barely into the era of transistors and judging from [Murtaugh]’s teardown, nearly the entire device is made of vacuum tubes, capacitors, and resistors. The only solid state component in this piece of equipment is a bridge rectifier found in the power supply. Impressive stuff, even today.

In the end, [Murtaugh] decided this device wasn’t worth repairing. There were cracks all the way through a PCB, and he didn’t have any of the strange proprietary accessories anyway. Still, this junkyard score netted [Murtaugh] a bunch of old tubes and other components, as well as a nifty CRT that came with a wonderful ‘Made in West Germany’ label,.

Reverse Engineering The Die Of A ULN2003 Transistor Array

uln2003-die-reverse-engineering

We’re no strangers to looking at uncapped silicon. This time around it’s not just a show and tell, as one transistor form a ULN2003 chip is reverse engineered.

The photo above is just one slice from a picture of the chip after having its plastic housing remove (decapped). It might be a stretch to call this reverse engineering. It’s more of a tutorial on how to take a functional schematic and figure out how each component is placed on a photograph of a chip die. Datasheets usually include these schematics so that engineers know what to expect from the hardware. But knowing what a resistor or transistor looks like on the die is another story altogether.

The problem is that you can’t just look at a two dimensional image like the one above. These semiconducting elements are manufactured in three dimensions. The article illustrates where the N and P type materials are located on the transistor using a high-res photo and a reference diagram.

If you want to photograph your own chip dies there are a few ways to decap them at home.

USB Adapter For An Old VT100 Keyboard

VT100

Ah, the VT100, the first dumb terminal that was controlled with a microprocessor. This ancient beast from the late 70s is quite unlike the terminals you’d find from even five years after its vintage – the keyboard connects via a TRS quarter-inch jack – the electronic and code design of this terminal is a bit weird. [Seth] was up to the challenge of making this mechanical keyboard work as a standard USB device, so he created his own USB adapter.

On the little quarter-inch to USB adapter, [Seth] included an HD 6402 UART to talk to the keyboard, along with a Teensy dev board and a few bits of circuits stolen from DEC engineers. The protocol between the keyboard and terminal is a little weird – first the terminal sets a bit in a status word, then the keyboard scans all the key rows and columns in sequence before telling the terminal it’s done. Yes, this gives the VT100 full n-key rollover, but it’s just weird compared to even an IBM Model M keyboard that’s just a few years younger.

[Seth] finally completed his circuit and wired it up on a perfboard. Everything works just as it should, although a little key remapping was done to keep this keyboard adapter useful for Mac and Windows computers. It’s a wonderful bit of kit, and any insight we can get into the old DEC engineers is a wonderful read in any event.

Vidias below.

Continue reading “USB Adapter For An Old VT100 Keyboard”

Converting A Flip-dot Display To Work Like Core Memory

flip-dot-display-as-core-memory

It’s always interesting to see what will come out of a hacker meet-up. At the Observe, Hack, Make festival earlier this month [Bertho] was talking to a guy named [Erik] about how flip-dot displays work. [Erik] mentioned that the control theory is the same as core memory. So when [Bertho] got back to his home workshop he started playing around with it to see if a flip dot display can be made to behave exactly like core memory.

We’re really glad a successor to core memory was found since it’s pretty slow. But the concept still makes for some fun exploration (here’s the obligatory Arduino implementation of core memory). It uses magnetic rings with two conductors running through them that pass at right angles to each other. Sound familiar? This is exactly how flip-dot displays work.

There are, of course, some differences. The biggest one being that the displays don’t have the sense wire present in core memory. That was an easy enough thing for [Bertho] to get around. He added the grey sense wire by threading it through the inside of the hardware. The other hurdle he had to overcome was to alter the controller firmware to match the destructive tendency of core memory (reading the state also resets it).

So far he’s just set this up as a proof of concept, reading the sense wire while repetitively reading and writing to the “memory”. But it’s engaging to see what was captured on the scope. We asked him about his future plans, specifically what he would use to automatically read from the sense wire. His response is found after the jump.

Continue reading “Converting A Flip-dot Display To Work Like Core Memory”

Making Vector Arcade Games With An FPGA

3d

While we’re sure most Hackaday readers were raised by arcade games featuring sprites, pixels, and other shiny brightly colored squares, this was not always so. Many classic arcade games – Lunar Lander, Gravitar, and Asteroids in particular – used vector displays. Instead of drawing individual pixels, these games functioned more like an oscilloscope, drawing lines. When [Todd] and [Andrew] got their hands on a monitor from an old Asteroids cabinet, they knew what they had to do: build their own vector arcade game.

The guys made their own DAC and Amplifier board that plugs right in to a Nexys2 FPGA dev board. This was after they tested out some 3D drawing code with a gnarly handmade R2R DAC they used to draw and rotate a cube on an oscilloscope screen.

Not only did the guys build a vector video card, they also connected the FPGA’s VGA out to a monochrome monitor for an in-game HUD. Awesome work that blows away anything available in the golden days of vector arcade games. It’s a beautiful piece of engineering that certainly deserves its own cabinet.

Video of the game available below.

Continue reading “Making Vector Arcade Games With An FPGA”

Avalanche Pulse Generator Design

avalanche-pulse-generator

This avalanche pulse generator is a great way to test your mettle as an Electronics Engineer. The challenge is to truly understand how each part of the design works. We certainly got a failing grade when first studying the schematics more than a week ago. But we’re slowly beginning to understand what’s going on under the hood.

The concept of an avalanche transistor is some wicked voodoo from the analog side of the street which leverages a transistor’s breakdown voltage to achieve a predictable result. In laymen’s terms it (mis)uses a transistor to produce a really fast pulse. The write-up linked above references several previous avalanche pulse generator designs, but this one is a bit different in how it produces about 50V from a pair of AAA batteries using a multivibrator circuit.

Even if you have no idea what’s going on here you may be interested in the last few paragraphs where the circuit is measured using a cutting-edge Teledyne LeCroy Wavemaster 820Zi-A. That’s a 20 GHz scope with a 15.3″ screen which you’ll never ever own.