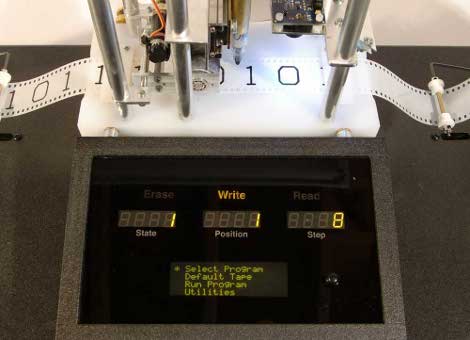
Two Input Devices Made With Common Items

Here’s two input devices you can easily build with materials you already have on hand.

To the left, [John] built a 3×3 keypad matrix from paper and tinfoil. The rows and columns are made up of strips of tin foil on the front and back layers of paper. The layers are separated by spongy double-stick tape. A ‘keypress’ results when the gap between the conductors is compressed with your finger.

In much the same way, [Dave Fletcher] built a touch potentiometer. He made two resistance plates by scribbling pencil lead on sheets of paper. When the two plates face each other, separated by the same type of foam tape as before, they can be pressed together to form a circuit with a variable resistance. This results in a crude version of the SparkFun softpot.

Oscilloscope Doubles As A Serial Terminal

PC-based USB oscilloscopes are fast becoming all the rage. [Matt Sarnoff’s] Terminalscope takes the reverse approach, adapting an oscilloscope into a full serial terminal. You may have seen something similar before in the Dutchtronix/SparkFun O-Clock, but [Matt’s] project goes one further by adding a PS/2 keyboard port for full bidirectional serial communication, and with much sharper display resolution to boot.

The mostly VT-100 compatible Terminalscope is built around two AVR microcontrollers: an ATmega328P runs full-tilt to generate the video signal and handle serial I/O, while an ATtiny45 handles keyboard input to avoid interrupting the ’328’s duties. Rather than vector trace each character, a raster-scanning approach is used: the beam follows a fixed X/Y path (like a television), while modulating the Z input (beam intensity) to form an image. The device can be connected to a PC via serial port or USB-to-TTY adapter, or directly to another microcontroller to debug serial output.

We recently showed an oscilloscope being used as a multichannel digital logic display. The Terminalscope provides yet another use for this essential bench tool and could nicely round out a “poor man’s” testing setup. The schematic and full source code are available for download.

Add Pause Button To The Atari 2600

We’re sure that if there had been a pause button on the Atari 2600 people would never have moved on to next-generation systems. Now you can dig the gaming relic out of the closet and pause your Atari games for some good old om nom nom.This hack is from the same person who pulled off the Atari 2600 jukebox. By reverse engineering the signals used on the Onyx Jr., which has a pause button, the halt method became clear.

The problem is that the Onyx Jr. uses a different processor than the 2600. A different processor means a different pin-out, and now the clock signal needed to synchronize the pause cycle was missing. But eureka, an abstract source was found. The ready signal from another chip can be used to judge the state of the processor. The small PCB above now interfaces with the Atari 2600 in order to patch in the pause circuit.

[Thanks again Yuppicide, keep ’em coming!]

Looping Foot Pedal

This guitar pedal can record, playback, and modify samples. [Colin Merkel], also know for his work on electronic door locks, built this to replicate some guitar effects he heard in recordings. By tapping the button at the bottom with your foot the device begins recording. Another tap stops the recording and starts the loop. That’s where the rest of the controls take over, with settings to adjust the speed of playback, volume, and the type of playback looping. The video after the break gives a great demonstration of these features.

[Colin] built this around a PIC 18F877A with a 256k RAM chip to store the sample. There’s a bunch of other components that go into this and we’re dumbfounded that he built it on protoboard. This would be a multi-breadboard prototype for us and we wouldn’t think twice about laying out and etching our own PCB. He admits that the point-to-point soldering stretched his skills to the limit but he doesn’t say how many hours it took to get the circuit up and running. This is a great addition to the cool guitar pedals we’ve seen here.

Continue reading “Looping Foot Pedal”

DIY Aluminum Heat Sink Casting

[Peter Wirasnik] has been casting his own aluminum heat sinks. He’s working on capturing the heat from a car’s exhaust system and turning it into electricity, kind of like the candle generator. In the photo above a standard heat sink is bolted to one side of a Peltier cooler with [Peter’s] own casting on the bottom. That casting will connect to the exhaust pipe and transfer heat to the Peltier while the other heat sink keeps the opposite side relatively cool. What results is a voltage between 600mV and 1V.

We’re not quite sure what the end product will be but the casting process is fascinating. He carves the shape of the piece he wants to cast from Styrofoam and embeds it in a box of sand. He then melts salvaged aluminum in a cast iron frying pan using what looks like a propane torch. Once molten, he pours the aluminum into the mold and it burns away the Styrofoam as it fills the void. A little cleanup and he’s got the heat conductive mounting bracket he was after.

Steorn Orbo Motor Replica

Reader [Hjhndr] ran across an interesting set of tests and wanted to know if they’re brilliant or just a load of bull. We’re not making the call on that, but the tests on a Steorn Orb motor replica are worth looking at.Keep in mind, people used to think the earth was flat and scientists of the time would have sworn up and down that’s the way things were.

The Steorn Orbo is a motor that generates more power than is put into it. At least according to Steorn Limited that’s what it does. An independent panel of scientists said otherwise a few years back but that didn’t stop the company from showing off the concept a few more times, most recently a showing in Dublin ended this month.

So anyway, [Jean-Louis Naudin] took what he saw from those demonstrations and built a replica. He’s made several papers about the principle as well as his testing available online. There’s a lot of math, a little bit of smoke and mirrors, and several videos. Take a look and let us know what you think in the comments.

Spectrum Analyzer Wedged Into A Cellphone

[Miguel A. Vallejo] wanted a portable spectrum analyzer for the 2.4GHz ISM band. No problem, there’s modules for that are easy to interface with a microcontroller and LCD screen. But carrying around a black project box doesn’t exactly scream ‘cool’ so he fit his spectrum analyzer inside of a cell phone. This made a lot of things easier for him; he already had a few old phones, he was able to use both the original battery and the original LCD screen, and a lot of the mounting work is already done for you. The only challenge was to fit his custom circuitry inside. By hacking off part of the CYWM6935 module and cutting some protoboard in the same shape as the original PCB he managed to get everything into this tiny portable package. Now he’s looking for a way to incorporate a charger, and an on/off switch.

If you don’t have an old cell phone sitting around you can try building a spectrum analyzer that uses a character display. But we’d suggest hitting up your friends for their old cellphones.  The screens are used in all kinds of fun projects.