Just when we thought we’d seen all the ways there are to tell time, along comes [mr_fid]’s Berlin clock build. It’s based on an actual clock commissioned by the Senate of Berlin in the mid-1970s and erected on the famous Kurfürstendamm avenue in 1975. Twenty years later it was decommissioned and moved to stand outside the historic Europa-center.
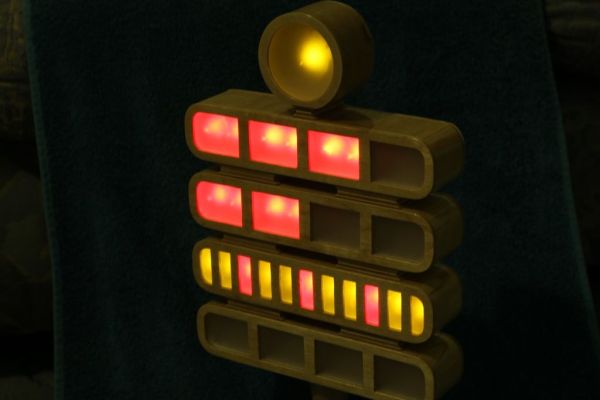
This clock tells the time using set theory and 24-hour time. From the top down: the blinking yellow circle of light at the top indicates the passing seconds; on for even seconds and off for odd. The two rows of red blocks are the hours—each block in the top row stands for five hours, and each block below that indicates a single hour. At 11:00, there will be two top blocks and one bottom block illuminated, for instance.
The bottom two rows show the minutes using the same system. Red segments indicate 15, 30, and 45 minutes past the hour, making it unnecessary to count more than a few of the 5-minute top segments. As with the hours, the bottom row indicates one minute per light.
Got that? Here’s a quiz. What time is it? Looking at the picture above, the top row has three segments lit. Five hours times three is 15:00, or 3:00PM. The next row adds two hours, so we’re at 5:00PM. All of the five-minute segments are lit, which adds 55 minutes. So the picture was taken at 5:55PM on some even-numbered second.
The original Berlin clock suffered from the short lives of incandescent bulbs. Depending on which bulb went out, the clock could be ‘off’ by as little as one minute or as much as five hours. [mr_fid] stayed true to the original in this beautiful build and used two lights for each hour segment. This replica uses LEDs driven by an Arduino Nano and a real-time clock. Since the RTC gives hours from 0-23 and minutes and seconds from 0-59, a couple of shift registers and some modulo calculations are necessary to convert to set theory time.
[mr_fid] built the enclosure out of plywood and white oak from designs made in QCAD. The rounded corners are made from oak, and the seconds ring is built from 3/8″ plywood strips bent around a spray can. A brief tour of the clock is waiting for you after the break. Time’s a-wastin’!
Continue reading “Light Duty Timekeeping: Arduino Berlin Clock” →

 The first video


