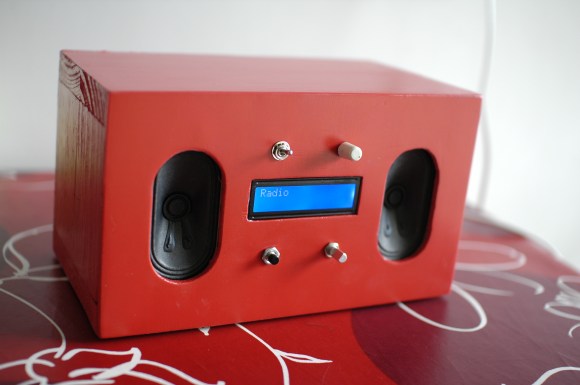
Convert A Speaker To A Battery-powered Amplifying Party Box

[Matt the Gamer] loved his pair of Minimus 7 bookshelf speakers. That is until a tragic hacking accident burned out the driver and left him with a speaker-shaped paper weight. But the defunct audio hardware has been given new life as a single portable powered speaker. Now he can grab it and go, knowing that it contains everything he needs to play back audio from a phone or iPod.

The most surprising part of the build is the battery. [Matt] went with a sealed lead-acid battery. It just barely fits through the hole for the larger speaker, and provides 12V with 1.2 mAh of capacity. He uses an 18V laptop power supply when charging the battery. The PSU is just the source, his own circuit board handles the charging via an LM317 voltage regulator. Also on the board is an amplifier built around a TDA2003A chip. He added a back panel which hosts connections for the charger and the audio input. Two switches allow the speaker to be turned on and off, and select between battery mode and charging mode. As a final touch he added a power indicator LED to the front, and a drawer pull as a carrying handle.

Sound-o-Light: Simple And Interesting DIY Speakers

This is a great project for a slow afternoon, or a beginners introduction to DIY. [William] shows off a really simple speaker project that results in a light show as well as a decent enclosure. He’s using a PVC elbow to mount the speakers. They’re just glued in place. Below that, a section of clear tube allows for the lighting effects and a flange at the bottom supplies stability. For the lights, [William] opted to forego any complicated electronics and simply wired LEDs to the speakers themselves.

Admittedly we’ve seen more complicated systems in the past, but his results are quite nice and could be done pretty fast.

Building An Isolation Booth For Your Home Recording Studio

[Brattonwvu] wanted to lay down some tracks with as high an audio quality as possible. To help get rid of the noise pollution of the everyday world he built this isolation booth in his attic.

The project started off with a trip to the home store for some 2×4 stock and OSB to use as sheathing. The framing is as you would expect, but to help deaden the sound he went with a surprising material. He’s filled the cavities between each 2×4 with stuffed animals and old clothes. The same is done in the walls and the inside surfaces are all covered in fabric to prevent echoing. The door has a lip and we can just make out what looks like weather stripping to provide a seal. There is just one opening in the box, where a PVC pipe allows electrical and microphone cables to pass through. [Brattonwvu] reports that you can hear your heartbeat in your ears when standing inside the sealed booth.

Reworking The Electronics For Better Computer Speaker Audio

[Michael Chen] liked the sound he was getting out of these Corsair SP2200 computer speakers, with one big exception. They were giving off some unpleasant crackling sounds. He figured this might be as easy as replacing a faulty potentiometer, but soon found out the fix was going to be more complicated than that. All said and done he ended up reworking the design of the speakers’ amplifier board.

The hardest part was identifying the problem. Once he had cracked open the case he found the volume potentiometer was working correctly by testing it with a multimeter. Next he inspected the board for bad solder joints but didn’t really find any. The breakthrough came when he realized that the crackling was also happening when he used headphones. With that discovery he started making a few more observations and realized that the crackling didn’t happen when the volume knob was all the way up or all the way down. There was an impedance issue between that potentiometer and the amplifier circuit. He rerouted the signal flow on the board to use the headphone amp as a filter and it fixed the problem. Fittingly, he’s entered this project into the Instructables Fix & Improve contest.

Developing A Better Way To Control 10,000 LEDs

The SoundPuddle project drives thousands of LEDs based on audio input. The team is working on a replacing the controller for this wire-filled setup with something more robust. They took the mess seen above to the Apogaea Festival and were plagued by loose wires and unreliable communications due to noise and interference. The aim of the new system is to reliably control up to 10,000 LEDs.

The red PCB seen at the center of the rats-nest is a Papilio FPGA board. They still want to use it to drive the installation, but a new hardware interface is necessary. The solution is to design what they call a megawing (wings are to Papilio as shields are to Arduino).  The LEDs will be in RGB strip form, so one of the requirements is to supply enough connectors to drive 16 channels of SPI devices. The wing will also include the 48V power source and connectors for the condenser microphone that serves as an input for the SoundPuddle. There are also two other options for audio input, one via a Bluetooth module (which can double as a control device) and the other via MIDI.

After the break you can see a lighting demo. Be ready with the volume controls as most of the sounds used in the test are quite annoying.

Continue reading “Developing A Better Way To Control 10,000 LEDs”

Adding Bluetooth Audio Playback To A Toyota Matrix

In this project [Ryan] shows how he added Bluetooth audio to the stock stereo of his Toyota Matrix. The work he did with his add-on hardware is quite good. And the installation was surprisingly easy. For example, the dashboard bezel which is hanging in the foreground of this picture simply pulls off without the need for any tools. Also, the CD changer input for the stereo is what he uses to patch into the system. It just happened to have a 0.1″ pin header so finding a connector that would work wasn’t a problem.

As for the add-on hardware, he built his own circuit board around an ATmega168 microcontroller and Bluegiga WT32 Bluetooth module. To connect to the car’s data system he went with an RS485 driver chip. It’s not quite the right part but it works well enough for his purposes. So far he can get audio playback working and plans to add support for hands free phone calls and displaying audio track information. Hey, maybe he’ll even add some extra shake-based automation; who knows?

Get a look at the install in the clip after the break.

Continue reading “Adding Bluetooth Audio Playback To A Toyota Matrix”

Ti Chronos Watch Controls Raspberry Pi

[Mike Field] was working on interfacing his TI Chronos eZ430 watch with the Raspberry Pi. As things were going pretty well, he took a side-trip from his intended hack and implemented watch-based control for an RPi audio player.

It really comes as no surprise that this is possible, and even easy. After all, the RPi board has native USB capability for hosting the watch‘s RF dongle, and it’s running Linux which we know already works well with the Chronos platform. But we still love the thought of having automation controls strapped to our wrist!

mpg321 is the audio playback program used for this hack. It plays MP3 files using ALSA for sound, which does have a few hiccups on the RPi. [Mike] found workarounds and included them in the C program he uses to gather everything into one nice code package. Control depends on keypresses sent from the watch (meant for use with PowerPoint) which are translated by his code and pushed to the audio/mp3 programs.