This excellent content from the Hackaday writing crew highlights recurring topics and popular series like Linux-Fu, 3D-Printering, Hackaday Links, This Week in Security, Inputs of Interest, Profiles in Science, Retrotechtacular, Ask Hackaday, Teardowns, Reviews, and many more.
There are dozens of different 3D printable cases out there for the Raspberry Pi, but the BeagleBone Black, as useful as it is, doesn’t have as many options. The folks at 3D hubs thought they could solve this with a portable electronics lab for the BBB. It opens like a book, fits a half-size breadboard inside, and looks very cool.
There’s a box somewhere in your attic, basement, or garage filled with IDE cables. Wouldn’t they be useful for projects? Yep, only not all the wires work; some are grounds tied together, some are not wired straight through, and some are missing. [esot.eric] has the definitive guide for 80-wire IDE cables.
Like case mods? Here’s a golden apple, made out of walnut. Yes, there are better woods he could have used. It’s a wooden replica of a Mac 128 with a Mac Mini and LCD stuffed inside. Want a video? Here you go.
If you have a 3D printer, you’re probably familiar with PEEK. It’s the plastic used as a thermal break in non-all-metal hotends. Now it’s a filament. An extraordinarily expensive filament at €900 per kilogram. Printing temperature is 370°C, so you’ll need an all-metal hotend.
It’s the Kickstarter that just keeps going and going and going. That’s not a bad thing, though: there really isn’t much of a market for new Amiga 1200 cases. We’ve featured this project before, but the last time was unsuccessful. Now, with seven days left and just over $14k to go, it might make it this time.
Sometimes wheels just don’t cut it. When the going gets tough, the tough make tracks. Continuous track drive systems – aka tank treads, or tracks, have been around for centuries. The first known use in relatively modern history is a system designed in 1770’s by [Richard Lovell Edgeworth]. Since then there has been a slew of engineers, hackers, and makers who have contributed to this versatile drive system. Today, tread systems find their way into plenty of robotics and transportation projects. This week’s Hacklet is all about some of the best track drive projects on Hackaday.io!
We start with [jupdyke] and Modular Continuous Track System. [Jupdyke] has made a project out of making the tracks themselves. These tracks are strong – shore 70A urethane rubber is no joke! Quite a bit of research and experimentation has gone into this project. [Jupdyke] started with 3D printed parts, before moving on to molded 2 part rubber. The rubber is cast in custom machined aluminum molds. The molds are even heated to ensure a quality casting. Rubber alone doesn’t make a track though. The backbone of these tracks are machined steel pins. The pins go through the treads and connect through roller chain components. We’re betting a set of these tracks could easily carry a person!
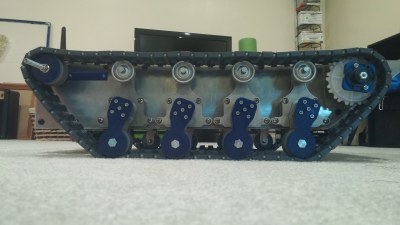
Next up is [williamg42] with Expandable Ruggedized Robotic Platform. [Williamg42] describes this vehicle as “able to operate in harsh environments”. We would shorten that to “It’s a beast”. Some incredible machine work has gone into this robot, especially on the suspension and idler wheels. Everything is made of metal – the frame is 8020 aluminum extrusion covered in plates. The suspension is aluminum and steel. Motors are mini-CIM motors. This robot isn’t lacking on brains, as a BeagleBone black controls it through a custom cape board. Next time we go out on a desert trek, we want this ‘bot at our side!
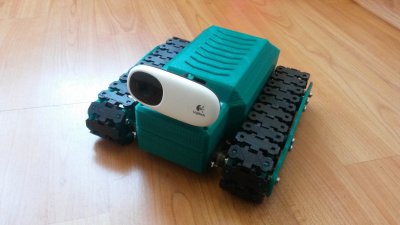
From the mind of [TinHead] comes TTBN Alpha, a TelePresence robot. TTBN alpha is based on a Raspberry Pi. Rather than start with Raspbian, [TinHead] built his own lightweight Linux distribution with buildroot. Control is through a web interface. The operator’s view of the world is through the electronic eye of a Logitech C110 webcam. [TinHead] printed his own tracks, using straightened paperclips as pins. Two servos modified for continuous rotation serve as the main drive motors.
Finally we have [Hendra Kusumah] with Surveillance Robot Camera (SUROCAM). SUROCAM was [Hendra’s] project for both the 2014 and 2015 Hackaday Prize. The chassis is based upon the common RP5 robot kit. This robot’s DC motors are driven by the classic L298n driver chip. Unlike TTBN Alpha above, SUROCAM uses a full Raspbian install, so this Pi is ready for anything. The code is written in Python, and pagekite and ngrok to help make connections to the outside world.
If you want to see more tank treaded rovers, check out our new tracked projects list. Did I miss your project? Don’t be shy, just drop me a message on Hackaday.io. That’s it for this week’s Hacklet; As always, see you next week. Same hack time, same hack channel, bringing you the best of Hackaday.io!
In the last Hacking and Kids post, I talked about an activity you can do with kids when you don’t have a lot of time or resources. The key idea was to have fun and learn a little bit about open and closed loop control. One of the things I usually briefly mention when I do that is the idea of a design trade: Why, for example, a robot might use wheels instead of legs, or treads instead of wheels.
Engineers and makers perform trades like this all the time. Suppose you are building a data logging system. You want precise samples, large storage capacity, and many channels. But you also want a low cost and low power drain. You might also want high reliability. All of these requirements will lead to different trades. A hard drive would provide a lot of space, but is more expensive, less reliable, larger, and more power hungry than, say, an SD card. So there isn’t a right choice. It depends on which of the factors are most important for this particular design. A data logger in a well-powered rack might be well served to have a terrabyte hard drive, while a battery powered logger in a matchbox that will be up on the side of a mountain might be better off with an SD card.
We can all relate to that example, but it is pretty boring to a kid. You probably can’t get them to design a data logger, anyway. But if I have about an hour and a little prep time, I have a different way to get the same point across. It is a modified version of the classic “egg drop”, but it is simple enough to do in an hour with very little preparation time.
Although there are many skilled and dedicated types of health care professionals, nurses are often the main point of contact between the medical establishment and a patient. You will probably spend more time with your nurse–especially in a hospital setting–than any other health care provider. Every patient’s needs are different, so it isn’t surprising that nurses sometimes improvise unique solutions to help their patients be more comfortable or recover faster.
That’s the idea guiding an innovative program called MakerNurse–an initiative backed by MIT and the Robert W. Johnson Foundation. The idea is to encourage nurses to be makers. One of the project’s cofounders, Anna Young, had found nurses in Central America making do with what they had on hand and naturally acting as makers. “We saw a nurse repair a stethoscope diaphragm with an overhead transparency,” she said. Young noted that often nurses didn’t realize the significance of their making–it was just how they got through the day.
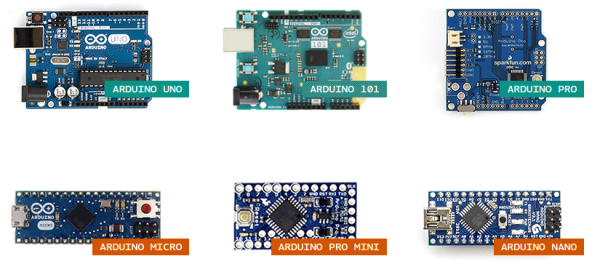
For over ten years, Arduino has held onto its popularity as “that small dev-board aimed to get both artists and electronics enthusiasts excited about physical computing.” Along the way, it’s found a corner in college courses, one-off burning man rigs, and countless projects that have landed here. Without a doubt, the Arduino has a cushy home among hobbyists, but it also lives elsewhere. Arduino lives in engineering design labs as consumer products move from feature iterations into user testing. It’s in the chem labs when scientists need to get some sensor data into their pc in a pinch. Despite the frowns we’ll see when someone blinks an LED with an Arduino and puts it into a project box, Arduino is here to stay. I thought I’d dig a little bit deeper into why both artists and engineers keep revisiting this board so much.
Arduino, do we actually love to hate it?
It’s not unusual for the seasoned engineers to cast some glares towards the latest Arduino-based cat-feeding Kickstarter, shamelessly hiding the actual Arduino board inside that 3D-printed enclosure. Hasty? Sure. Crude, or unpolished? Certainly. Worth selling? Well, that depends on the standards of the consumer. Nevertheless, those exact same critical engineers might also be kicking around ideas for their next Burning Man Persistence-of-Vision LED display–and guess what? It’s got an Arduino for brains! What may seem like hypocrisy is actually perfectly reasonable. In both cases, each designer is using Arduino for what it does best: abstracting away the gritty details so that designs can happen quickly. How? The magic (or not) of hardware abstraction.
Meet HAL, the Hardware-Abstraction Layer
In a world where “we just want to get things blinking,” Arduino has a few nifty out-of-the-box features that get us up-and-running quickly. Sure, development tools are cross-platform. Sure, programming happens over a convenient usb interface. None of these features, however, can rival Arduino’s greatest strength, the Hardware Abstraction Layer (HAL).
A HAL is nothing new in the embedded world, but simply having one can make a world of difference, one that can enable both the artist and the embedded engineer to achieve the same end goal of both quickly and programmatically interacting with the physical world through a microcontroller. In Arduino, the HAL is nothing more than the collection of classes and function calls that overlay on top of the C++ programming language and, in a sense, “turn it into the Arduino programming language” (I know, there is no Arduino Language). If you’re curious as to how these functions are implemented, take a peek at the AVR directory in Arduino’s source code.
With a hardware abstraction layer, we don’t need to know the details about how our program’s function calls translate to various peripherals available on the Uno’s ATMEGA328p chip. We don’t need to know how data was received when Serial.available() is true. We don’t “need to know” if Wire.begin() is using 7-bit addressing or 10-bit addressing for slave devices. The copious amounts of setup needed to make these high-level calls possible is already taken care of for us through the HAL. The result? We save time reading the chip’s datasheet, writing helper functions to enable chip features, and learning about unique characteristics and quirks of our microcontroller if we’re just trying to perform some simple interaction with the physical world.
Cross-Platform Compatibility
Teensy 3.2 keeps form factor but adds on-chip hardware features compared to 3.1
There are some cases where the HAL starts to break down. Maybe the microcontroller doesn’t have the necessary hardware to simultaneously drive 16 servos while polling a serial port and decoding serial data. In some cases, we can solve this issue by switching Arduino platforms. Maybe we actually do need three serial ports instead of one (Teensy 3.2). Maybe we do need pulse-width-modulation (PWM) capability on every pin (Due). Because of the hardware abstraction layer, the rest of the source code can remain mostly unchanged although we may be switching chip architectures and even compilers in the process! Of course, in an environment where developing code for the target platform does matter, it doesn’t make sense to go to such efforts to write the general-purpose code that we see in Arduino, or even use Arduino in the first place if it doesn’t have the necessary features needed for the target end-goal. Nevertheless, for producing an end-to-end solution where “the outcome matters but the road to getting there does not,” writing Arduino code saves time if the target hardware needs to change before getting to that end goal.
HAL’s drawbacks
Of course, there’s also a price to pay for such nice things like speedy development-time using the HAL, and sometimes switching platforms won’t fix the problem. First off, reading the Arduino programming language documentation doesn’t tell us anything about the limitations of the hardware it’s running on. What happens, let’s say, if the Serial data keeps arriving but we don’t read it with Serial.read() until hundreds of bytes have been sent across? What happens if we do need to talk to an I2C device that mandates 10-bit addressing? Without reading the original source code, we don’t know the answers to these questions. Second, if we choose to use the functions given to us through the HAL, we’re limited by their implementation, that is, of course, unless we want to change the source code of the core libraries. It turns out that the Serial class implements a 64-byte ring buffer to hold onto the most recently received serial data. Is 64 bytes big enough for our application? Unless we change the core library source code, we’ll have to use their implementation.
Both of the limitations above involve understanding how the original HAL works and than changing it by changing the Arduino core library source code. Despite that freedom, most people don’t customize it! This odd fact is a testament to how well the core libraries were written to suit the needs of their target audience (artists) and, hence, Arduino garnered a large audience of users.
Pros of Bare-Metalspeak
digitalWrite takes a whopping 52-55 cycles to change pin direction! [image source]Are there benefits to invoking the hardware directly? Absolutely. A few curious inquirers before us have measured the max pin-toggling frequency with digitalWrite to be on the order of ~100 KHz while manipulating the hardware directly results in a pin-toggling frequency of about 2 MHz, about 20 times faster. That said, is invoking the hardware directly worth it? Depends, but in many cases where tight timing isn’t a big deal and where the goal of a functional end-to-end system matters more than “how we got there,” then probably not! Of course, there are cases when tight timing does matter and an Arduino won’t make the cut, but in that case, it’s a job for the embedded engineer.
Use the HAL, Luke!
To achieve an end-to-end solution where the process of “how we got there” matters not, Arduino shines for many simple scenarios. Keep in mind that while the HAL keeps us from knowing too many details about our microcontroller that we’d otherwise find in the datasheet, I don’t proclaim that everyone throw out their datasheets from here on out. I am, however, a proponent of “knowing no more than you need to know to get the job done well.” If I’m trying to log some sensor data to a PC, and I discover I’ll be saving a few days reading a datasheet and configuring an SPI port because someone already wrote SPI.begin(), I’ll take an Arduino, please.
If you’ve rolled up your sleeves and pulled out an Arduino as your first option at work, we’d love to hear what uses you’ve come up with beyond the occasional side-project. Let us know in the comments below.
Halloween is coming, and that means dressing children up as pirates, fairies, characters from the latest Marvel and Disney movies, and electrolytic capacitors.
There’s a new movie on [Steve Jobs]. It’s called the Jobs S. It’s a major upgrade of the previous release, featuring a faster processor and more retinas. One more thing. Someone is trying to cash in on [Woz]’s work. This time it’s an auction for a complete Apple I that’s expected to go for $770,000 USD.
Hackaday community member [John McLear] is giving away the factory seconds of his original NFC ring (think jewelry). These still work but failed QA for small reasons and will be fun to hack around on. You pay shipping which starts at £60 for 50 rings. We’ve grabbed enough of them to include in the goody bags for the Hackaday Superconference. If you have an event coming up, getting everyone hacking on NFC is an interesting activity. If you don’t want 50+, [John] is also in the middle of a Kickstarter for an improved version.
Your 3D printed parts will rarely come out perfectly. There will always be some strings or scars from removing them from the bed. There’s a solution to these problems: use a hot air gun.
Everyone has a plumbus in their home, but how do they do it? First, they take the dinglebop, and smooth it out with a bunch of schleem. The schleem is then repurposed for later batches.
Over 750,000 people pass through New York City’s Grand Central Terminal each day. Located in the heart of the city, it’s one of the largest train stations in the world. Its historic significance dates back to 1913, when it opened its doors to the public. At the time, few were aware of the secret computer that sat deep in a sub basement below the hustle and bustle of the city’s busy travelers. Its existence was kept secret all the way into the 1980’s.
Westinghouse had designed a system that would allow authorities to locate a stuck train in a tunnel. There were cords stretched the length of the tunnels. If a train stalled, the operator could reach out and yank on the cord. This would set off an alarm that would alert everyone of the stuck train. The problem being that even though they knew a train was down, they did not know exactly where. And that’s where the computer come in. Westinghouse designed it to calculate where the train was, and write its location on some ticker tape.
So this is the part of the post where we tell you how the computer established where exactly the train breakdown occurred. Although the storyteller in the video is admirably enthusiastic about telling the story, our depth of detail on the engineering that went into this seems nowhere to be found. Let us know in the comments below if you have a source of more information. Or just post your own conjecture on how you would have done it with the early 20th century tech.
The invention of the two way radio made the whole thing obsolete not long after is was built. Never-the-less, it remains intact to this day.


 It’s not unusual for the seasoned engineers to cast some glares towards the latest Arduino-based cat-feeding Kickstarter, shamelessly hiding the actual Arduino board inside that 3D-printed enclosure. Hasty? Sure. Crude, or unpolished? Certainly. Worth selling? Well, that depends on the standards of the consumer. Nevertheless, those exact same critical engineers might also be kicking around ideas for their next Burning Man Persistence-of-Vision LED display–and guess what? It’s got an Arduino for brains! What may seem like hypocrisy is actually perfectly reasonable. In both cases, each designer is using Arduino for what it does best: abstracting away the gritty details so that designs can happen quickly. How? The magic (or not) of hardware abstraction.
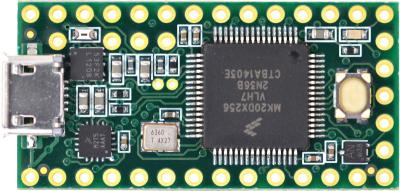
 Of course, there’s also a price to pay for such nice things like speedy development-time using the HAL, and sometimes switching platforms won’t fix the problem. First off, reading the Arduino programming language documentation doesn’t tell us anything about the limitations of the hardware it’s running on. What happens, let’s say, if the Serial data keeps arriving but we don’t read it with Serial.read() until hundreds of bytes have been sent across? What happens if we do need to talk to an I2C device that mandates 10-bit addressing? Without reading the original source code, we don’t know the answers to these questions. Second, if we choose to use the functions given to us through the HAL, we’re limited by their implementation, that is, of course, unless we want to change the source code of the core libraries. It turns out that the Serial class implements a 64-byte ring buffer to hold onto the most recently received serial data. Is 64 bytes big enough for our application? Unless we change the core library source code, we’ll have to use their implementation.
![digitalWrite takes a whopping 52-55 cycles to change pin direction! [image source]](https://hackaday.com/wp-content/uploads/2015/10/arduino-digital-write-pin-toggle.jpg?w=400)