Programming AVR I2C Interface

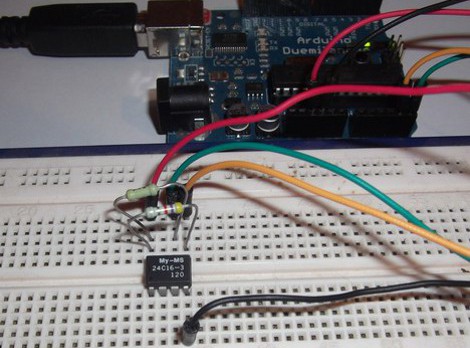
I2C as many of you know, is a simple serial interface for many peripheral devices to micro controllers, but it can quickly become confusing to people who may not be accustom to it. Because of that, I2C tutorials are always welcome, and this new tutorial by [Embedds] does an excellent job of how to use I2C with an AVR with a 24C16 2Kbyte EEPROM.

The first half of the tutorial provides a clear explanation of how I2C works, including its signal structure, addressing, and data packets. It then moves on to AVR territory showing how to setup the I2C in an AtMega micro controller. The author uses a pretty standard to most of us Arduino, with software written in AVR C and a nifty little GUI programming application which eases the hassle of dealing with AVRDude directly.

Plenty of code samples follow from twiddling registers to a full blown application reading and writing bits from the EEPROM to a serial terminal on a PC.

See Through Everything With A Home Made X-ray

[Grenadier] built his very own x-ray machine. He’s no stranger to high voltage – we’ve seen his Jacob’s Ladders and Marx generators. Surely he can handle himself with high voltage and dangerous equipment. With this portable x-ray machine, [Grenadier] has begun overloading Geiger counters. We’re just happy he knows what he’s doing.

The key component of [Grenadier]’s portable x-ray machine is the Coolidge tube, a simple vacuum tube that produces x-rays with the help of 75 kilovolts of power. The finished build looks awesome. Two meters display the milliamps and kilovolts going to the x-ray tube, and a trio of nixies display the exposure time.

Even though [Grenadier] doesn’t have x-ray film, he can see through things with a scintillation screen that fluoresces when exposed to ionizing radiation. There are two pictures of the x-ray in action – one showing the inside of a pen and the guts of a hard drive (as shown in the title pic).

The output of the x-ray was measured with a Geiger counter. [Grenadier] was able to get a hit every second or so at 50 yards, and very loud white noise at 1 foot. Check out the video of [Grenadier]’s Buildlounge laser cutter contest submission after the break.

via Buildlounge

Continue reading “See Through Everything With A Home Made X-ray”

So You Wanna Learn FPGAs…

FPGAs are the bee’s knees. Instead of programming a chip by telling it what to do, FPGAs allow you to tell a chip what to be. Like everything though, a new skill set is needed to fully exploit the power of FPGAs. [Mike Field] decided to give back to the internet community at large and put up a crash course in FPGA design.

Right now, [Mike] has a couple of modules up that include subjects like binary math, busses, counting, and of course setting up the FPGA hardware. The recommended hardware is the Papilio One, although the Digilent Nexys2 is what [Mike] has been using so far.

We’ve seen a ton of awesome stuff that uses FPGAs, like the emulated Mac Plus, breaking HDCP, and an Ocarina of Time. [Mike]’s tutorials look like a great starting point for some FPGA work. [Mike] is also looking for some feedback on his tutorials, so if you’ve got an idea of what he should cover be sure to drop him a line.

EDIT: The server was running on an FPGA and we can’t find a cache anywhere. If you’ve found a mirror, send a message. Apparently Amazon’s EC2 runs on an FPGA.

A Vacuum Chamber From A Pressure Cooker

[Allan] needed a small vacuum chamber to get all the air out of clear casting resin. Degassing is a simple step in casting that improves the finished product immensely. The problem, though, is building a vacuum chamber. [Allan]’s chamber seems easy enough to build, and pulls enough air out to get to 0.1 atmospheres.

After a hole was drilled in the side of the pressure cooker, [Allan] installed a 15mm “speedfit” plastic tank connector. The seal around the connector is neoprene self-adhesive foam. This foam was also taped around the lip of the pressure cooker for the top.

A thick-walled pressure cooker is more than capable of handling the outside pressure when under vacuum, but [Allan] cautions against using acrylic plastic for the top. Acrylic has the tendency to fail catastrophically, so he used a thick sheet of Lexan. Check out the demo video of [Allan] sucking the air out of shaving cream after the break.

Continue reading “A Vacuum Chamber From A Pressure Cooker”

Awesome Little UAV Flies 1 Km

After going to an SMD soldering workshop at the Stuttgart hackerspace ShackSpace, [Corvus] decided to be an over achiever and build a flight controller for his very own unmanned aerial vehicle.

The airplane itself is a regular store-bought foam contraption, and not terribly interesting in and of itself. Autonomous flight piques some interest, though. A custom flight controller PCB was designed and built by [Corvus] to work alongside a tiny STM32 Linux board. These two boards, combined with the OpenPilot project allow the plane to keep altitude, bearing, speed, and position in check autonomously. Telemetry between the ground station and vehicle is handled by UAVTalk and a ThinkPad.

In the video after the break, [Corvus] piloted the plane up to altitude, then directed it to fly 500 meters North and turn around. The result was an autonomous flight of over one kilometer. The next stage of the project is implementing some SLAM applications with optical path finding and obstacle avoidance.

Continue reading “Awesome Little UAV Flies 1 Km”

Ethernet Controlled Garage Door

[Thomas]’ garage door opener is a big old industrial unit, so he doesn’t have the convenience of a remote-controlled garage door opener.  Obviously, this would get annoying after a while, so [Thomas] decided to build an Ethernet enabled relay board so he can open his door with his iPhone.

The build is based around an ATMega328 and a neat little Ethernet controller from Microchip. There are two relays on the board that connect to the Up and Down buttons on the door opener. The board receives UDP packets with instructions like, ‘RELAY 2 ON’ and the door responds accordingly.

Building just one of his boards cost [Thomas] the meager sum of $43. Considering the new Arduino Ethernet board costs around $60, we’re thinking he did a good job here. From the video after the break, we’re seeing that [Thomas] has to hold the button on his iPhone down for the door to go up. We see a few more pins on his AVR, so perhaps v.2 of his board could contain a few headers to attach sensors. Still, it’s a very nice build.

Continue reading “Ethernet Controlled Garage Door”

A Keyboard For Your FIGnition

[Carl] sent in his keyboard he made for his FIGnition microcomputer. At least now he has more than 8 buttons.

The FIGnition is a tiny little microcomputer that harkens back to the 8-bit days of yore. Designed to be an educational computer like the Altair or Heathkit (sans blinkenlights), the FIGnition gives its students ‘bare metal’ access to everything in the system. It’s powered by an ATMega168, a 4 Kb SRAM and an 8Mb Flash chip for storage. Unfortunately, the FIGnition only has 8 buttons to program Forth with, so [Carl]’s project is very much desired in the community.

To expand 8 buttons into an alpha-numeric keyboard, [Carl] came up with the solution of using two tact switches per character. The switches are of different button heights, so pressing a pair of buttons actuates the two buttons in order, which is natively interpreted by the FIGnition. It’s a perfect match for the chord-keys of the FIGnition.

Check out the video of [Carl]’s bundle of wires after the break.

Continue reading “A Keyboard For Your FIGnition”