Working all year long, herding elves and fabricating toys for all the good boys and girls; it takes dedication. It’s only natural that one could fall behind in beard care, right? This year, [Norbert Zare] saves Christmas with his beard-combing robot.
OK, this is much more of a shitty robot in the [Simone Giertz] school of wicked funny machines than it is a serious robotics project. But props to [Norbert] for completeness — the code that wiggles the two servos that get the job (almost) done is even posted up on GitHub.
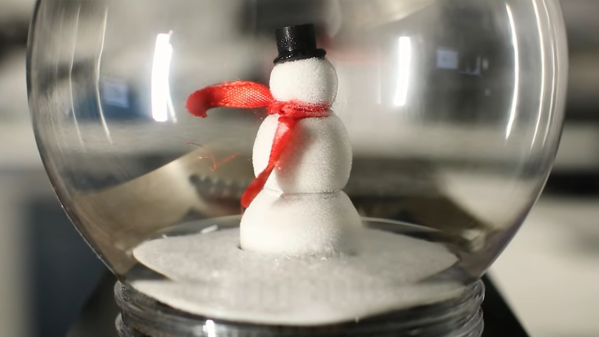
We doubt that few of us ever thought that snow globes contain real snow, but now that we’ve seen a snow globe that makes its own snow, we have to admit the water-filled holiday decorating mainstay looks a little disappointing.
Like a lot of the Christmas decorations [Sean Hodgins] has come up with over the years, this self-frosting snowman is both clever in design and cute in execution. The working end is a piece of aluminum turned down into the classic snowman configuration; the lathe-less could probably do the same thing by sticking some ball bearings together with CA glue. Adorned with 3D-printed accessories, the sculpture sits on a pedestal of Peltier coolers, stacked on top of a big CPU cooler. Flanking the as-yet underdressed snowman is a pair of big power resistors, which serve as heating elements to fill the globe with vapor. [Sean]’s liquid of choice is isopropyl alcohol, and it seems to work very well as the figurine is quickly enrobed with frost.
As we approach the moment in the year at which websites enter a festive silly season of scrambling to find any story with a festive angle, we’re pleased to see the ever-reliable [Ken Shirriff] has brought his own take on Christmas tech to the table with a decapping of the UM66T melody chip that has graced so many musical greeting cards.
The surprise in this age of ubiquitous microcontrollers is that this is not a smart device; instead it’s a single-purpose logic chip whose purpose is to step through a small ROM containing note values and durations, driving a frequency generator to produce the notes themselves. The frequency generator isn’t the divider chain from the RC oscillator that we might expect, instead it’s a shift register arrangement which saves on the transistor count.
Although the UM66 is a three-pin device, there are a few other pins on the die. These are likely to be for testing. As a 30+ year old product its design may be outdated in 2021, but it’s one of those chips that has survived without being superseded because it does its task without the need for improvement. So when you open a card and hear the tinny tones of a piezo speaker this holiday season, spare a thought for the ingenuity of the design behind the chip that makes it all possible.
Lithophanes are neat little artistic creations that use variations in the thickness of a material to reveal an image when lit from behind. 3D printing is a great way to make lithophanes, and they can make for beautiful Christmas decorations, too!
It’s easy to make lithophane decorations for your Christmas tree with the help of the ItsLitho tool. The online application takes any image you upload, and can generate lithophane geometry that you can 3D print at home. Print your custom bell or bauble, add the printed hooks, and then the final decoration can be backlit to reveal its image by inserting an LED from a string of Christmas lights.
The result is a beautiful, glowing decoration that displays a detailed image when lit up. All you need is a few images and a 3D printer to produce decorations as unique gifts for your family and friends.
We’ve seen the technique put to other uses too, such as in this convincing lamp designed after our very own Moon. Video after the break.
The festive season is often as good a reason as any to get out the tools and whip up a fun little project. [Simon] wanted a little tchotchke to give out for the holidays, so they whipped up a Christmas tree PCB that’s actually Arduino-compatible.
O’ Christmas Tree, on PCB…
It’s a forward-looking project, complete with USB-C connector, future-proofing it for some time until yet another connector standard comes along. When plugged in, like many similar projects, it blinks some APA102 LEDs in a festive way. The PCB joins in on the fun, with white silkscreen baubles augmented by golden ones created by gaps in the soldermask.
An ATTiny167 is the brains of the operation, using the Micronucleus bootloader in a similar configuration to the DigiSpark Pro development board. It relies on a bit-banged low-speed USB interface for programming, but the functionality is largely transparent to the end user. It can readily be programmed from within the Arduino IDE.
It’s not an advanced project by any means, but is a cute giveaway piece which can make a good impression in much the same way as a fancy PCB business card. It could also serve as an easy tool for introducing new makers to working with addressable LEDs. Meanwhile, if you’ve been cooking up your own holiday projects in the lab, don’t hesitate to drop us a line!
The festive season is upon us, and for Brits of a technical bent that means it’s time for the GCHQ Christmas Challenge. Sent out annually as part of the Christmas card from the UK’s intelligence centre, this is a chance for would-be spooks to pit their wits against some of the nation’s cleverest cryptologists whose work you’ll never have heard of.
This year the puzzle is aimed at those with a secondary school education, in the hope of fostering an interest in maths and science in younger people. It’s a series of puzzles of ascending difficulty, but don’t be lulled into a false sense of security by the earlier ones being easy, to complete the set will still require some brain power.
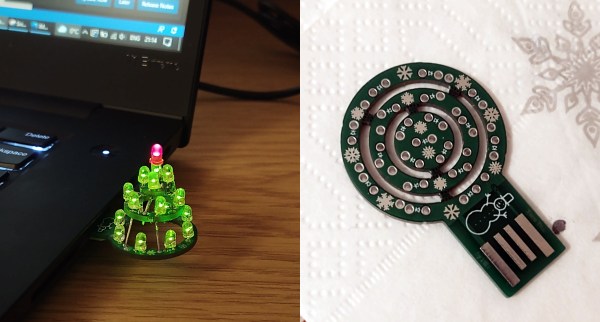
[Piotr SB] knows there is no way out of the holidays; the only path is through. You’ve got to find cheer wherever and however you can, so why not cater to your own interests and build the cutest little LED Christmas tree you ever did see? And did we mention it’s USB and absolutely free (as in carols, not eggnog)?
This O-Christmas tree is made up of concentric rings that are built into a tier as you solder the LEDs. And of course you’re supposed use the LED legs as supports! One leg from each LED — 18 green and a red one for the top. Because the PCB is not quite thick enough, you’ll need to add a plastic spacer to get it to stay in the USB port. Not only is this a nice design, the snowflakes and snowman on the silkscreen totally seal the cuteness deal.


 The surprise in this age of ubiquitous microcontrollers is that this is not a smart device; instead it’s a single-purpose logic chip whose purpose is to step through a small ROM containing note values and durations, driving a frequency generator to produce the notes themselves. The frequency generator isn’t the divider chain from the RC oscillator that we might expect, instead it’s a shift register arrangement which saves on the transistor count.