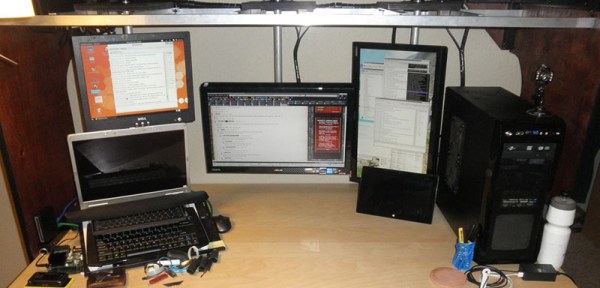
Upgrading Home Automation To Home Anticipation

geofencingHomeAnticipation

[Bithead’s] already built some home automation to control the lighting and temperature in his house while he’s away, but he wanted to take things a step further and have the house automatically anticipate his arrival and adjust the environment accordingly. The project takes advantage of geofencing to create a perimeter around the home that listens for a transceiver in [Bithead’s] car. We featured a similar project with a Raspi a few months ago, which locked the doors upon driving away.

[Bithead’s] implementation uses a pair of Digi Xbee Pro XSC radios with U.FL antennas to provide an impressive 2+ mile range of communication. The home-based Xbee hooks up to a Parallax Xbee USB adapter and subsequently into his computer—its antenna sits in a nearby window on the top floor of his house to maximize range. For his car, [Bithead] originally opted for an Xbee shield and an Arduino Uno, but he’s recently overhauled the build in favor of an Arduino Fio, which reduced the footprint and increased the range. Check out his page for the build log specifics and more pictures.

Hidden Pantry Compartment Opens With A Puzzle!

winerack

What’s the number one thing kids always dream about for when they have their own house someday? Hidden passages? Revolving bookcases? Closets that lead to Narnia? Secret compartments? Well, [TracRat] has lived out at least one of those dreams by making his very own Myst inspired hidden pantry compartment!

His pantry is located under the stairs and to make use of the awkward space, he decided to build a wine rack. He still had a lot of unused space so he decided to take it a step further. He’s built a wooden puzzle combination lock consisting of four colored knobs that slide back and forth in grooves. When the correct combination is made, pressing on the square symbol at the top rolls the entire wine rack backwards, exposing a secret side cabinet. It’s an absolutely gorgeous piece of woodwork and we’re totally impressed by the perfect execution of it.

Do you love Myst too? Check out this awesome Myst inspired Myst(ery) box [Michael] made for his girlfriend’s birthday! Or how about a leather-bound Myst book that lets you play Myst on a computer inside of it!

Kitchen Computer Hides In Pantry Door

hidden-kitchen-pantry-computer

You might look at the images above and think “oh neat” and then go about your business. But you’d be missing a great motorized hidden computer build. We simply must insist that you click on that link and look at all that went into it. Do it. DO. IT.

Still here? Okay, we’ll give you the gist and then you won’t be able to help yourself. First off, [Designforhire] built that door completely from scratch using skills that your average hacker wields. At first glance you’d think it was a retrofit or done with serious woodworking tools (quality table saw, router table, etc.). This actually started with a simple frame out of 2″x3″ pine studs. This is faced with Masonite which was affixed with glue and brads. From there the upper half was outfitted with a dry-erase panel, and trim pieces were added.

Now the hack really starts to get interesting. The opening for the monitor and the keyboard are both motorized. An old cordless drill (borked handle and dead battery) was cannibalized for its motor which is run using the two black switches just above the left corner of the monitor. When closed, a dry-erase calendar covers the monitor and a blank panel keeps the keyboard secret. The computer itself is actually in the basement, with cables running down the hinged side of the door and through a hole in the jamb.

We didn’t see a video showing off the build, but you can satisfy that craving by looking back at the Kitchen HAL installation from a few years back.

The K9 Curfew Door

[Kenbob] is an awesome pet owner. He has two small dogs that have free access to the backyard through a doggy door. It’s great during the day, but they have to close it at night to stop the dogs from bothering the neighbors. So he decided to make an automatic curfew based doggy door!

Before setting out on his project, he determined some design goals that had to be met. Namely, he couldn’t have it lock the dogs outside by accident! The hack makes use of an old large format flat-bed scanner that had stopped working a while ago. As it so happened, this scanner had just enough carriage travel to be able to actuate a cover for the doggy door. After reinforcing the sliding cover, he hooked it up to an Arduino Nano, a RTC and a H-Bridge motor driver in order to control it.

In order to add scheduling ability and to program the door remotely, he has also hooked it into his existing x10 control infrastructure in his house — not too shabby! It also features a manual 3-position switch to lock it open, closed, or to leave it on automatic. The question is, can a raccoon get in?

He’s been testing it for a few weeks and it works quite well, although he admits it is not the most rugged solution — lucky for him, his dogs aren’t the type to run headfirst into things. Stick around after the break to see it in action.

Continue reading “The K9 Curfew Door”

Stealth Camper Van

Sometimes you need to sleep where you’re not supposed to. In this case, [MisterE] wanted to cut the costs associated with his climbing trips. He took a 2001 GMC Savana cargo van and turned it into a stealthy mobile living space. The project is from back in 2008 and we almost waved off from featuring it. But when you start to look at all of the creative space-saving solutions in the hack we think you’ll agree it’s worth a look.

Since he’s a climber that means time in the mountains, which can be quite cold. The sides and floor of the van were insulated to about R19 before the build work itself started and there’s a small wall-mounted heater. For comfort, a fouton was a must for sleeping but also for its double use as a sofa. For style the only choice here was bead-board to cover all of the walls. There is a small kitchenette that is mainly just a sink (we’ve seen running water in vehicles before). A couple of extra batteries power all of the electronics: audio, laptop, etc. When asked, [MisterE] confirms that he added hidden storage areas for his more pricey gear. Total cost on the project came it at $11,500. About nine for the van and the rest for improvements.

He mentions he blew an inverter because of grounding issues while starting the van. As long as he turns it off before start-up he’s fine. Shouldn’t there be a better way to build protection into this? Please leave a comment after the break and let us know what you’d do differently.

[Thanks Mac]

CFL + Bugzapper = Battery Operated Camping Light

CFLBugzapper_01_20

Knowing different ways of generating light is a great skill to have, so go ahead and add this one to your arsenal by combining a Bugzapper with a CFL Light Bulb.

Sure a CFL(Compact Fluorescent Lamp) works just fine on its own if you have AC mains, but what we’re talking about here is getting the light bulb to work off of a single D battery. We featured a similar hack a few months back by using a Joule-Thief to get the high voltage for the fluorescent tube, but if you can’t get your hands on discrete components, [Jan] shows us another way by gutting a tennis racket bugzapper for its booster board. Knowing that the bugzapper steps up the 3V to about 2000V, he decided to see if that same circuit would run off a single 1.5V D battery and achieve the voltage required to drive a CFL tube. After carefully removing the electronics from the CFL housing, [Jan] was able to directly connect the booster board to the electrode wires of the fluorescent tube, and voila; he now has a D-Battery operated camp light that has a run time of over 200 hours.

It would be interesting to see how this hack compares to the Joule-Thief method in terms of brightness and run-time. Before you go and scrap the parts out of the CFL light bulb, make sure you check out this detailed breakdown of popular CFL light bulbs.

DIY Pipe Freezing Kit

Have you ever needed to freeze a water pipe to do a quick plumbing job without shutting off all the water? It’s actually a fairly common practice for contractors, except they use a rather expensive tool to do it. As it turns out, there’s actually a fairly cheap and easy DIY solution you can do with minimal supplies or experience.

[Go Repairs] shows us that all you need is some pipe insulation (or a large sponge), a plastic bag, two zip-ties, and a air duster can. Wrap the insulation and plastic bag around the pipe, and zip-tie it in place. Holding the air duster can upside down, release the majority of the contents into the insulation. Congratulations, you’ve just frozen your pipe. Continue reading “DIY Pipe Freezing Kit”