Real-Time Thermal Projection Saves Your Tastebuds From The Hot Stuff

With another wave of holiday parties about to land on our doorstep, we still haven’t found a great way to stop scalding our tongues each time [Uncle Dave] pours us an enticing cup of boiling cocoa.

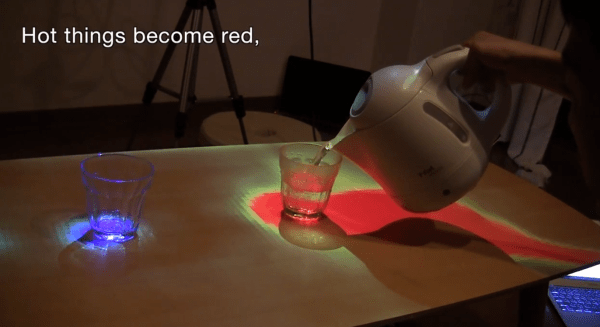
Thankfully, [Ken] has both you and your holiday guests covered with a clever trick that takes the data from a FLIR ONE and projects a heat profile onto the surface it’s observing. Here, [Ken] has superimposed his FLIR ONE data onto his kitchen table, and he’s able to visualize 2D heat profiles in near-real-time.

If you haven’t started quantifying yourself recently (and what are you waiting for?), the FLIR ONE is yet another opportunity to help you become more aware of your surroundings than you are now. It’s a thermal camera attachment for your iPhone, allowing you to see into the infrared band and look at the world in terms of heat. We’ve covered the FLIR ONE before, and we’ve seen ways of making it both clearer and more hacker-friendly.

As we tip our hats to [Ken], we’d say he’s a generous fellow. This hack is a clever inversion of the normal use case where you might whip out your FLIR-ONE-enabled iPhone and warn your cousins not to try the hot chocolate for a few more minutes. With [Ken’s] solution, the data is right there on your condiments and in plain sight of everyone, not just for you with your sweet, Star-Trek-augmented iPhone.

Continue reading “Real-Time Thermal Projection Saves Your Tastebuds From The Hot Stuff”

Connected Thermostat

Raspberry PiPhone Thermostat Monitors Your Entire House — Or At Least That’s The Plan

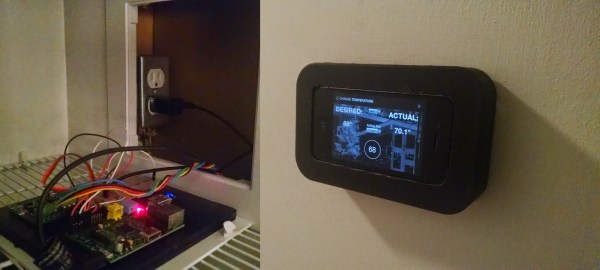
[Jeff McGehee] or how he likes to be known, [The Nooganeer] just finished his first big tech project after finishing grad school. It’s a connected thermostat that makes use of his old iPhone 4, and a Raspberry Pi.

Ever since [The Nooganeer] bought his first home with his wife back in the spring of 2014, he’s had ever consuming dream of adding home automation to every appliance. As he puts it…

Home automation has always been a fascination of mine.  How much time and irritation would I save if I didn’t have to worry about turning things on and off, or wonder in which state they were left?  How much more efficient would my home be?  Wouldn’t it be cool to always know the state of every power consumer in my home, and then be able to record and analyze that data as well?

His first challenge was making a smart thermostat — after all, heating and cooling your house typically takes the most energy. Having used a Raspberry Pi before he figured it would be the best brain for his system. After researching a bit about HVAC wiring, [The Nooganeer] settled on a Makeatronics Solid State Relay board to control the HVAC. This allows him to use the GPIO’s on the Raspberry Pi in order to control the furnace and AC unit.  Continue reading “Raspberry PiPhone Thermostat Monitors Your Entire House — Or At Least That’s The Plan”

iPhone trace repair

Using The Wrong Screw: A Painful Lesson In IPhone Repair

If you’ve ever had to repair an iPhone for a friend, you’ll know they have a ridiculous number of screws. Most companies standardize screws in their products, but since Apple doesn’t expect you to fix a phone yourself… they may have let this one slide.

You see, each of these screws is different.iPhone screws The red ones are 1.7mm long, the yellow one, 1.3mm, and the orange one, 1.2mm.

Guess what happens if you install either red or yellow screws into the orange spot, since your eyesight isn’t good enough to notice a 0.1mm difference? The screw will cut into the PCB and break several 50 micron traces, as shown in the picture above, causing a blue screen error on the phone.

Fun stuff.

[Sam Schmidt] is the owner of a repair outfit called iRepairNational, and he and his team spent a day trying to figure out the problem – it’s not exactly easy to spot. They’ve managed to repair it by cutting thin strips  of copper foil (the width of a human hair) and floating it into place using the surface tension of the flux they were using for soldering. On average it takes them around 2 hours to do the repair, though they’ve done a few in just under an hour.

Since discovering and sharing the problem, they’ve had customers around the world sending in phones for repair – often at the fault of someone else trying to repair something completely different in the phone, and then using the wrong screw as they put it all back together.

Counterfeit Apple Charger

More Counterfeit Apple Chargers Than You Can Shake An IPod At

Phones, MP3 players, designer bags, artwork, money…. anything with value will bring out the counterfeiters looking to make a quick buck. Sometimes the product being counterfeited isn’t even necessarily expensive. For example, an Apple iPad Charger. [Ken Shirriff] got a hold of a counterfeit iPad Charger, took it apart, and did some testing.

So why would someone buy a counterfeit product? To save some money! The counterfeits are usually cheaper to reel the potential buyer in thinking they are getting a deal. In this case, the Apple product costs $19 and the knock-off is $3, that’s a huge difference.

Continue reading “More Counterfeit Apple Chargers Than You Can Shake An IPod At”

Don’t Just Go Sticking That Anywhere: Protect The Precious With A USB Wrapper

Oooh, look, a public charging station. Should you trust it? You might get juice jacked. Oh wait, you’ve got a USB Wrapper designed by [Scasagrande] to deny access to your datas.

This project was inspired by the USB Condom, but the problem with those is that they completely cut out the data lines and limit the charge rate to USB 2.0 (500mA). The data lines are used to communicate information about the charger’s power sourcing capabilities to the device. Many manufacturers short D+ and D- together, but Apple applies specific voltages to those lines.

[Scasagrande]’s USB Wrapper gives you options. You can set it to Dedicated Charging Port, Sony, Open Circuit, or Apple. The super-cool part of this hack is for you Apple fanboys. The bottom slider lets you emulate any Apple charger and use any USB cube (including one you may have made) as long as you have that funny cable in your messenger bag.  The hardware is open source and available at [Scasagrande]’s repo.

Make the jump to see [Scasagrande]’s nicely detailed video about the project.

Continue reading “Don’t Just Go Sticking That Anywhere: Protect The Precious With A USB Wrapper”

HackPhx Winter 2014 Hackathon Winners

HackPhx 2014

The HackPhx Winter 2014 hackathon was held at Heatsync Labs hackerspace in Mesa, Arizona, USA. The advertised theme was “Arduino Wearables”. Participating attendees were randomly placed on teams evenly distributed by their disclosed skills across all teams. There were 10 teams with 4 to 5 members per team competing for two winning spots.

Each team had to build an amazing wearable project utilizing the secret ingredient which was Seedstudio’s Arduino-compatible Xadow wearable platform and add-ons. The Xadow is similar to the Arduino Leonardo and participants used an Arduino cross compatibility and pin mapping chart to assist in development.

Top prize was the Judges’ prizes for the best completed and documented Xadow wearable team project. The second prize was the Jury’s prize given to the team project that the other teams liked the most regardless of event criteria.

Read more about the winning teams and watch their presentations after the break.

Continue reading “HackPhx Winter 2014 Hackathon Winners”

Use Your Smartphone As A Microscope For Less Than $10

FY4TBHSHMMFBB4V.LARGE[Yoshinok] recently posted an Instructable on doing a $10 smartphone-to-microscope conversion. The hack isn’t so much a conversion as just a handy jig, but it’s still interesting. The basic idea is to set up a platform for the slides, and to mount the smartphone directly above. The trick, and the reason this can be called a microscope, is that [Yoshinok] embeds the lens from a cheap laser pointer into the smartphone holder. He is able to get 40x optical magnification with the lens, and even though it sacrifices quality, he uses the built-in digital zoom to get up to 175x magnification.

By itself, you could use this with a light source to magnify 3D objects. [Yoshinok] demonstrates this with a dime. But since the slide holder is made of clear acrylic, he mounted a cheap LED flashlight in the base to serve as through-sample lighting. Using this setup, he was able to observe the process of plasmolysis.

If you have kids, this is certainly a project to do with them, but we can’t help but think it will be useful for non-parents alike. This sort of magnification is good enough for simple lab experiments, and given that most Hack-a-Day readers have these parts lying around, we figure the cost is closer to $0. If you give it a try, let us know your results in the comments!

Continue reading “Use Your Smartphone As A Microscope For Less Than $10”