Hackaday Logo Projector From A Single LED

Here’s another Trinket Contest entry that was interesting enough for its own feature. [Adam] made his own Hackaday version of the Bat signal. It’s not nearly as big, but the concept is the same. Using this single modified LED he’s able to project a 12″ image that seems quite well-defined (more pictures below).

The LED is one he pulled from an old flashlight. After sanding the dome flat he made a jig which positioned it inside of his laser cutter. From there he etched the 0.1″ logo and filled the negative space with some ink. The remaining surface was polished to help the light shine through, then positioned in front of a jeweler’s loupe to magnify the image.

There’s just a couple of hours left before the Trinket Contest draws to a close. Get your entry in for a chance to win!

Continue reading “Hackaday Logo Projector From A Single LED”

Light Controller Goes Overboard For Halloween

floodbrain-halloween-light-controller

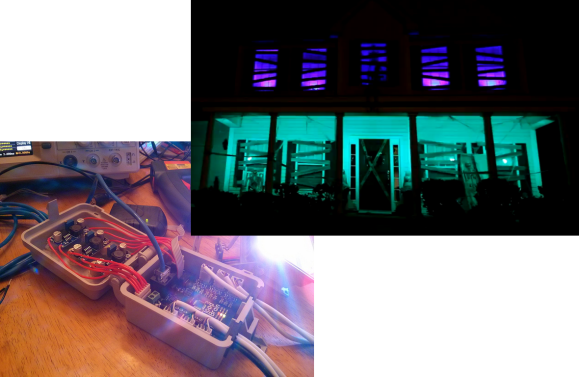
Yep, we said it. This Halloween decoration goes way overboard… and we love it! Not only does [Shelby Merrick] put on an incredible sound and light show for the neighborhood, but he keeps us happy by posting all the details for the lighting controller he designed. He calls the creation FloodBrain as it’s switching a set of flood lights to achieve the effects seen above. But for the full experience you’ll want to watch the demo videos below as well.

He needed a way to switch twelve RGB flood lights which pull 10 Watts. His controller was designed to communicate with them via RS485, with an AVR Xmega8E5 controlling the system. We like it that he included some images of the manufacturing process, using a stencil for solder paste before placing components for reflow.

The floodlights themselves are also an interesting hack. To get what he wanted at the best price he picked up 10W white LED flood lights for about eight bucks a piece, then swapped out the LED itself for an RGB version (same wattage) using the same heat sink and case.

More often that not we see this type of system controlling Christmas lights. [Shelby] mentions that he did get help from Christmas light controller forum We also think he should have no problem repurposing the controller for that type of application.

Continue reading “Light Controller Goes Overboard For Halloween”

LED Magic Staff Just In Time For Halloween!

[Dave]’s been working pretty hard on his Arduino driven, LED-lit, magical staff for the past few months, and now it’s finally coming together.

He’s using 6 LED strips that contain 55 LEDs each — at full brightness the staff can suck up an impressive 20A @ 5V! To power it, he’s equipped the staff with 8 NiMH C size batteries (5000mAh @ 1.5V). This works out to about 15-20 minutes of runtime at full power (255, 255, 255, LED values) — to counter this he usually runs a sparkly LED algorithm that lasts much longer. Besides, at full power it’s really quite blinding.

The staff is controlled by an Arduino Uno and currently only has two different modes: random and full brightness. Not to worry though, he’s planning on adding a sound sensor to turn it into an equalizer, a shock sensor to give it a cool ripple effect while walking, and maybe a few other interesting patterns!

Stick around after the break to see the first test video!

Continue reading “LED Magic Staff Just In Time For Halloween!”

An Impressively Large LED Matrix

One of the more impressive projects a home-bound tinkerer can pull off is some sort of display. Not only does the final project result in a lot of blinky, glowey things, but driving hundreds of LEDs is an achievement in itself. [Fabien] decided he wanted to build his own LED display and ended up with something great (French, Google translation).

Instead of going off the deep end and making his own boards for this giant LED display, [Fabien] found a very cheap 16×32 LED display board on DealExtreme. Once these kits were pieced together, [Fabian] mounted them in a wooden frame and started connecting the displays together.

The original plan was to drive these with an Arduino, but with so many pixels he quickly ran out of RAM. Replacing the Arduino with a larger ATMega1284p, [Fabian] found the RAM he needed and started work on some interesting visualizations.

Of course, Conway’s Game of Life made a showing in the final build, but [Fabian] also managed to whip up a spectrograph using FFT. It’s a very nicely put together display that makes us want to buy a few of these displays ourselves.

Old Fax Machine Shows Signs Of Life

fax1

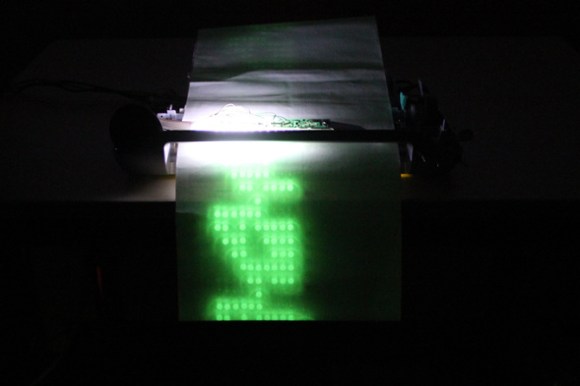
[Dmitry] is a Moscow based artist. He’s also a an avid circuit bender and hardware hacker. His latest project is entitled “signes de vie” or signs of life. [Dmitry] started with an Arduino and an old thermal fax machine. He removed the thermal print head and replaced it with a row of 10 LEDs. These old fax machines would use rolls of paper, cutting each sheet of as it was printed. [Dmitry] kept the roll system, but treated his paper with fluorescent dye. As the paper passes under the LEDs, it pauses for a moment and the LEDs are flashed. This causes a ghostly glow to remain on the paper for several minutes as the next rows are printed.

While [Dmitry] could have made this the world’s biggest tweet printer, he chose to go a more mathematical route. Each printed row of dots represents a generation of one-dimensional cellular automata. Cellular automation is a mathematical model of generations of cells. All cells exist on a grid, and can be alive or dead. The number of neighboring live cells determines if any given cell will live on to the next generation. One common implementation of cellular automation is Conway’s Game of Life. In [Dmitry’s] implementation, a bank of switches select which of the 256 common cellular automata rules controls the colony. A second bank selects how long each generation lasts – from 1 to 18 seconds.

We really like how the paper becomes a printed, yet temporary history of the colony. [Dmitry] doesn’t say if he’s using a single long strip of paper, or if he created a loop. We’re hoping for the latter. Finally a useful implementation of the old black fax loop prank.

Continue reading “Old Fax Machine Shows Signs Of Life”

Pseudo-Random Flickering Jack-O-Lantern LED Using ATtiny13

Pseudo_Random_Flicker_ATtiny13

It’s time to get those jack-o-lanterns twinkling for Halloween. If you don’t want to use candles or buy a jack-o-lantern light this Halloween you can do like [Johannes Bauer] and code your own pseudo-random flickering super bright LED. His wife wanted their pumpkin to be illuminated this year and he knew it would be easy to do with an Arduino, but that would be overkill for such a simple project. Plus, he doesn’t have an arduino. [Johannes] used very few components; 4 slightly depleted AA batteries, a super bright LED, 680 ohm resistor and a little custom code on an 8 pin ATtiny13. The circuit does work great for a pumpkin lantern but his video is more of a tutorial on coding linear congruential generator (LCG) for the 8 bit pseudo-random LED flickering.

The code is short and can be gleaned from the YouTube video. [Johannes] used avr-gcc to compile and has packaged his code and build scripts for download. The hex file can be flashed over to the chip using avrdude or AVR Studio. If you have any ATtiny13s lying around you should cobble this hack together just in time to emulate that real look of a pumpkin candle without the hassles and hazards of real flames.

If you want something with a lot more light that still has that candle like flicker then checkout “Flickering Pumpkin Lanterns” that used the signal from LED tea lights to power some 12 V lamps.

Follow along after the break to watch [Johannes Bauer’s] video.

Continue reading “Pseudo-Random Flickering Jack-O-Lantern LED Using ATtiny13”

FlightDeck: A “Touchless” MIDI Controller

flightdeckmidi

[Edward] wanted a different way to modulate notes on his MIDI controller, so he decided to go touchless. Inspired by the pressure-sensing modulation on his Edirol keyboard, [Edward] aligned eight sensors into a row of playable notes and used infrared to sense the distance of a player’s hand from the keys. He also included some function buttons to cycle through 10 octaves and RGB LEDs beneath the table that perform alongside the music.

He chose SHARP GP2D120 sensors (direct link to datasheet) for their low threshold, which allowed the board to detect distance close to the sensor. Each is mounted onto a sheet of frosted acrylic along with its own “hold note” button and an LED to indicate the key is playing. The lower panel houses an Arduino Mega that drives the system along with an RGB LED strip and its driver board. [Edward] used Maxuino and OSC-Route to interface the Mega to a Max/MSP patch which runs the show.

Learn more about the FlightDeck’s features in a video demonstration of the controller and the software after the break, then check out some other MIDI hacks like this organ pedal or the Arduino-driven MIDI sequencer.

Continue reading “FlightDeck: A “Touchless” MIDI Controller”