Reading Paper Tapes From Scratch!

Home made tape reader

Feeling a little nostalgic? Dying to read some paper ticker tapes? You can do it manually, but that’d take forever! [NeXT] decided to make a little PCB to help him out.

Having searched for paper tape readers for years, and even getting halfway through building the mechanical portion of it in his high-school tech class, [NeXT] decided to take a serious stab at it — and by golly, it works!

The reason he finally decided to go down this route is because you just can’t buy them (well, for cheap), and even the DIY or hobby ones out there are notoriously slow — what better reason to design it from scratch?

Continue reading “Reading Paper Tapes From Scratch!”

Tag Connect Programming Headers

A Small Replacement For Large Programming Headers

No matter how small you make your embedded projects, you still need a way to program the MCU. Standard programming headers can be annoyingly large for those very small projects. [Danny] wrote in to tell us how we can save room on our PCB designs using special spring loaded connectors, rather than large headers.

There are so many small embedded development systems, such as the Trinket that still rely on standard headers. Reducing the size of the programming headers and interface headers is an issue that deserves more attention than it currently receives. Based on Tag-Connect, a proprietary connector built around pogo-style pins, your PCB does not actually require any on-board mating connector. The PCB footprint simply has test-pads that connect with the pogo-pins and holes that allow for a rock solid connection. While the Tag-Connect header is a bit expensive (it costs about $34), you only need to buy it once.

It would be great to see even smaller Tag-Connect cables. Do you have a similar solution? What about something even smaller and more compact? Write in to tell us about any ultra-compact connector solutions you have been using!

Send Wireless TXT Between Two TI Calculators


TI calculators with wireless circuitry

One day while sitting in class in a Cornell University schoolroom, [Will] and [Michael] thought how cool it would be to send text messages to each other via their Texas Instruments calculators.  Connecting the two serial ports with a serial cable was out of the question. So they decided to develop a wireless link that would work for both TI-83 and TI-84 calculators.

The system is powered by a pair of ATmega644’s and two Radiotronix RF Modules that creates a wireless link between the two serial ports. The serial ports are 3 wire ports, which can be used for several things, including acting as a TV out port. [Will] and [Michael] reverse engineered the port’s protocol and did an excellent job at explaining it in full detail. Because they are dealing with the lowest level of the physical protocol, there is no need for them to deal with higher levels like checksums, header packets, ext.

Be sure to stick around after the break to see a video of the project in action. It’s quite slow for today’s standards. If you have any ideas on how to speed it up, be sure to let everyone know in the comments.

Continue reading “Send Wireless TXT Between Two TI Calculators”

Improved Thermocouples On A Microcontroller

ktype

If you’re reading a thermocouple with one of those fancy schmancy SPI thermocouple amplifiers, this one isn’t for you. If, however, you’re still going through those old-school analog thermocouple amplifiers like the AD595, [miceuz] has just the thing for you. He’s come up with a library for embedded devices that reads the temperature of a k-type thermocouple with +- 0.03°C of accuracy.

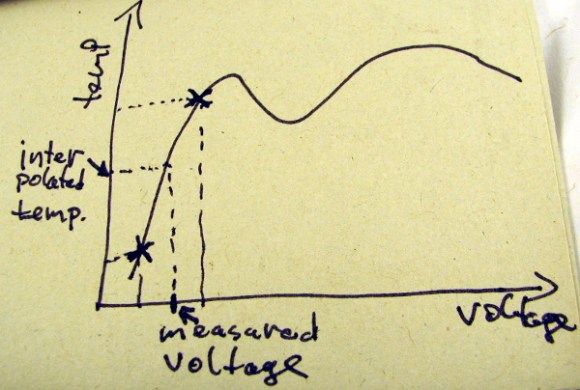
As with anything dealing with natural phenomena, the voltage generate by the bimetallic junction of a thermocouple probe is decidedly non-linear. This is a problem when dealing with embedded devices, as that would mean using floating point arithmetic, greatly increasing the amount of code. [micuez] found the NIST tables for a K-type thermocouple and interpolates the actual temperature of the thermocouple probe from the NIST data. The usual way of measuring thermocouples – a polynomial unction of some sort – has an error of about 0.06°C. [miceuz]’s library has an error of less than half that, all while using less code.

The library doesn’t support temperatures below zero, but this is still a work in progress. Still, if you’re looking for a very accurate library for a forge, crock pot sous vide build, or a toaster  oven reflow controller, you can’t do better than [miceuz]’s work.

Interactive LED Beer Pong Table Has More Features Than You Can Shake A Stick At

LED Beer Pong

Holy cow. The amount of detail and functionality that went into this Interactive LED Beer Pong Table is absolutely incredible.

The table features 384 individually controlled RGB LEDs, covered with a 2′ x 8′ Lexan sheet to protect them from spills. Each cup holder (pod) contains an additional 4 RGB LEDs and an IR sensor that can detect whether or not the cup is in place — if it is removed, the IR sensor triggers an animation on either the 32 x 12 LED grid across the middle of the table or the other pods.

The rings of LEDs on the outside edge act as VU meters and pulse to the music in different animation patterns. What is really impressive is that [Jeff] also included a ping pong ball washer — A water reservoir connects under the table between the two LED rings at either end. When you put the ball into one, it gets sucked underneath and pops out the other side clean!

You seriously have to see the video of this thing in action.

Continue reading “Interactive LED Beer Pong Table Has More Features Than You Can Shake A Stick At”

Measuring Light With ChipKIT

light meter showing LUX value

How does one go about measuring the amount of light in a given area? With a Light Meter of course! Maintaining proper lighting levels can be very important in places like schools, hospitals and even your own workbench.

[Raj] over at Embedded Labs has put together an excellent tutorial on how to construct your very own light meter based upon the chipKIT platform. The chipKIT Uno32 is similar to Arduino, but boasts a much more powerful PIC32MX320F128 microcontroller.  We’ve seen projects that feature the chipKIT Uno (pdf warning) here before. From playing pong to hosting several temperature sensors, it’s certainly a versatile platform.

The light meter uses an I/O shield and communicates to a BH1750FVI digital light sensor via I2C. The firmware divides the raw data coming off the sensor by a constant, and displays the light intensity data on an OLED display in Lux, foot-candles, and Watts/m^2 units. Be sure to check out the tutorial for full schematics and source.

model helicopter attached to boom

Self-Learning Helicopter Uses Neural Network

Though this project uses an RC helicopter, it’s merely a vessel to demonstrate a fascinating machine learning algorithm developed by two Cornell students – [Akshay] and [Sergio]. The learning environment is set up with the helicopter at its center, attached to a boom. The boom restricts the helicopter’s movement down to one degree of motion, so that it can only move up from the ground (not side to side or front to back).

The goal is for the helicopter to teach itself how to get to a specific height in the quickest amount of time. A handful of IR sensors are used to tell the Atmega644 how high the helicopter is. The genius of this though, is in the firmware. [Akshay] and [Sergio] are using an evolutionary algorithm adopted from Floreano et al, a noted author on biological inspired artificial intelligences. The idea is for the helicopter to create random “runs” and then check the data. The runs that are closer to the goal get refined while the others are eliminated, thus mimicking evolutions’ natural selection.

We’ve seen neural networks before, but nothing like this. Stay with us after the break, as we take this awesome project and narrow it down so that you too can implement this type of algorithm in your next project.


Continue reading “Self-Learning Helicopter Uses Neural Network”