Apex Electronics, Your Souce For Oscilloscopes And Drop Tanks

While some of the Hackaday crew is in LA for The Gathering, we decided to make a trip out to Apex Electronics, easily the oldest and largest electronics surplus store on the west coast.

Inside Apex, everything is stacked to the 20-foot ceiling with any electronic component you can imagine. Want a shopping cart full of huge capacitors? Awesome. Tube sockets? Done. Any kind of wire imaginable? That takes up two aisles. Test equipment abounds as well with oscilloscopes, signal analyzers and function generators, multimeters, and even a pair of cockpit voice recorders.

There’s also an outside yard at Apex containing at least two airplanes (one is a Cessna 150 that’s crying out to be made into a flight simulator), yet more test equipment, tons of video equipment, a few aircraft drop tanks, and enough aluminum extrusion to build anything.

If you’re wondering how fair the prices are at Apex, I picked up a grab bag assortment of wire wrap sockets (including a few 64-pin DIPs) that would cost $100 through the usual eBay/Chinese retailers for only $5. [Mike] picked up some stepper motors, proto boards, a pound of standoffs, and a dozen some vintage 7-segment displays for $20. No clue how much the test equipment costs, but from what we’ve seen the prices are low.

We’re not the first EE/Hacker Blog/Vlog to visit Apex. [Dave Jones] made the trek a few years ago and posted an awesome video. Below you’ll find a ton of pictures from our trip.

Continue reading “Apex Electronics, Your Souce For Oscilloscopes And Drop Tanks”

$1 Coin Cell Charger

Sure, coin cells usually last a long time — but do you really want to buy new ones and throw the old ones out? The LiR2032 coin cell is a rechargeable lithium battery, for which you can build a charger at around $1.

The 5 minute hack starts with a TP4056 lithium charging circuit, which is a great DIY board designed to charge high-capacity cells at about 1A. Luckily, it is pretty easy to modify the board to charge lower capacity batteries. It’s just a matter of replacing resistor R4, and a little bit of soldering! Continue reading “$1 Coin Cell Charger”

Nixie-ify Me Necklace

big-nixie

[Armilar] wanted to cheer up his friend who was going through a rough spot at the time — she really likes Dieselpunk, so he decided to improvise a Dieselpunk themed photo shoot for her. We’re assuming they had other costumes and props, but [Armilar] had this idea to make a nixie tube pendant for a while, he’d just have to expedite the build process to have it ready!

What he managed to whip up the day of the shoot looks amazing considering the time involved, if not just a little bit ill-advised. There may or may not be 200VAC running around his friend’s neck.

He’s using an electroluminescent driver rated for 5VDC to 100VAC, over-powered to 12VDC, resulting in about 200VAC, which is just enough to make the nixie glow a nice warm orange. In an effort to minimize the size of the pendant, he had to keep the battery and driver hanging off the back of the necklace.

Continue reading “Nixie-ify Me Necklace”

Built-in Coffee Table Lightbox

diydollarstorelightbox

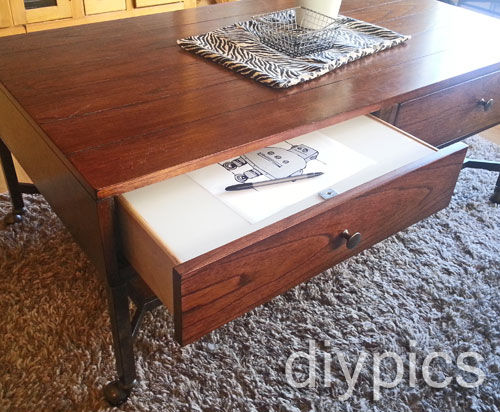
[Flyingpuppy] sent us this tip about her cleverly-concealed pull-out lightbox drawer. Her resolution for the new year was to make more art, so she filled this coffee table with art supplies and decided she’d draw while relaxing in front of the television. She also wanted a lightbox nearby, which originally involved hacking the entire tabletop with some acrylic, but she eventually opted for a simpler build: and it’s portable, too! The drawer’s lights are battery-powered, so you can pull the entire thing out of the table and drag it onto your lap, if that makes drawing more comfortable.

[Flyingpuppy] sourced seven inexpensive LED units from her local dollar store, which she mounted to the back of the drawer with some screws. The rest of the drawer was lined with white foam board, the bottom section angled to bounce light up onto the acrylic drawing surface. Because she needs to open the case to manually flip on the lights, she secured the acrylic top magnetically, gluing a magnet to the underside of the foam board and affixing a small piece of steel to the acrylic. A simple tug on the steel bit frees the surface, providing access underneath. Stick around for a video below.

Continue reading “Built-in Coffee Table Lightbox”

Lux: A 100% Open Source Camera

luxCamera

[Kevin Kadooka] recently finished his open source camera. The Lux Camera is 100% open source. Lux uses no parts from other cameras – not even a lens! To date we’ve only seen this with achieved with pinhole cameras. [Kevin] isn’t new to camera hacking. He was the man behind the Duo camera, which had a successful Kickstarter campaign in February of 2013. Duo is a DIY camera, but it still required lenses from Mamiya-Sekor, and a shutter from Seiko. Lux is a different animal. It has a manual focus 65mm f/5.6 Single Element lens. The shutter is [Kevin’s] own solenoid based leaf shutter design. Just as in the original shutter, an Arduino controls shutter operation and timing.

The main camera body and many of its parts are 3D printed. [Kevin] got some very nice quality parts from Shapeways 3D printing service. We have to say that some of the assemblies look a bit complex for desktop printers. However since everything is open source, anyone willing to put the time in could adapt them for the average RepRap or Ultimaker. [Kevin] has posted detailed build photos, as well as some photos taken with the Lux on his flickr stream. The pictures have  a decidedly holga-esque look to them, due in part to the single element lens. Even with this limitation, we love the idea of having a brownie style camera built completely from scratch.

Copper Etching: Not Just For PCBs

etching buttons

[Morag Hickman] is an artist who makes use of ferric chloride for something other than etching a PCB. She uses the process to etch beautiful designs into her jewelry.

[Tortoise Butler] is a small film crew that created this three and a half minute film on the art of etching copper, and it is an absolute pleasure to watch. There are no computers, no toner transfers, and she doesn’t even etch on a flat surface. It’s an excellent example of doing something different — why not add etching to finish off a project? If you’ve already done PCBs, it can’t be that hard to do a logo instead!

Anyway, it’s been a while since we’ve shared a handmade hack, and we think this is a great example that deserves the spotlight. Don’t forget to send in your own handmade projects to the tips line!

Stick around after the break to enjoy the film — we recommend watching it full screen and in HD.

Continue reading “Copper Etching: Not Just For PCBs”

I Am The Midnight Message Board What Messages At Midnight

Photoluminescent stars on your bedroom wall or ceiling are pretty cool, though the stationary shapes can become boring. [Adi] felt this way, too. While doodling with a bright white light on some glow in the dark vinyl, it occurred to him that this could make for an interesting display. He set about making GLO, the midnight message board and RSS display.

[Adi]’s light writer uses 12 UV LEDs on a linear axis powered by a stepper motor to write RSS headlines, Twitter trends, or custom text on his wall. He finds the slow fade of the text very soothing to fall asleep by, and it’s easy to see why. The LED array imprints a section of a character consisting of a 6×5 bit pattern. The 12 LEDs are split into two groups, so it can write two lines at 45-50 characters each. [Adi] designed his own pixel font for this project, and advises that only upper case letter forms be used.

[Adi]’s write-up is quite admirable and comprehensive. In the circuit build section, he advises that the LEDs must be very close to the vinyl for optimum results, but that they should protrude farther than the shift registers so the chips don’t rub the vinyl. Of course you could opt for more intense light sources, like laser. See it in action after the break.

Continue reading “I Am The Midnight Message Board What Messages At Midnight”