Recycling PLA And Other Plastic Waste With Compression Molding

After previously trying out low-tech compression molding with a toaster oven and 3D printed molds, [future things] is back with a video that seeks to explore some of the questions raised after the first video. Questions such as how well this method works with HDPE and PLA thermoplastics, whether the flashing could be cut off by the mold and the right temperatures and times to heat the plastic before a charge is ready for inserting into the mold.

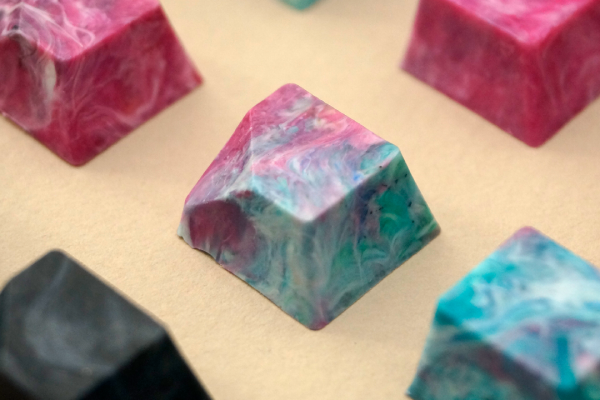
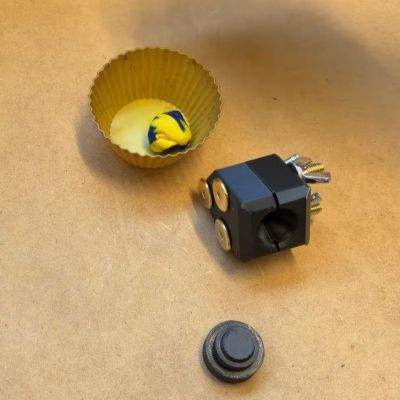
In this video the same PHA-based mold is used, but in a three-piece configuration to allow for a more complex shape. This way game tokens could be made for use by the son of the author, which also shows one straightforward and very practical use of this method.

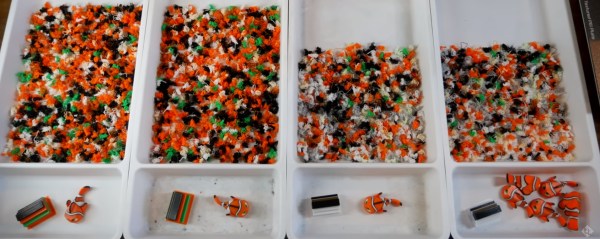
A big change here is that no more metal chopsticks are used to handle the charge, as this was found to cool down the heated plastic too much. Instead the hot charge is handled with fingers and wooden chopsticks, with the plastic heated until it has about the consistency of thick honey. For LDPE this takes about 5-7 minutes at 130°C. After compressing the charge into the mold, about 30 seconds are all it takes for the plastic to cool down enough.

There was a question about the use of mold release spray, but this didn’t seem to cause any issues, so can probably be used safely. As for other plastic types, HDPE works fine too when you heat it up at a slightly higher temperature and don’t mind it being tougher to handle.

Easiest is probably PLA, which would seem unsurprising. Using some chopped-up PLA printing waste it was easy enough to make a few more game tokens, demonstrating that this method is very viable for converting scrap FDM print waste into such items. As noted in the comments by [edmundchao] this method works great too for PETG, using PETG molds, while using a ratcheting clamp for extra pressure instead of just pressing by hand.

Continue reading “Recycling PLA And Other Plastic Waste With Compression Molding”

Hands On With Creality’s New M1 Filament Maker

Ever since 3D printing has become a popular tool, the question of waste has been looming in the background. The sad reality of rapid prototyping is that you’re going to generate a lot of prints that just aren’t fit for purpose, even if your printer runs them off perfectly every time. Creality has some products on the way aimed at solving that problem, and [Embrace Making] on YouTube has got his hands on a pre-production prototype of the Creality M1 Filament Maker to give the community a first look.

The M1 is actually only half of the system; Creality is also working on an R1 shredder to reduce your prints into re-usable shreds. [Embrace Making] hasn’t gotten his hands on that, but shredding prints isn’t the hard part. We’ve featured plenty of DIY shredders in the past. Extruding filament reliably at home has traditionally proven much more difficult, which is why we mostly outsource it to professionals.

Lacking the matching shredder, and wanting to give the M1 the fairest possible shake, [Embrace] tests the machine out first using Creality-supplied PLA pellets. The filament diameter isn’t as stable as we’ve gotten used to, and the spool rolling setup needs a bit more work.

Again, this is an early prototype. Creality says they’re working on it and claims they’ll get to ±0.05 mm precision in the production models. Doubtless they’ll also fix the errors that led to [Embrace]’s messy spool. That’s probably just software given that the winding mechanism did a pretty good job on the Creality-supplied spool.

Most importantly, the M1-produced filament does print. The prints aren’t perfect due to the variation in diameter, but they turn out surprisingly well for home-made filament. [Embrace] also shows off the ability to mix custom colors and gradients, but, again, using raw PLA rather than shredded material. Hopefully Creality lets him test drive the R1 shredder once its design is further along.

This is hardly the first time we’ve seen a filament extruder. The goal of this product is to pair with a shredder and use it for recycling, but if you’re going to stick with raw plastic pellets, you may as well print them directly.

Continue reading “Hands On With Creality’s New M1 Filament Maker”

Guitar Picks made from recycled sheets

Artsy And Durable Recycling From A Heat Press

Plastic recycling is something that many of us strive to accomplish, but we often get caught up in the many hurdles along the way. [Brothers Make] are experienced in the world of plastic recycling and graced us with a look into a simple and reliable way to get consistent thin sheets of durable plastic. Using a common T-shirt press and a mixture of plastic scraps, you can get the process down quickly.

Summarizing the process is pretty easy due to its simplicity. You take a T-shirt press, put some Teflon baking sheets on both sides of some plastic scraps, and then press. Repeating this a couple of times with different colored plastic will get you a nice looking sheet of usable sheets for any purpose you could dream of. Thicker pieces can have some life changing applications, or as simple as guitar picks, as shown by [Brothers Make].

Make sure to try out this technique yourself if you have access to a press! Overuse of plastic is a widely known issue, and yet it feels like almost no one attempts to solve it. If you want a different kind of application, try making your own 3D printing filament out of recycled plastic!

Continue reading “Artsy And Durable Recycling From A Heat Press”

five 100% recycled keycaps, spaced out

These Keycaps Are 100% Recycled Plastic

Artisan keycaps are generally meant to replace your Escape key, though they can be used anywhere you like (as long as they fit, of course). Keycap maker [tellybelly] of jankycaps has been experimenting with making keycaps out of 100% recycled plastic, and offers an interesting post detailing their development and production process.

Animation of injection molding flow into a set of four keycaps.What do you do when normal injection molding tooling is out of your budget, and silicone molds simply won’t do? You turn to 3D printing if you can. In this case, [tellybelly] and company found a resin designed to withstand high temperatures.

[tellybelly] was able to design the mold using a plethora of online resources, and even verified the flow using a special program. Although the first two versions worked, they had some flaws. Third time’s the charm, though, and then it was time to sort plastic and fire up the shredder.

After heating up the shreds to 200 °C or so, it was time to start the injecting. This part isn’t exactly a cakewalk — mixing different plastics together can vary the workable temperature range that doesn’t degrade the plastic. Although it sounds like the end, [tellybelly] reports that they spent just as much time here as they did at the drawing board, experimenting with pressure on the mold, various cool-down methods, and how long to wait before opening the mold.

Via reddit

Reducing Poop On Multicolor Prints

While multicolor printing eliminates painting steps and produces vibrant objects, there are two significant downsides; filament consumption and print time. A single-nozzle filament printer needs to switch from one color to another, and doing so involves switching to the other filament and then purging the transition filament that contains a mixture of both colors, before resuming the print with the clean new color.

[teachingtech] tests out a variety of methods for reducing print time and waste. One surprising result was that purging into the infill didn’t result in significant savings, even when the infill was as high as 50%. Things that did have a positive effect included reducing the amount of purge per transition based on light to dark color changes, and printing multiple copies at once so that even though the total amount of waste was the same as a single part, the waste per part was reduced.

All of the tests were with the same model, which had 229 color changes within a small part, so your mileage may vary, but it’s an interesting investigation into some of the deeper settings within the slicer. Reducing filament waste and print time is an admirable goal, and if you make your own extruder, you can turn all of that purge waste into various shades of greenish brownish filament. Continue reading “Reducing Poop On Multicolor Prints”

Two men in black shirts stand between a white and a blue exercise bike sitting on a table in front of them. The exercise bikes have black drums slightly larger than a coffee can affixed to the front of the bike which houses the shredding mechanism. In the background is a "Precious Plastics Torino" circular logo.

Getting Shredded Plastic…and Legs

While electric motors have taken the drudgery out of many tasks, human power has its advantages. [Precious Plastic Torino] has developed a human-powered plastic shredder for those times when an electric motor just won’t do.

Designed primarily for educational purposes at venues where electricity can be difficult to source, but also useful for off-grid environments, this exercise bike-based shredder can take small pieces of plastic and shred them into tiny pieces suitable for use with any of the other machines in the Precious Plastics ecosystem like their injection molding machine. As with all [Precious Plastics] projects, the files are will be open source; however, there is a six month exclusivity period for Patreon subscribers to help fund development efforts.

The build is relatively simple: take an old exercise bike, remove the unnecessary bits, and run the chain up to drive a shredding mechanism mounted on the front of the bike. We think they should’ve kept the flywheel to help keep the momentum going while shredding but can’t fault them for wanting to keep the prototype as simple as possible. Maybe the next step is getting these in spin classes around the country so people can get their exercise and help recycle in their community at the same time!

If this shredder doesn’t suit your fancy, maybe recycle your plastic with SHREDII or this other DIY effort. If you’d rather generate electricity on your exercise bike, then try building this bike generator.

Continue reading “Getting Shredded Plastic…and Legs”

A man with dark skin in a red shirt and khaki shorts sits in a chair. His left leg has a prosthetic below the knee. The upper half of the prosthethic is an off white plastic socket with flecks of different off white plastic throughout hinting at the recycled nature of the plastic. The lower half is a metal tube attached to an artificial foot in black sandals.

Precious Plastic Prosthetics

Plastic waste is a major problem, but what if you could turn the world’s trash into treasure? [Yayasan Kaki Kita Sukasada (YKKS)] in Indonesia is doing this by using recycled plastic to make prosthetic legs.

Polypropylene source material is shredded and formed into a sheet which is molded into the required shape for the socket. A layer of cloth and foam is used to cushion the interface between the patient and the socket itself. Using waste plastic to make parts for the prosthetics lowers the price for patients as well as helps to keep this material out of the landfill.

What makes this project really exciting is that [YKKS] employs disabled people who develop the prosthetics and also trains patients on how to maintain and repair their prosthetics with easily sourced tools and materials. With some medical device companies abandoning their devices, this is certainly a welcome difference.

We’ve previously covered the Precious Plastic machines used to make the plastic sheets and the organization’s developments at small scale injection molding.

Continue reading “Precious Plastic Prosthetics”