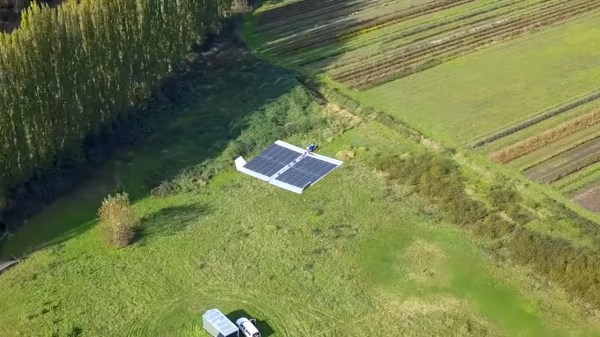
TR-109 Raspberry Picorder 2 Really Nails The Star Trek Aesthetic

Star Trek famously showed its medical staff using a multifunctional device by the name of the tricorder. While no such devices are regularly used by current medical staff in this timeline, the concept is nonetheless appealing to fans of the show. [directive0] is one such person, and built himself a replica by the name of the Picorder 2.

Picorder 2 is inspired by the tricorders from Star Trek: The Next Generation. The name is an indication that this isn’t a first attempt; it builds upon an earlier project based on the models from the original series. It’s built with a nifty 3D printed case that folds in half, just like the real deal. Plenty of attention to detail has been invested in the decals and backlit controls to really complete the look.

Inside, a Raspberry Pi Zero W runs the show, paired with a bunch of sensors and accessories to get the job done. The human interface is via capacitive touch, and data is displayed on an ST7735 LCD display for output. The graphing software [directive0] built does a great job of creating a Trekesque aesthetic, displaying data from various in-built sensors, such as temperature, humidity, and barometric pressure. There’s also a low-resolution thermal imaging camera – and it’s hard to get more sci-fi than that.

While we’re a ways off from medically-useful tricorders, it’s nonetheless fun to see replica props that have some life and functionality built into them. The tricorder remains a popular build – we see them pretty regularly! – and we can’t wait to see where the fandom takes them over the next few years.  Video after the break.

Continue reading “TR-109 Raspberry Picorder 2 Really Nails The Star Trek Aesthetic”

Build Your Own Bluetooth Notification Ticker

Stock tickers were telegraph-based machines from the 19th century, and quickly fell by the wayside with the advent of computer replacements from the 1960s onwards. However, there’s something charming about small machines that deliver us paper strips of information – as demonstrated by this notification ticker from [DIYprojects] (Russian language, Google Translate link).

The heart of the build is an Arduino Mini, which receives the text content of smartphone notifications via a Bluetooth module hooked up to its serial port. The machine mounts a small roll of paper strip, which is pulled along by a stepper motor fitted with a rubber earbud for added grip. The pen is moved along the paper by a servo using a Lambda mechanism to allow it to move nicely perpendicular to the paper’s direction of travel. Instead of moving the pen up and down, the paper is pushed into the pen by a solenoid mounted underneath.

It’s a fun little project, and one we can imagine being great for educational purposes. It teaches skills required to work with steppers, servos, solenoids and Bluetooth, all at once. It’s a little different from some other pen plotter designs, but the ticker format has a certain charm that’s hard to replicate any other way. Video after the break.

Continue reading “Build Your Own Bluetooth Notification Ticker”

A Useful Macro Pad For Microsoft Teams

Working from home has now become de rigeur for many more people around the globe. With it, has sprung up a desire for better controls for streaming and conferencing software. There are plenty of streamdecks on the market, of course, but this isn’t BuyADay, it’s HackADay. Thus, you’ll want to check out this great build for Microsoft Teams by [Build Comics].

The build consists of a series of Cherry MX Silent Red key switches in a 3D printed housing, dedicated to muting audio, switching video, and making and hanging up on calls. Naturally, they’re marked with their individual functions and lit with RGB LEDs for obvious feedback. The keys are read by a Raspberry Pi Pico, which handles USB communication with the PC. AutoHotKey is then pressed into service to make the final link to the Microsoft Teams software. [Build Comics] also worked on a 3D-printed busylight that indicates when they’re on a call; however, thus far it isn’t quite working properly. Jump into the conversation on Github or comment below if you’ve got insight on the problem.

It’s a build that likely saves a lot of hassle when you’re on several calls a day. The mute button is a sure-fire jobsaver on some occasions, and it’s better to have it and not need it, then need it and not have it. We’ve featured work from [Build Comics] before, too – like this excellent vintage meter restoration. Video after the break.

Continue reading “A Useful Macro Pad For Microsoft Teams”

Incandescent 7-Segment Displays Are Awesome

When we think of 7-segment displays as the ubiquitous LED devices that sprung into popularity in the 1970s. However, numbers have existed for a lot longer than that, and people have wanted to know what the numbers are for quite some time, too. Thus, a variety of technologies were used prior to the LED – such as these magnificent incandescent 7-segment displays shown off by [Fran Blanche].

The displays are basic in concept, but we imagine a little frustrating in execution. Electronics was tougher back in the days when valves needed huge voltages and even a basic numerical display drew a load of current. Built to industrial-grade specifications, they’re complete with a big heatsinking enclosure and rugged gold-plated connectors. [Fran] surmises that due to the likely military applications of such hardware, the filaments in the bulbs were likely built in such a way as to essentially last indefinitely. The glow of the individual segments has a unique look versus their LED siblings; free of hotspots and the usual tapered shape on each segment. Instead, the numerals are pleasingly slab-sided for a familiar-but-not-quite aesthetic.

[Fran] demonstrates the display running with a CD4511B BCD-to-7-segment decoder, hooked up with a bunch of 3904 power transistors to get the chip working with filament bulbs instead of LEDs. It’s a little fussy, but the displays run great with the hardware sorted.

We’d love to see these used on a very heavy ridiculous watch; nixies aren’t the only game in town after all. If you do happen to make one, be sure to let us know. Video after the break.

Continue reading “Incandescent 7-Segment Displays Are Awesome”

Large Format Lego Camera Is A Bit Near-Sighted

Photography doesn’t have to be expensive, something that’s especially true in the realm of film photography, where the imperfections of the medium can be half the appeal. There are many DIY plans and kits available for analog cameras, but [bhiga143] had couple spare components and a pile of small, colorful bricks lying around, so he decided to build a functional 4×5″ film camera out of Lego.

Details are light for this build, but with a little knowledge about camera structure we can guess at what’s going on inside. Simplicity makes for robust design, and what we have here is in effect a box with a lens on one side and photographic film on the other. The center section of the front, which actually supports the lens, is capable of sliding in and out to adjust focus. On the far side (not pictured) is a slot just wide enough to insert a standard film holder.

The camera really is a hack. [bhiga143] stayed true to the “Lego” part of Lego camera, so there is no glue, no black paper lining, and no frills. The tripod is whatever stack of books lay underneath it. The lens is, quote, “barely functional”. There are light leaks galore, and it can’t focus beyond about 3 feet (1 meter). But every one of those points just makes us love it more. Every nugget of imperfection is a few words added to the story each picture tells. And we honestly can’t wait to see more pictures.

Other Lego cameras we’ve seen have been smaller and less colorful, but using a simple pinhole lens can reduce the overall cost. Of course, you’re not limited to Lego if you want to build your own pinhole camera. Although, the ubiquitous plastic bricks can also be useful in later stages of the film photography process.

Toggle Switch Puzzle Boggles The Mind, Opens The Box

We all have too much stock of one component or another. Maybe you have more audio pots than you know what to do with, or maybe it’s zener diodes. For [technologyguy], that thing is a pile of toggle switches.  Fortunately he’s always wanted to build a locking box with a binary code that’s laid out in switches — as in, find the right code, and a solenoid unlatches the box. This lovely parts bin special only responds to two combinations out of a possible 4,000+, so anyone who tries to open it should probably block out the afternoon.

Inside you’ll find two 9 V batteries, a home-brew metal latch, a solenoid, and the undersides of four DPDT and eight SPDT toggle switches. If you just picked this thing up and had no idea what was going on, you’d be so screwed as to what to do first. The box needs power, so you’d have to figure out which switch is which. But it’s so much harder than that, because the bottom left switch selects between the two paths that result in an unlocked book-box.

The next two toggles in from the left are on/off selectors for code A and code B, so not only do you have to have the right path chosen, you have to power it, too. The only progress indicators are the LEDs — there’s one for main power, and the other lets you know that the box is unlatched. What a fun conversation piece for the coffee table Zoom-viewable area!

Want to do something far less useful with your throng of toggles? How about a complicated useless machine?

Kitchen Bump Bar Plays Doom Between Orders

For as much as we love reverse engineering projects, we have to admit that we almost passed up on this “kitchen bump bar” hack. Having never had the privilege of working in the food-service industry — well, there was that time working at Chuck E. Cheese’s, but that only lasted for one shift — we were unaware of what a bump bar is, and the whys and hows of hacking one to the point where it can play Doom.

We’re glad we stuck with it, though, because [Kiwa]’s hack is pretty cool, and we got to learn a little about the technology of the modern commercial kitchen. Most fast food and family casual restaurants have what’s known as a “kitchen display system”, which relays orders from the wait staff to the kitchen. You’ve probably seen parts of the KDS, like the touch screens used by the wait staff to enter orders, or the screens dangling in the kitchen that display the pending orders. A bump bar is a small terminal used by the kitchen crew to review orders and move them around in the queue, or “bump” them, as needs dictate.

The bump bar [Kiwa] dug into appears to be a model from the early 2000s and very sturdily built, as anything used in a kitchen would need to be. Hooked up to a monitor and a keyboard, [Kiwa] discovered that it booted right into an OS with all the familiar trappings of DOS. After a detour for a teardown and dumping the flash contents, [Kiwa] was able to boot it up and run Doom, albeit somewhat slowly. It also looks like he’s got a couple of different Windows versions running, and even played some Solitaire.

It’s always fun to see what will run Doom — an NES, an oscilloscope, a thermostat, or even a bag of potatoes.

Thanks to [Fritnando] for the tip.