Building A Tiny Arcade Cabinet From A Game Boy Advance

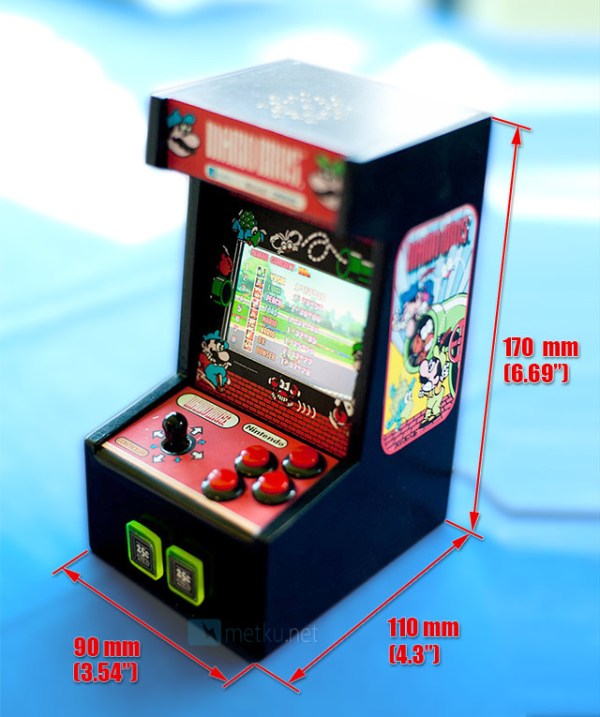
[Jani ‘Japala’ Pönkkö] found a way to make his old Game Boy Advance exciting again. He poured a ton of time and craftsmanship into building a miniature arcade cabinet. He did such a good job it’s easy to think this is a commercial product. But when you open the back of the case to switch games one look at what’s crammed inside let’s you know this is custom work.

What’s most surprising to us is that he didn’t draw out a full set of plans before beginning. He simply measured the circuit board and LCD screen from the Game Boy and went with his gut for everything else. The case itself is crafted from baltic birch plywood, which was primed and painted before applying the decals. There is also a screen bezel made of acrylic with its own decal like you’d find on coin-op machines. These were made using printable sticker paper. The electronic part of the build involves no more than extending contacts from the circuit board to buttons mounted on the case. But he did also replace the stock speaker for one that produces better audio.

Morse Code Transceiver Based On Gameboy Color Camera

Morse Code IR Transceivers

For their final project in a microcontrollers course, [Trudy] and [Josh] designed a pair of morse code transceivers. To send the message, they used an array of IR LEDs. The message is received using a Gameboy Color Camera, which takes care of basic image processing. This allows a 8-bit ATMega1284p microcontroller to handle transmitting and receiving messages.

The transmission LEDs form a square pattern with one LED in the center. The four outside LEDs are used to help the receiver locate the center LED, and the center LED is used for transmitting the message.

The Gameboy Color Camera is based on a M64282FP image sensor. This sensor uses an SPI-like protocol, which they implemented on the ATMega. It allows them to grab frames from the camera, and get the value of specific pixels. From this data they find the center LED and process the message.

The result can transmit messages of 200 letters at a time, but the speed is limited by the frame rate of the camera. If you have a Gameboy Color Camera lying around, their detailed write up might provide some inspiration and information on how to use it in a hack.

Making A Game Boy Color Louder

When [Anton] picked up an old translucent purple Game Boy Color, he noticed a nearly complete lack of sound coming from the speaker. This simply would not do, so [Anton] replaced the speaker and soldered in a 2 Watt amp, making his Game Boy very loud indeed.

After cracking open his Game Boy, [Anton] noticed the speaker was rusted. He replaced it by soldering in a speaker from a Motorola cell phone, fixing the most immediate problem. After plugging in a few batteries, he still noticed a nearly complete lack of sound.

Turning to his electronics junk drawer, [Anton] pulled out a TI TPA2000D1 Class D amplifier. This tiny amplifier is able to provide 2 Watts to a speaker and is very power efficient given it’s Class D pedigree.

After making a PCB and wiring up his amp to the Game Boy’s circuit board, [Anton] spent a little time tracking down the source of some high-frequency hissing. As it turns out, the power regulators and converters on a 15-year old Game Boy aren’t of the highest quality, but after adding a few capacitors [Anton] got everything under control.

Now [Anton]’s Game Boy has very loud, crystal-clear sound. Considering the lengths chiptune artists take modifying old ‘brick’ style game boys for use with Little Sound DJ or nanoloop, [Anton]’s build could become a worthwhile modification for musicians looking for a little more oomph to their performance.

3d Printed Nes Portable Looks Fantastic And Contains No Hot Glue

[Parker] emailed us today to show off his latest NES portable build. This time he’s using the standard “top loader” NES instead of the typically used NES on a chip. This is pretty cool since the NES on a chip has compatibility issues with some games. For the screen, he uses a common PSone screen with a slight power modification. From the factory, the screen takes 7.4 V and converts it down to 5V to use. He removed this and ran it directly from his own 5V power source. It may not seem like that big of a deal, but with portables, every bit counts. He also ditched the sound amplifier from the PSone screen in favor of something a little more efficient. He seems to have done a pretty good job because he says it gets roughly 10 hours at full volume right now.

Another cool aspect of this deign is that the cartridge serves as a sort of stand for the unit, although the button placement looks like it might be a tiny bit awkward when used this way.


Simple Trick For Replacing Game Boy Cart Batteries While Retaining Game Saves

[Adr990] wants to make sure his Game Boy game saves aren’t lost to aging batteries. They’re stored in SRAM with a small coin cell inside the cartridge to keep the memory energized when the game is not being played. But if you pull out the battery in order to replace it the data will be lost in the process. It turns out that you can hot-swap the battery without too much effort. As shown in the video after the break, he disassembled the case of the cartridge, then replaced the battery while the Game Boy is switched on. The edge connector feeds power which will keep the SRAM active while the backup battery is removed. We’re sure this could be done with a bench supply as well, but you’ll need to do your own testing before risking those prized game saves.

The other option is to backup your SRAM before replacing the batteries. We’ve seen an AVR-based cartridge dumper, and also one that uses an Arduino. Both should be able to read and write SRAM data. Continue reading “Simple Trick For Replacing Game Boy Cart Batteries While Retaining Game Saves”

Adding A MIDI Input To A Game Boy

[Sprite_tm] is back again, and his work never fails to impress. His latest project is a Game Boy Advance MIDI synth that takes MIDI data from a keyboard or sequencer and maps that to Game Boy sound channels.

Because he seems to never do anything the normal way, [Sprite_tm] decided to run the Game Boy without a cartridge. We’ve seen this before; the GBA boots into the synth software over the link cable with multibooting.

Continue reading “Adding A MIDI Input To A Game Boy”

Going A Long Way For Game Boy Advanced Video Out

Here’s an intense hack that lets [Matt Evans] play Game Boy Advanced on a larger LCD monitor. He didn’t take the easy way out during any step of the process.

He’s using an FPGA to translate the LCD signals from the GBA hardware into a 1280×960 picture that is then pushed to the large monitor. But did he use an FPGA development board? No, instead he picked up an old PCI card at a surplus store because it had a Xilinx Virtex-E FPGA. So the first thing he had to do there was to remove unneeded components and figure out how to make the connections to reprogram that chip.

So next you’d grab a working monitor and hook it up to the FPGA signal, right? Wrong, [Matt] had a slightly borked monitor, getting rid of the LVDS section and wiring up his own connections to push the RGB signals through in parallel.

Yeah, that’s a lot of work. But as you can see in the clip after the break, it works like a charm. If you’re looking for some other gnarly video-out hacks, check out this one that lets you play Game Boy on an oscilloscope.

Continue reading “Going A Long Way For Game Boy Advanced Video Out”