BadUSB Means We’re All Screwed

Does anyone else get the feeling that the frequency of rather horrible vulnerabilities coming to light is accelerating? Off the top of our head, there’s Heartbleed, Shellshock, and now this one. The BadUSB exploit attack stems from the “invisible” microcontroller in most USB devices.

We first heard about it when we were attending DEFCON in August. The exploit had been announced the same week at Blackhat but there wasn’t much information out yet. Now the talk has been posted and there’s a well-explained overview article at Big Mess o’ Wires.

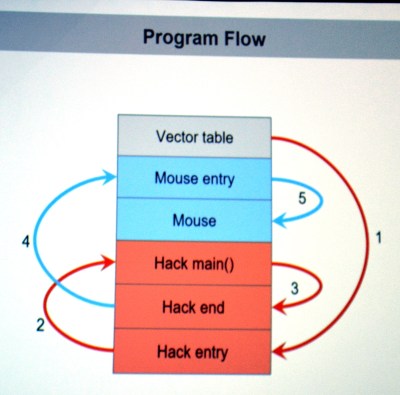
Here’s how this one goes: all USB devices rely on a microcontroller to handle the peripheral-side of USB communications. The computer doesn’t care which microcontroller, nor does it have a way of knowing even if it wanted to. The uC is “invisible” in this situation, it’s the interface and data flowing through it that the computer cares about. BadUSB is an attack that adds malicious functionality to this microcontroller. To the computer it’s a perfectly normal and functional USB device, while all the bad stuff is happening on the peripheral’s controller where the computer can’t see it.

badusb

How deeply do you think about plugging each and every USB device? Check out what happens at 19:20 into the video below. The USB device enumerates and very quickly sets up a spoofed Ethernet connection. You can still load a webpage via WiFi but the fake connection is forwarding packets to a second server.

Once discovered, you can wipe the computer and this will stop happening; until you plug the same device again and reinfect. Worse yet, because the controller is invisible to the computer there’s almost no way to scan for infected devices. If you are smart enough to suspect BadUSB, how long will it take you to figure out if its your mouse, your keyboard, a thumb drive, a webcam, your scanner… you get the point.

Continue reading “BadUSB Means We’re All Screwed”

Using The Boxee Remote With A PC

When it was first announced in 2010, the Boxee remote was a stroke of genius. Not because it controlled the BoxeeBox, the set-top media center PC, mind you. It was impressive because the reverse side of the remote had a small qwerty keyboard, just the thing for searching menus loaded up with movies and TV shows and entering URLs. [Martin]’s BoxeeBox loved his BoxeeBox, but it’s an old device now, with some support for web streaming (including Netflix) gone.

Other media center devices have filled the void in [Martin]’s life, but he loved that Boxee remote. Getting it working on his XBMC-equipped PC was a top priority. This meant figuring out a way to connect the RF receiver from a BoxeeBox to a USB port. It turns out this is pretty easy, requiring only a few parts and half of a USB cable.

[Martin] traced out the connectors on the RF receiver for the BoxeeBox, and found the usual V+, V-, Power, and Ground connections found in a USB cable. The receiver operated at 3.3 Volts, so stepping down the voltage required regulator. The rest of the project was simply putting everything in a project box and stuffing it behind his PC.

Windows identifies the RF receiver as a normal keyboard, so everything went swimmingly. Since [Martin] built this small device, a few people have come up with better keyboard layouts for XBMC and the Boxee remote, allowing this device to function far into the future.

Hacklet 17 – Keyboards

This week on The Hacklet we’re featuring some of the best keyboard hacks from Hackaday.io!

Hackers are really into their keyboards. Everyone has a favorite, and those favorites vary wildly. Mechanical, soft touch, ergonomic, QWERTY, DVORAK, chorded, you name it, there is a hacker, maker, or engineer who loves it, or absolutely hates it. For some, no commercial product is perfect. All is not lost though, as a custom keyboard is just a hack away!

ergo60

[Warren Janssens] gets things rolling with Ergo60, his 60 key ergonomic keyboard. [Warren’s] layout is a pair of 25 key hand clusters, each with a matching 5 key thumb cluster. This layout minimizes lateral wrist movement. With the reduced key count and stacked keys, the user’s hands never move from the home row. [Warren] rolled his own PCBs for Ergo60. A Teensy 2.0 running a fork of TMK serves as Ergo60’s controller. [Warren’s] is running Cherry Black switches and his keycaps are from Signature Plastics. [Warren] is using Ergo60 as his daily driver these days, so it’s no surprise that he’s set the “Completed Project” tag.

keycaps

Some say he needs no keyboard at all, and that his heartbeat sounds just like an IBM Model M. All we know is he’s called [Brian Benchoff]. [Brian’s] created a pair of minimalist keyboard projects. The Unhappy Hacking Keyboard takes us back to basics. After all, computers run on 1’s and 0’s, right? What more could a person need? Apparently just a space and return. Unhappy Hacking Keyboard uses an ATtiny85 with V-USB as the controller and the interface. Keys are cherry MX blues. The keycaps are [Brian’s] own Hackaday Cherry MX Keycaps printed by Shapeways.

zxkeyboardAn entire generation of hackers don’t know the joy of typing on a tiny rubber keyboard. [Alistair MacDonald] aimed to fix that, so he turned an old computer into a keyboard with his ZX Keyboard. [Alistair] started with a broken ZX Spectrum. He gutted the original electronics and added an Ardunio Pro Mini running the V-USB library. [Alistair] directly wired the row and column I/O lines from the keyboard to his Arduino. The result is a keyboard which is the perfect size for cell phones, Raspberry Pi’s and the like.

chordkey[Servo] teaches us new ways to type with Chordy KEY, his chording keyboard project. Chordy Key is meant to be used in the left hand. Five finger buttons and three thumb buttons are all that is needed to chord out 64 different letters and symbols. [Servo] utilized an ATmega32U4 powered Sparkfun pro micro to control his keyboard. Chordy Key is a proof of concept, but with [Servos’s] use of 3D printed parts, Chordy Key looks like it’s ready for your next wearable computing project!

chord2[jmptable] is also working on a chorded keyboard design. Chord Keyboard uses only 7 keys to send the entire ASCII character set and a few control combinations. [jmptable] used an ATmega328P as his processor. Chord keyboard isn’t wired though. An RN-42-HID module provides bluetooth connectivity to the world.

[jmptable] has provided an amazing amount of detail on his research, including one of his goals of adding a chorded keyboard to the Gameboy Advance. They keyboard itself would be mounted on the spine of a game cartridge. We would love to see that idea come to fruition, [Servo]!


mightyFinally we have [Gertlex], who just wanted a scroll wheel embedded in his keyboard. He got there with the help of an Apple Mighty Mouse. Keyboard with Apple Mouse Scroll Ball is one of those hacks that looks like it original equipment. [Gertlex] took a drill to a Targus slim USB keyboard, putting a small hole right between the ESC and F1 keys. He fit the scroll ball from his Apple Mighty Mouse in the hole. Electronics are as simple as plugging the mouse and keyboard into the same USB hub. The only downside to the design is that [Gertlex’s] keyboard doesn’t recognize fast enough to send key presses during the boot process.

That’s just about enough keystrokes for this episode of The Hacklet. As always, see you next week. Same hack time, same hack channel, bringing you the best of Hackaday.io!

Update – check our our keyboard list right here!

Canon Pixma Printer Frontpanel Library

Re-Using The LCD & Button Assembly From A Broken Inkjet Printer

Inkjet printers are a dime a dozen. You probably have taken old printers apart to scavenge parts like motors, pulleys, belts, switches, linear rods, power supply, etc. These parts are easy to reuse in other projects, unlike the controller portion of the printer which not as easy to make use of. [Blaupause] has done something very interesting, and it probably ranks in the ‘extreme difficulty’ category for most tinkerers. He has taken the front panel off an otherwise non-working Canon Pixma inkjet printer and has figured out a way to interface with it.

The front panel of this printer has the standard buttons that you would find on any ole printer, but the Pixmas also has a small LCD screen. [Blaupause] has written a library for the Olimexino microcontroller that can communicate with and make use of the repurposed front panel. And the neat part of this project is that the front panel’s on-board processor does the heavy lifting when it comes to displaying images on the LCD screen or checking button states which frees up your microcontroller to do whatever else. Right now, the LCD screen can display bitmaps and supports image transparency. The library can not display video as of yet, but that option is being worked on.

[Blaupause] makes all his hard work available to the public on the project’s Sourceforge page. In addition to the library, he also includes printer panel pinouts and detailed information on how to communicate with the buttons and LCD screen. Video after the break…

Continue reading “Re-Using The LCD & Button Assembly From A Broken Inkjet Printer”

Rapid Fire Mod For A Wireless Mouse

Rapid Fire Wireless Mouse

Sometimes changing your computer mouse can be uncomfortable for a while until you get used to the replacement. It may also take some time to get used to new features or the lack of features the new mouse has. [Jon] bought an awesome wireless mouse that he really likes but it is missing one critical feature: rapid fire for gaming. He previously modded his old wired mouse to have a rapid fire button using a 555 timer. That worked fine as the mouse ran off the USB’s 5 volts, and that’s the voltage the 555 timer needed. The new wireless mouse has a 1.5 volt battery and can not support the 555 timer. What’s a gamer to do?

[Jon] searched around the ‘net but could not find any wireless rapid fire mods. Eventually, he did find a low-voltage variation called the LMC555 and ordered a few for his project. The new wireless mouse was taken apart in order to find out how the mouse buttons work. In this case, the signal pin is pulled low when the mouse button is pushed. Now that it is known how the mouse button works, just a couple of resistors, a capacitor, an NPN transistor and a push button switch are all that are necessary to finish up this mod. When the push button is pressed, the LMC555 timer activates the transistor in order to ground the mouse button signal pin. This happens to the tune of 1236 times a minute! That is a lot of rapid firing.

The few components were soldered up neatly and packed into the limited spare area inside the mouse. A hole drilled in the side of the mouse’s housing holds the new rapid fire push button in an ergonomically pleasing location.

Earlier, we mentioned [Jon] has done this mod before on a wired mouse. He learned about that project here on Hackaday. Check it out if your wired mouse is craving a rapid fire button.

Video after the break…

Continue reading “Rapid Fire Mod For A Wireless Mouse”

ZX Spectrum Turned Into A USB Keyboard

ZX

They’re a little hard to find in the US, but the ZX Spectrum is right up there with the Commodore 64 and the Atari 8-bit computers in England. [Alistair] wanted to recreate the feeling of sitting right in front of the TV with his Speccy, leading him to create the ZX Keyboard, a Spectrum repurposed into a USB keyboard.

While most projects that take an old key matrix and turn it into a USB keyboard use the TMK firmware, [Alistair] wanted to flex his programming muscles and wrote the firmware from scratch. It runs on an Arduino Pro Mini, scanning the matrix of five columns and eight half rows to turn combinations of keypresses into an astonishing number of commands, given the limited number of keys on the ZX.

The firmware is available on [Alistair]’s repo, available to anyone who doesn’t want to pay the £50 a new ZX Spectrum keyboard will cost. As far as the usability of a Spectrum keyboard goes, at least [Alistair] didn’t have an Atari 400 sitting in the attic.

Building A True Unix Keyboard

keyboard

compact keyboards that do away with a third of the keys you would usually find on a normal-sized keyboard are all the rage now, but for [jonhiggs], they weren’t good enough. There is a long tradition of Unix shortcuts these compact keyboards don’t pay attention to – CTRL-A being the Home key, and CTRL-D being the Page Down key. To fix this horrible oversight of Unix history, [jon] tore apart one of these compact keyboards, rewired the switch matrix, and made his own perfect keyboard.

The keyboard [jon] is using is a Filco Minila, a very nice and high quality keyboard in its own right.  After mapping out the switch matrix, [jon] wired all the switches up to a Teensy 2.0 loaded up with the TMK firmware. This is a pretty standard way of building a custom keyboard, and [jon] could have just cut a switch plate and installed panel-mount switches and wired up the matrix and diodes point to point. The case for the keyboard is constructed out of Lego.

Because this is a true, modern Unix keyboard, [jon] needed to connect this keyboard to a box running his *nix of choice. He’s doing this in the most future-retro way possible, with an Amazon EC2 instance. This project isn’t done yet, and [jon] is hoping to add an ARM dev board, an iPad Retina display, battery, and SSD, turning this into a completely homebrew laptop designed around [jon]’s needs.