Improving Terrible Computer Speakers

[Victor] likes to watch movies on his laptop, but the tiny speakers in his machine don’t do [John Williams] and other perfectly fine soundtracks justice. To pump up the jams a little bit, [Victor] got a pair of Trust Mila 2.0 speakers for Sinterklaas. Unfortunately, these speakers were terrible – noise everywhere, tinny output and a brighter-than-the-sun blue LED. These problems were fixed once [Victor] replaced the amplifier in both speakers.

After shopping around for a new power amp to go in each speaker, [Vic] hit upon the MAX9575 3.2 Watt amplifier. This little guy met all of [Victor]’s requirements. The only problem is that the MAX9575 is only available in a TQFN package.

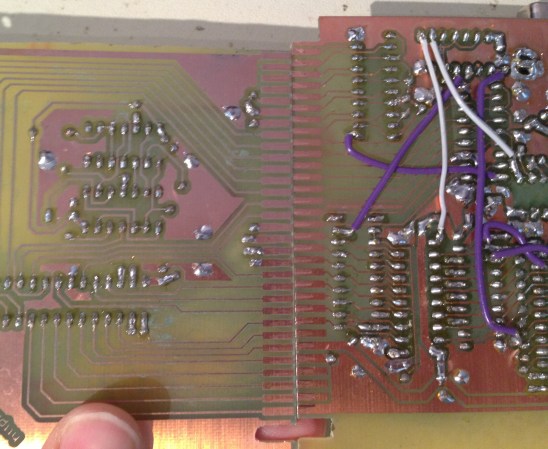
After a deep breath and much sweat of the brow, both amps found a new home in their respective speakers, deadbug style. It probably would have been easier to etch a PCB, but we’ll give a tip of the hat to [Victor]’s fine motor skills anyway.

Because of the insane soldering skill demonstrated in the title pic, [Vic] now has a really nice pair of speakers. Check out the demo of the improved speakers after the break.

Continue reading “Improving Terrible Computer Speakers”

Pick Up That Can, [Jeri]

We all need an excuse to play Half-Life 2 sometimes. [Jeri Ellsworth] put together a My First Crowbar controller to throw a few headcrabs across the room. It’s pretty much Half-Life 2 for the Wii.

The build is very simple – just a tilt switch hot glued to the underside of a childs-size crowbar. Two leads go from the tilt switch to the contacts on a (PS3?) controller. All you need to do to attack is swing the crowbar wildly.

[Jeri] has us wondering what other awesome game controllers could be made. Of course we’ve been wanting a real-life Gravity Gun or Portal Gun for years now, but right now we’re thinking about a real Katamari. We might need more hot glue.

As far as building our own, we’re thinking about using one of the Cheap DIY tilt switches we saw the other day. It’s a simple build, and sure looks like a lot of fun.

Continue reading “Pick Up That Can, [Jeri]”

Researchers Claim That HP Laser Printers Can Be Hijacked To Steal Data And Catch Fire

hp-laserprinter-security-holes

The news was abuzz yesterday with coverage of a study released by Columbia University researchers warning consumers that HP laser printers are wide open to remote tampering and hacking. The researchers claim that the vast majority of printers from HP’s LaserJet line accept firmware updates without checking for any sort of digital authentication, allowing malicious users to abuse the machines remotely. The researchers go so far as to claim that modified firmware can be used to overheat the printer’s fuser, causing fires, to send sensitive documents to criminals, and even force the printers to become part of a botnet.

Officials at HP were quick to counter the claims, stating that all models built in 2009 and beyond require firmware to be digitally signed. Additionally, they say that all of the brand’s laser printers are armed with a thermal cutoff switch which would mitigate the fuser attack vector before any real fire risk would present itself. Despite HP’s statements, the researchers stand by their claims, asserting that vulnerable printers are still available for purchase at major office supply stores.

While most external attacks can easily be prevented with the use of a firewall, the fact that these printers accept unsigned firmware is undoubtedly an interesting one. We are curious to see if these revelations inspire anyone to create their own homebrew LaserJet firmware with advanced capabilities (and low toner warning overrides), or if this all simply fizzles out after a few weeks.

Simple Low Toner Workaround Squeezes Out A Few Extra Pages When Your Printer Refuses

low-ink-hacking

[Andrew] was getting ready to print out an assignment when his Samsung printer suddenly started blinking a red error light at him. Unable to find any documentation explaining the issue, he called Samsung directly and found that it was indicating the toner cartridge was nearly empty.

He held down the button that prints a test page, which came out just fine despite the printer’s insistence that there was not enough toner left. Annoyed at the fact that he felt Samsung was trying to strong arm him into buying another pricey toner cartridge, he looked for a way around the restriction.

He discovered that his printer’s software allowed him to specify a custom test page document, though it required that the document be in PostScript format. After a few shell commands, he had his document converted and was on to bigger and better things.

While a bit time consuming, his workaround should let him get by on this toner cartridge at least for a little while longer. We imagine that since he’s using Linux, the process could probably be scripted to save time, though we’re not sure if the same can be said for Windows-based PCs.

ColorHug: A Reasonably-priced, Completely Open Color Calibration Tool

colorhug-opensource-color-calibrator

[Richard] wanted to create a color profile for his computer monitor, but he wasn’t thrilled with the existing color calibration offerings he found for sale. Color calibration tools can be somewhat costly, but even more troubling to [Richard] was the fact that they are all closed source. Closed hardware and closed software can be a drag, especially when manufacturers drop support for a product, so he set off to design his own open-source monitor calibration tool.

Once his ColorHug sensor is placed against a monitor, it begins sampling colors from the screen, creating an ICC color profile from the data it gathers. The sensor is a Linux-only tool at the moment, but he has created a live CD from which a color profile can be created, then subsequently used in Windows or OSX.

While ColorHug doesn’t sport all the features of its commercial competitors, its color sampling rate is second to none, and since the software is open, anyone is free to implement any sort of functionality they wish.

[Richard] is currently selling finished ColorHug modules to anyone interested in giving them a test drive, but you can always build your own from the plans found at ColorHug’s Github repository.

[via Adafruit blog]

NES Controller Is A Slick Way To Carry Around Your Portable OS

nes-controller-linux-drive

[Oliver] had an old NES controller laying around, and without any other use for it, he decided to repurpose it as a portable storage device.

He gutted most of the controller, removing the plastic standoffs, leaving the D-pad and remaining buttons intact. He crammed a 32 GB flash drive inside, along with the guts from an SD card reader. Using a Dremel he cut several openings into the controller, one for the flash drive and SD card reader’s USB ports, as well as for the SD card itself. When the physical modifications were finished, he installed a small Linux distro on the flash drive, which can be run by any PC that supports booting from USB.

While some might argue, we think it’s a neat way to reuse an old gaming peripheral that he might have otherwise thrown out. The portable OS is something that would certainly come in handy, though we can’t wait until the Raspberry Pi is finished – it would be awesome to have a complete computer packed in there too.

Using Your Existing Hardware To Automate Scanning And Filing

This one must have been fun to come up with because it’s got it all. There’s hardware, firmware, networking, and server scripts all working together to create a filing, scanning document center for your business. The best part is that [Janis Jakaitis] was tasked to do this as part of his job (we’re sure there’s a bunch of IT guys shaking their heads at this statement, but it sounds like fun to us!).

The goal was to use an existing document scanner to create PDFs which are then stored in a filing system on the network. Of course it needed to be automatic. The first big issue was that the scanner was USB only, and when connected to a USB-to-LAN bridge the buttons on the device no longer functioned. [Janis] put together an Arduino circuit that added that button, as well as a display to show the status of your scan job.

The next issue is getting the filing system to recognize the document as a unique file. The solution here is to generate a unique barcode label that can be affixed to the page before scanning. Since this is a standalone setup, it was tricky to get the label printer to spit out a unique label. He already had the Arduino working with the scanner, so [Janis] decided to use it to drive this barcode job as well. It calls to a Lua script running on the server, which then pushes the next unique code to the printer.

Tie it all together and you get the demo video after the break.

Continue reading “Using Your Existing Hardware To Automate Scanning And Filing”