Two-Thirds Keyboard Is Inspired By The Typesetting Era

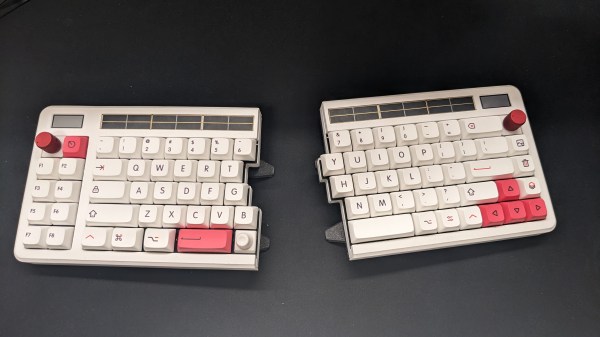
We see all kinds of custom keyboard builds around here. Most of them are intended to optimize typing to the user’s desires. This glorious build from [Attoparsec] isn’t one of those, and is instead part of the growing joke keyboard genre. The so-called Two-Thirds Keyboard is inspired by the long-gone typesetting era.

The build is based on the typecases used in the era when type was assembled by hand. Typesetters would grab “majuscule” letters from the upper case of type, and “miniscule” letters from the lower case of type, when setting a page, which would go on to influence how we refer to those letters today. Letters that came up more often, like e and s, would get larger compartments in the type cases, while rarer letters like z and q would get smaller compartments. The Two-Thirds keyboard replicates this by giving the most common letters the biggest keys, while rarer letters and upper-case majuscule letters get smaller keys. The overall layout matches that of the popular Two-Thirds California Case of type that grew popular in the US in the typesetting era.

There were some engineering issues in building the keyboard. While stabilizers are available for wide keys like Enter and Space in regular keyboard designs, stabilizing keys that are wide and high is fussy. The build relies on multiple switches to enable them to move cleanly. Nor were 2×2 and 2×3-sized custom keycaps readily available. In the end, resin printing was key to producing all the necessary components.

Typing on the keyboard is not quick, but lower speeds were probably acceptable in the typesetting era. Regardless, [Attoparsec] used it for a full week to do it justice, going from around 10  wpm to 22 wpm by the end of the test.

It’s a fun build, but by no means the slowest keyboard we’ve ever seen.

Continue reading “Two-Thirds Keyboard Is Inspired By The Typesetting Era”

A huge cardboard computer with an equally huge mouse

Massive Mouse Game Mimics Classic Software Crashes

Computer mice come in all kinds of shapes and sizes, but are typically designed to fit in the palm of your hand. While some users with large hands may find standard mice uncomfortably small, we don’t think anyone will ever make that complaint about the humongous peripheral [Felix Fisgus] made for a game called Office Job at the ENIAROF art festival in Marseille. With a length of about two meters we suspect it might be the largest functional computer mouse in existence.

An optical mouse sensor mounted on a cardboard frameInside the massive mouse is a wooden pallet with four caster wheels that enable smooth movement in all directions. This motion is detected by an ordinary optical mouse sensor: perhaps surprisingly, these can be used at this enormous scale simply by placing a different lens in front.

As for the mouse button, [Felix] and his colleagues found of that the bottom of an empty five-liter can has a nice “pop” to it and installed one in the front section of the device, hooked up to an ESP32 board that communicates with a computer through Bluetooth.

The mouse connects to an equally huge desktop computer, powered by a Raspberry Pi, on which users play a game that involves clicking on error messages from a wide variety of old and new operating systems. Moving the mouse and pressing its button to hit those dialog boxes is a two-person job, and turns the annoyance of software errors into a competitive game.

Optical mouse sensors are versatile devices: apart from their obvious purpose they can also serve as motion sensors for autonomous vehicles, or even as low-resolution cameras.

Continue reading “Massive Mouse Game Mimics Classic Software Crashes”

Exploded version of the Cistercian display

Serial Cistercian Digit Module

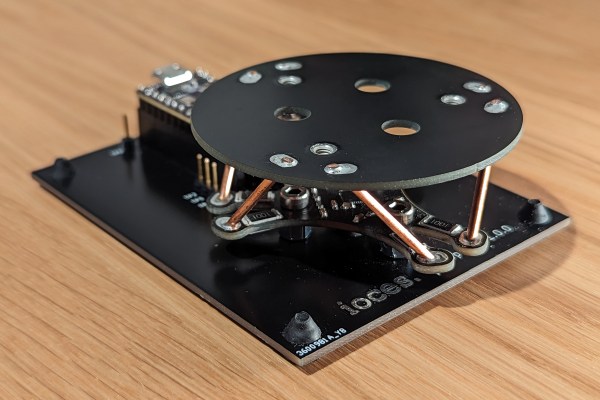
There’s no doubt that the 7-segment display is a gold standard for displaying lighted digits. But what about a throwback to an older system of displaying numbers — Cistercian? With thirty-one 0805 LEDs, [Josue Alejandro] made a simple module displaying a single Cistercian digit (any from 0-9999).

The first iteration used castellated edges and required a significant number of GPIO, so on the next rev, he switched to a serial-to-parallel converted from Lumissil (IS31FL3726A). A diffuser and spacer were printed from PLA and made for an incredibly snazzy-looking package.

Of course, it couldn’t stop there, and a third revision was made that uses SK6812 Neopixels, allowing full RGB capability. All the design documents, layout files, and incredibly detailed drawings are available on GitHub. What makes this incredibly handy is having a module you can easily add to a project. Perhaps even as a component in an escape room in a box that would allow you to flash multiple numbers. Or perhaps as a stylish clock. We’d even go so far as to challenge someone to create a calculator by combining several of these modules with this keypad.

A toy gamepad controlling Super Mario World emulated on a MacBook

Turning A Toy Gamepad Into A Real One, With Bluetooth

It’s important to instill healthy habits in your children when they’re still young. Preferences for sports, snacks and dinosaurs are typically formed in early childhood, as is loyalty to a specific gaming platform. [RetrogradeScene] apparently wished to steer his young daughter towards the Nintendo camp, but wasn’t looking forward to having her grubby hands touch his prized controllers. So he built her her own kid-friendly controller out of a Fisher-Price toy.

The toy in question is an imitation game controller that just makes funny sounds when you press the buttons. Converting it into a real, working game controller was a matter of soldering some wires onto the existing PCB and hooking them up to a microcontroller board, in this case a DFRobot FireBeetle. After loading the ESP32-BLE-Gamepad library and assigning the correct pin-button combinations in software [RetrogradeScene] ended up with a big, brightly-coloured gamepad that actually functioned as one.

Unfortunately, the FireBeetle took up space where the original AAA batteries were sitting, so the hacked gamepad needed a new power source. Classic batteries are heavy and inconvenient anyway, so [RetrogradeScene] installed a modern lithium battery plus a USB-C port for charging. Of course, no Bluetooth gadget is complete without an accompanying smartphone app either: [RetrogradeScene] wrote one for his iPhone that enables him to quickly change the button layout between the Nintendo and Xbox styles.

This might be a rare example of someone making a gamepad from, well, a gamepad. We’ve seen a few more unusual things being converted into game controllers, ranging from a handful of LEGO bricks to entire cars.

Continue reading “Turning A Toy Gamepad Into A Real One, With Bluetooth”

Osprey Keyboard Lets The NRF52840 Spread Its Wings

While most people don’t care whether they use one finger or ten, some people want to better themselves by learning how to touch-type. And honestly, there’s no easier way to do that than by getting into the ergo keyboard game. Even if you consider yourself a touch-typist already, an ortholinear or column-staggered keyboard may teach you otherwise, as you find yourself trying to type ‘c’ with your index finger (for example) and failing miserably.

[ebastler] chose the best of all routes and decided to build his own perfect keyboard, called the Osprey. It’s a wireless, column-staggered 40% that runs on ZMK firmware, which of course is open-source, as is the PCB itself and the thick and travel-ready printed enclosure. Although [ebastler] has yet to implement either one of these additional inputs, the Osprey also supports a thumbstick and a track pad.

Brain-wise, it’s a bare nRF52840 chip along with a TI BQ24075 for battery charging. The interesting thing about this implementation is that [ebastler] used and abused Nordic sample schematic #4, which utilizes both DC-DC converter stages of the chip. We can’t wait to see what this trailblazing build will mean for the community!

Rotary Dial Number Pad Is The Perfect Prank For Retro-Phone Enthusiast

We’re not sure about the rest of you, but to us, a keyboard without a number pad all the way over to the right just seems kind of — naked? We might not be accountants, but there’s something comforting about having the keypad right there, ready for those few occasions when you need to enter numbers more rapidly than would be possible with the row of number keys along the top of the keyboard.

What we are sure about, though, is that rapid numeric keying is not what this rotary dial numpad keyboard is all about. In fact, it’s actually an April Fool’s prank [Squidgeefish] played on a retro-phone-obsessed coworker, and it worked out pretty well. Starting with an old telephone dial from what must be an exceptionally well-stocked parts bin, [Squidgeefish] first worked out the electrical aspects of interfacing the dial with a cheapo mechanical keyboard. It turns out that there’s a lot of contact bounce in those old dials, leading to some software hacks to keep the Arduino happy.

There was also a little hackery needed to stuff a USB hub into the keyboard, as well as literal hacking of the keyboard’s PCB. A 3D printed enclosure allows the rotary dial to nestle into the place where the regular numpad would be, and it looks pretty good. We also like forcing the issue by replacing the entire row of number keys with a single massive prank key.

While this was all for fun, there are a couple of cool tips here, like chucking a bit of printer filament in a Dremel tool to stir-weld parts together. And even though we’ve seen that parametric keycap generator before, it is pretty cool to see it in action.

A grey keyboard with orange and dark grey accents is angled away from the camera. The keys nearby are clearly distinguishable in the foreground but blurry toward the back/right. The keyboard is quite thick as it also contains a computer motherboard.

Mechanical Keyboard With A Framework Inside

Like the Commodore 64 and other keyboard computers of yore, the [Elevated Systems]’s CJ64 fits all of its processing and I/O into a single keyboard-shaped package.

This iteration of the project takes it to the next level with an enclosure milled out of aluminum instead of the mere 3D printed enclosure of the previous versions. With a Framework mainboard, the ports are configurable via the Framework expansion card system giving you even more options to customize this build. To round it out, this keyboard PC doesn’t scrimp on the keyboard part either with mechanical switches and MT3 profile keycaps.

If you’d like to build one of these for yourself, [Elevated Systems] has uploaded the 3D printed enclosure files to his GitHub repository. The files for machining are available as well, but only to patrons.

For some more Framework-based mods, check out this Framework Tablet, the Framedeck, or this other retro-inspired Framework build. If you want an all-in-keyboard slabtop, then maybe check out Are Slabtops the Future of Computing?

Continue reading “Mechanical Keyboard With A Framework Inside”