Pi Pico QR Display Hands Out WiFi Info With Style

At this point, you’re likely aware that you can store your wireless network’s credentials in a QR code, so that anyone who wants to connect with their smartphone need only scan the 2D barcode. Whether you print it out on paper, extrude it out of plastic, or paint the thing on the wall, it still works the same. It’s a neat trick for when you’ve got friends and family over, and saves you having to explain your ponderously long WPA key.

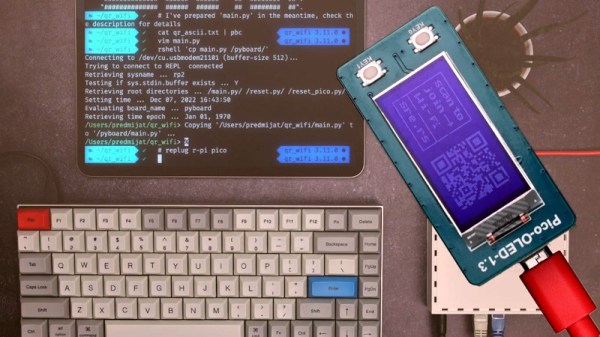
But what if you want to change up the encryption key every so often? Sure would be a hassle to have to repaint the wall. Enter this interesting project from [Predrag Mijatovic], which uses a few scripts to automatically set up a new encrypted guest WiFi network and present the appropriate QR code on an OLED display attached to a Raspberry Pi Pico. It’s a bit convoluted, and almost certainly won’t work on your network without significant tweaks, but we’re intrigued by the idea.

As [Predrag] explains, the whole thing is based on a Latvian MikroTik router that can be configured over SSH. A Bash script generates a new encryption key by base64 encoding the output /dev/urandom,  logs into the router to set up a new network using it, and then generates the matching ASCII QR code. With some sed trickery, the code is then embedded into a MicroPython program that gets uploaded to the connected Pi Pico.

In the video after the break [Predrag] takes us through the process manually so it’s easier to see what’s going on. Under normal circumstances, it would all happen automatically and would take just a few seconds to complete. We’d feel more comfortable if the scripts had some error correction that would allow them to gracefully exit if something goes wrong, but as a proof of concept, it certainly works.

We’d like to see this concept explored a bit further, perhaps using one of the physical QR code displays we’ve seen over the years. A programmable electronic paper display would also be a logical way to show off a dynamic QR code.

Continue reading “Pi Pico QR Display Hands Out WiFi Info With Style”

Power Over Ethernet, Explained

Most readers will be familiar with Ethernet networks in some form, in particular the Cat5 cables which may snake around the back of our benches. In a similar vein, we’ll have used power over Ethernet, or PoE, to power devices such as webcams. Buy a PoE router or switch, plug in a cable, and away you go! But what lies behind PoE, and how does it work? [Alan] has written a comprehensive guide, based on experience working with the technology.

What we get first is a run-down of the various topographies involved. Then [Alan] dives into the way a PoE port polls for a PoE device to be connected, identifies it, and ramps up the voltage. Explaining the various different circuits is particularly valuable. The final part of the show deals with the design of a PoE module, with a small switching power supply to give the required 48 volts.

All in all, this should be required reading for anyone who works with Ethernet, because it’s one of those things too often presented as something of a black box. If you’re thirsty for more, it’s a subject Hackaday have touched on too in the past.

Osprey Keyboard Lets The NRF52840 Spread Its Wings

While most people don’t care whether they use one finger or ten, some people want to better themselves by learning how to touch-type. And honestly, there’s no easier way to do that than by getting into the ergo keyboard game. Even if you consider yourself a touch-typist already, an ortholinear or column-staggered keyboard may teach you otherwise, as you find yourself trying to type ‘c’ with your index finger (for example) and failing miserably.

[ebastler] chose the best of all routes and decided to build his own perfect keyboard, called the Osprey. It’s a wireless, column-staggered 40% that runs on ZMK firmware, which of course is open-source, as is the PCB itself and the thick and travel-ready printed enclosure. Although [ebastler] has yet to implement either one of these additional inputs, the Osprey also supports a thumbstick and a track pad.

Brain-wise, it’s a bare nRF52840 chip along with a TI BQ24075 for battery charging. The interesting thing about this implementation is that [ebastler] used and abused Nordic sample schematic #4, which utilizes both DC-DC converter stages of the chip. We can’t wait to see what this trailblazing build will mean for the community!

DrLCD Is Here To Give Your MSLA Printer A Checkup

Over the last couple years, we’ve seen an absolute explosion of masked stereolithography (MSLA) 3D printers that use an LCD screen to selectively block UV light coming from a powerful LED array. Combined with a stepper motor that gradually lifts the build plate away from the screen, this arrangement can be used to produce high-resolution 3D prints out of photosensitive resins. The machines are cheap, relatively simple, and the end results can be phenomenal.

But they aren’t foolproof. As [Jan Mrázek] explains, these printers are only as good as their optical setup — if they don’t have a consistent UV light source, or the masking LCD isn’t working properly, the final printed part will suffer. In an effort to better understand how these factors impact print quality, he designed the DrLCD: a TSL2561 luminosity sensor mounted to a robotic arm with associated software to map out the printer’s light source.

The individual LED assemblies are clearly visible.

The results when running DrLCD against a few different types of printers is fascinating. [Jan] was clearly able to make out the type of lenses used, and in one case, was even able to detect that a darker spot in the scan was due to a bit of resin having leaked into the light source and clouded up the optics.

But DrLCD can do more than just tell you where you’ve got a dark spot. Using the data collected from the scan, it’s possible to create a “compensation map” that can be combined with the sliced model you wish to print. As the slicer assumes an idealistic light source, this map can help by adding additional masking where bright spots in the display have been detected.

[Jan] goes on to compare the dimensional accuracy of printed parts before and after the compensation map has been applied to the model, and was able to identify a small but distinctive improvement. Not everyone is going to be concerned about the 157 µm deviation observed without the backlight compensation, but we certainly aren’t going to complain about 3D printers getting even more dimensionally accurate.

A couple years back we covered a similar technique that used a DSLR to capture high-resolution images of the bed. While arguably much easier to pull off, we can’t help but fall in love with the glorious overengineering that went into the DrLCD system, and we can’t wait until it starts making house calls.

The Robots Of Fukushima: Going Where No Human Has Gone Before (And Lived)

The idea of sending robots into conditions that humans would not survive is a very old concept. Robots don’t heed oxygen, food, or any other myriad of human requirements. They can also be treated as disposable, and they can also be radiation hardened, and they can physically fit into small spaces. And if you just happen to be the owner of a nuclear power plant that’s had multiple meltdowns, you need robots. A lot of them. And [Asianometry] has provided an excellent synopsis of the Robots of Fukushima in the video below the break.

Starting with robots developed for the Three Mile Island incident and then Chernobyl, [Asianometry] goes into the technology and even the politics behind getting robots on the scene, and the crossover between robots destined for space and war, and those destined for cleaning up after a meltdown.

The video goes further into the challenges of putting a robot into a high radiation environment. Also interesting is the state of readiness, or rather the lack thereof, that prompted further domestic innovation.

Obviously, cleaning up a melted down reactor requires highly specialized robots. What’s more, robots that worked on one reactor didn’t work on others, creating the need for yet more custom built machines. The video discusses each, and even touches on future robots that will be needed to fully decommission the Fukushima facility.

For another look at some of the early robots put to work, check out the post “The Fukushima Robot Diaries” which we published over a decade ago.

Continue reading “The Robots Of Fukushima: Going Where No Human Has Gone Before (And Lived)”

Build A Better Mousetrap… But It Better Be Better!

As creative problem solvers, we like to “think outside the box,” and we should strive for that. But what happens if your strange idea isn’t kept in check by cooler heads? There is a real danger — especially if you work alone — to falling so in love with your idea, that you lose sight of what it really means to be better.

Case in point. The self-parking car. Well, not the modern variant, which seems to work pretty well. But did you know that the self-parking car was invented in the 1930s and used an extra fifth wheel? Hard to imagine? See the video below. History tells us that the idea didn’t catch on.

Continue reading “Build A Better Mousetrap… But It Better Be Better!”

A Very Tidy ATX Bench PSU

If there’s one thing that for decades of desktop PCs have given us, it’s a seemingly endless supply of relatively capable power supplies. If you need 5 volts or 12 volts at a respectable current they’re extremely useful, so quite a few people have used them as bench power supplies. Some of these builds box up the mess of wires into a set of more useful connectors, but [Joao Pinheiro] has taken his to the next level with a very neat 3D printed case and a set of variable switching regulators to make a variable bench supply with a top voltage of 60 volts.

In many ways it’s a straightforward wiring job to build, but there’s an unexpected power resistor involved. It’s sinking the 5 volt line, and we’re guessing that some current is required here for the PC power supply to run reliably. The thought of a high power resistor dumping heat into a 3D printed case leads us to expect that things might become a little melty though.

ATX power supplies are so numerous as to be expendable, so it’s always worth regarding them as a source of parts as well as a power supply.