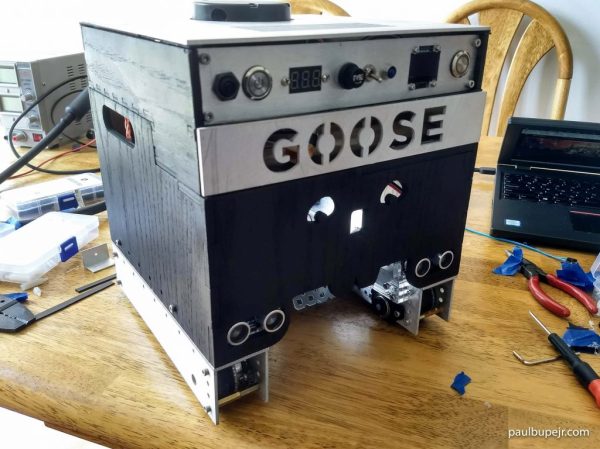
Robotics is hard, maybe not quite as difficult as astrophysics or understanding human relationships, but designing a competition winning bot from scratch was never going to be easy. Ok, so [Paul Bupe, Jr’s] robot, named ‘Goose’, did not quite win the competition, but we’re very interested to learn what golden eggs it might lay in the aftermath.
The mechanics of the bot is based on a fairly standard dual tracked drive system that makes controlling a turn much easier than if it used wheels. Why make life more difficult than it is already? But what we’re really interested in is the design of the control system and the rationale behind those design choices.
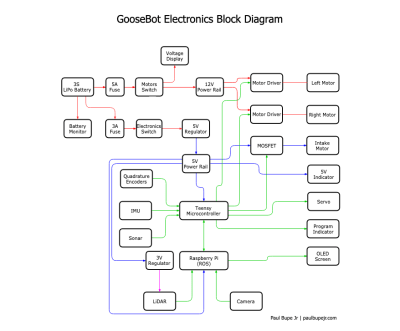
The diagram on the left might look complicated, but essentially the system is based on two ‘brains’, the Teensy microcontroller (MCU) and a Raspberry Pi, though most of the grind is performed by the MCU. Running at 96 MHz, the MCU is fast enough to process data from the encoders and IMU in real time, thus enabling the bot to respond quickly and smoothly to sensors. More complicated and ‘heavier’ tasks such as LIDAR and computer vision (CV) are performed on the Pi, which runs ‘Robot operating system’ (ROS), communicating with the MCU by means of a couple of ‘nodes’.
The competition itself dictated that the bot should travel in large circles within the walls of a large box, whilst avoiding particular objects. Obviously, GPS or any other form of dead reckoning was not going to keep the machine on track so it relied heavily on ‘LiDAR point cloud data’ to effectively pinpoint the location of the robot at all times. Now we really get to the crux of the design, where all the available sensors are combined and fed into a ‘particle filter algorithm’: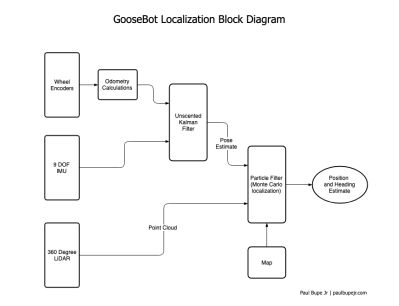
What we particularly love about this project is how clearly everything is explained, without too many fancy terms or acronyms. [Paul Bupe, Jr] has obviously taken the time to reduce the overall complexity to more manageable concepts that encourage us to explore further. Maybe [Paul] himself might have the time to produce individual tutorials for each system of the robot?
We could well be reading far too much into the name of the robot, ‘Goose’ being Captain Marvel’s bazaar ‘trans-species’ cat that ends up laying a whole load of eggs. But could this robot help reach a de-facto standard for small robots?
We’ve seen other competition robots on Hackaday, and hope to see a whole lot more!
Video after the break: Continue reading “Designing An Advanced Autonomous Robot: Goose” →