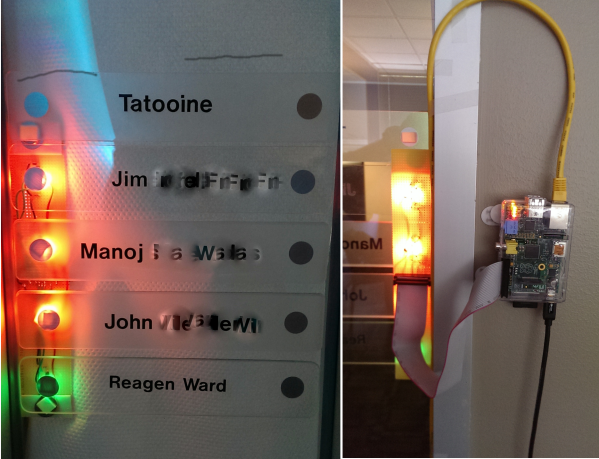
LED IM status indicator

Green Light Go, Red Light Come Back Later

Depending on your taste for social interaction and tolerance for distraction, an open floor plan or “bullpen” office might not be so bad with a total of four people. Hackaday.io user [fiddlythings] likes it, but people often stop by to see him or one of his coworkers only to find them busy or absent. While their status is something they could plainly see in Microsoft Communicator from their own desk, some people like to chat in person or stop by on their way to and from meetings.

In order to save these visitors a few seconds, [fiddlythings] came up with an IM status indicator using their existing nameplates outside the door. Each of their names has a little silver dot by it which he backlit with a flattish RGB LED. These LEDs are driven by a Raspberry Pi and NPN transistors through a ribbon cable.

The plan was to imitate the Communicator status colors of green for available, red for busy, and yellow for away. [fiddlythings] dialed up a lovely shade of amber for away using a mix of red and green. Since he really only needs two colors, he’s using eight NPN transistors instead of twelve. The quick ‘n dirty proof of concept version used Python and a Pidgin IM console client called Finch. Once he got IT’s blessing, he implemented the final version in C++ using Libpurple to interface with Communicator.

This isn’t the first time we’ve seen a Pi used to indicate status—remember this mobile hackerspace indicator?

BrickPi Bookreader 1 And 2 Read Tablets Or Books Aloud, You Choose

BrickPi Bookreader 2

Have you ever wanted to relax with a good book but couldn’t due to the hassle of having to actually read and turn pages? Well, now BrickPi offers 2 solutions to that problem. They have you covered regardless if your document is on a tablet or resides in a physical book.

The original Bookreader will read out loud the displayed text on a tablet. brickpi bookreaderThis is not an application that runs on the tablet, it is a completely separate device that ‘reads’ the tablet screen. As you could guess from the BrickPi name, the brains behind the operation is a Raspberry Pi. A camera takes a photograph of the displayed text and the Raspberry Pi converts that image file to text using Optical Character Recognition. A Text-to-Speech engine then speaks the text in a robotic sounding voice. In order to change the page the Raspberry Pi controls a Lego Mindstorms arm that swipes across the tablet screen and the entire process is repeated.


Continue reading “BrickPi Bookreader 1 And 2 Read Tablets Or Books Aloud, You Choose”

Raspberry Pi Boiler Control Uses A Webcam To Read The Analog Gauge

sub-image

One of the biggest problems with home automation is trying to interface with old or analog devices. Do you upgrade the device just so you can automate it? Or do you find a workaround like [Seb] did?

[Seb] doesn’t have on-demand hot water, and as such has to turn on his boiler if he wants to have a hot bath or shower. Not very convenient having to wake up an hour early in the morning just to turn the boiler on so he can have a morning shower! Nonplussed with having to continue putting up with this, he decided to try his hand at home automation using a Raspberry Pi.

The problem is there’s no easy way to have feedback on what the boiler is doing — sure he can turn it on and off using a mains relay with the Pi’s GPIO, but how can he easily measure the temperature inside the boiler?

Continue reading “Raspberry Pi Boiler Control Uses A Webcam To Read The Analog Gauge”

The PebblyPi: A Smart Doorbell

PebblyPi

A Pebble smart watch, and a Raspberry Pi. They are a perfect match. This is probably what [Daniel] thought when he embarked upon his latest project, a smart doorbell called the PebblyPi (tip submitted by [Ben]).

The actual project is quite easy to implement. All you need really need is a Raspberry Pi, a switch, a resistor, and a Pebble Smart Watch (plus a smart phone). Using a simple Python script on the Raspberry Pi, button press notifications are sent to Pushover, which allows the notification to arrive on your smart phone (and thus your Pebble Smart Watch). Pushover is a very cool notification service for Android devices, iPhones, iPads, and your Desktop. The concept behind this project is great, and the fact that it is so simple to implement opens up many other possibilities for interfacing your home electronics with the Pebble Smart Watch (or even just your smart phone). The ability to create custom notifications on any of your devices using any internet connected system is amazing!

You could receive notifications from your absurdly accurate weather station, or even your soil moisture monitor. Have you used Pushover in any of your projects? The possibilities are endless!

Continue reading “The PebblyPi: A Smart Doorbell”

Input And Output On A Single Pin

IO

[Emilio] has a Raspberry Pi with a few sensors running totally headless. It’s a great way to gather data and post it on the Internet, but for the rare occasions when the Pi needs to be turned off for maintenance, [Emilio] needs to connect a monitor, a keyboard, and a mouse. Not a perfect solution when a simple pushbutton and indicator LED would suffice. There’s one problem with adding a simple button and LED combo: there’s only one GPIO pin available in the setup. That’s nothing a few resistors won’t fix.

After wiring up a very simple circuit on a piece of perfboard, [Emilio] met his design goal of being able to tell if the Pi was running and giving it a software reset button using only a single GPIO pin. The circuit requires only two resistors, and the software to make everything run – a simple Python script – toggles the pin between input and output, checking if the button is held down for five seconds. If it is, the Raspi powers off for [Emilio]’s routine maintenance.

My First Robot: A Dad’s Journey In Robotics For His Daughter

My first robot

[Joel Miller] wants to get his daughters into electronics early (his oldest is only 3), so he’s decided to foray into the wonderful world of robotics as a fun way to get them interested. As bonus to us and all other would-be robotics enthusiasts out there, he’s keeping track of the project on his blog!

He started by sketching out some ideas about what he wanted his robot to be capable of — it should be able to move around, be remote controlled, have sensors for experiments, and even have some personality — expression capable eyes maybe? Oh and it should be able to automatically charge itself, and have tank treads!

It’s been a few weeks since he started scheming up ideas… and he already has a prototype complete! Talk about a productive father! He decided to try 3D printing a continuous tank tread using ABS, but unfortunately it was a bit too stiff, so he’s opted to use a tried and true Lego system instead — although maybe he should try printing in two materials, like we just saw with the FlexyDualie extruder!

Continue reading “My First Robot: A Dad’s Journey In Robotics For His Daughter”

Recycled Foam Box Is Now A Weather Station

Raspberry pi in foam box

When [Ioannis] received some high resolution LCD’s in a tattered foam box, he posed to himself a most interesting question – Should he throw the foam box away, or use it as a container for a project? Fortunately for us, he decided on the latter and threw together a very capable weather station!

Having only an hour to spare, [Ioannis] grabbed a Raspberry Pi, WiFi USB stick and a camera module and went to work. He mounted the camera module to the foam lid using a highly advanced technique, and soldered a cable that would power the device directly to D17 – a Zener diode that sits on the bottom of the board.

For the weather data, he’s using another design of his – the Sensor Stick. This nifty device — which we featured over the weekend — is about the size of a stick of chewing gum, and sports an array of sensors including the popular BMP085, which can measure pressure and temperature .

He wraps up everything using open source software to get the data from the weather station. Pretty impressive for an old foam box and an hours time! This would be an interesting start to a home automation system. Connect it to motorized windows and/or a sprinkler system and he’s on his way to claiming The Hackaday Prize.