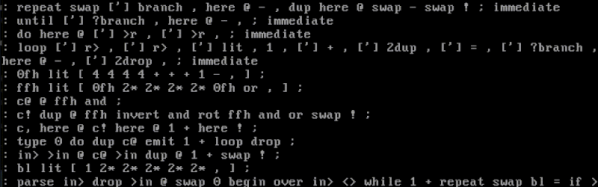
When you think of a programming language, you probably think of a hefty compiler or interpreter. Maybe its on a bunch of floppies, a CD, or even an EEPROM. But what about a language that fits in a single disk sector? A language like that would — in theory — be used to help bootstrap a computer system and that was the idea behind Sector Forth and, later, Sector Lisp. However, there’s a new game in town: milliForth, which claims to be the smallest ever at 422 380 bytes.
Why would you want such a thing? Well, first of all, why not? Even as a form of code golf, packing a functioning language into a tiny space seems interesting. However, you could also presumably use something like this to boot a small system or on a system with limited storage.
The Raspberry Pi series of boards are noted for their good software support, with a continuous flow of operating system upgrades such that an original Pi from 2012 will still boot the latest Pi OS. But these upgrades are best done by writing a fresh SD card, so oddly, the Pi remains surprisingly difficult in many cases to upgrade in place. [Iustin Pop] has taken a look at the problem, and finds that though it’s not always easy it remains possible with a bit or work.
An upgrade in place of a Raspberry Pi OS install that’s running on a headless device is probably the simplest of the lot, with a relatively small set of issues. Do it on a machine using the GUI though, and the switch from x.org to Wayland makes for a whole world of pain.
Perhaps most interesting for the insight it gives us into the way Raspberry Pi OS is derived from Debian, is the crossgrade process from the ARMhf build for earlier machines to the ARM64 one for the more recent ones. Here aside from a headache of differing paths and versions, he encounters the Pi-specific compilation tweaks put in place by the developers of Raspberry Pi OS, leading to the ARMhf version being a different branch from the original Debian than the ARM64 one.
Having read his examination of in-place upgrades we have to say that simply writing a new SD card remains the most attractive option. But sometimes along comes a remote system where that’s simply not possible, and this guide might just be very useful sometime.
We imagine many of you have seen the ridiculous scene from the TV series NCIS in which a network intrusion is combated by two people working at the same keyboard at once. It’s become a meme in our community, and it’s certainly quite funny. But could there be a little truth behind the unintentional joke? [Tedu] presents some possibilities, and they’re not all either far-fetched or without application.
The first is called Duelmon, and it’s a split-screen process and network monitor worthy of two players, while the second is Mirrorkeys, a keyboard splitter which uses the Windows keys as modifiers to supply the missing half. As they say, the ability to use both at once would be the mark of the truly 1337.
Meanwhile here at Hackaday we’re evidently closer to 1336.5, as our pieces are written by single writers alone at the keyboard. We would be fascinated to see whether readers could name any other potential weapons in the dual-hacker arsenal though, and we’d like to remind you that as always, the comments are open below.
The intense hacking scene from NCIS can be found below the break. Be warned though, it contains the trauma of seeing a computer unplugged without shutting down first.
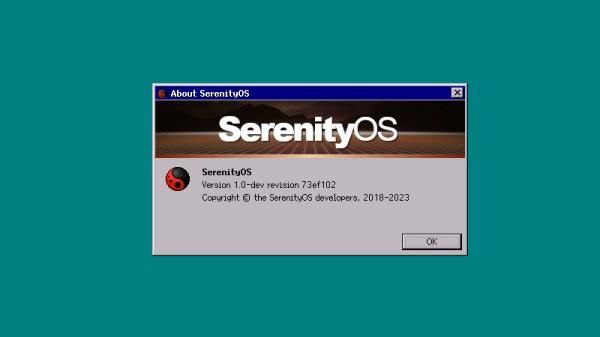
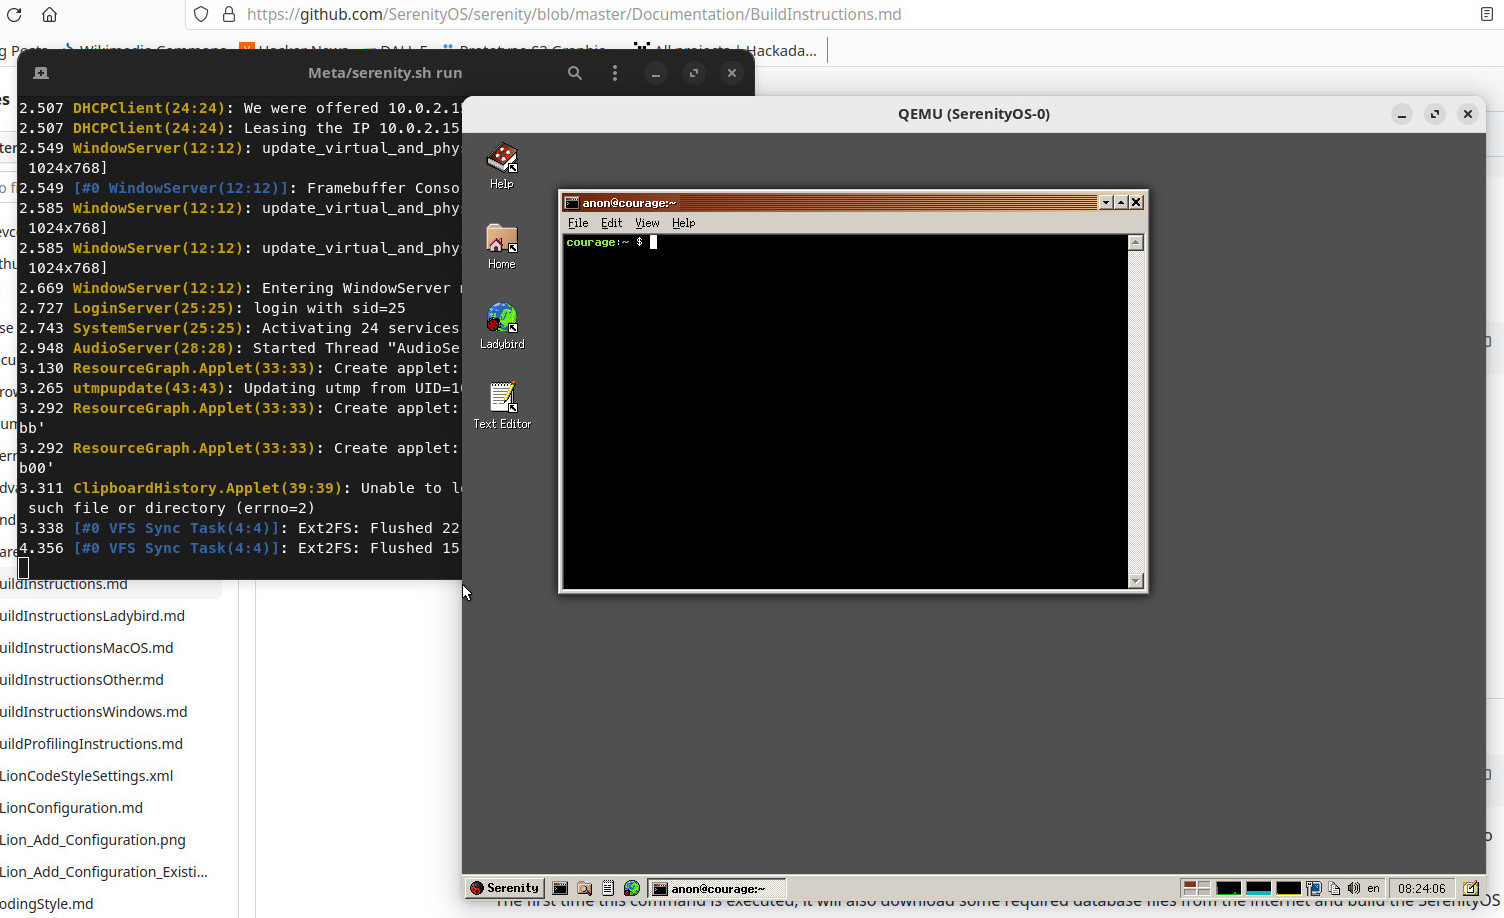
As we continue on with the series in which I take a different OS for a spin every month I am afraid, dear reader, that this month I have a confession to make. Our subject here isn’t a Daily Driver at all, and it’s not the fault of the operating system in question. Instead I’m taking a look at a subject that’s not quite ready for the big time but is interesting for another reason. The OS is SerenityOS, which describes itself as “a love letter to ’90s user interfaces with a custom Unix-like core“, and the reason I’m interested in it comes from its web browser. I know that the OS is very much a work in progress and I’ll have to forgo my usual real hardware and run it in QEMU, but I’ve heard good things about it and I want to try it. The browser in question is called Ladybird, and it’s interesting because it has the aim of creating a modern fully capable cross-platform browser from scratch, rather than being yet another WebKit-based appliance.
A Pleasant Trip Into The 1990s
My first look at SerenityOS after building it.
SerenityOS isn’t ready to be installed on real hardware, and there’s no handy ISO to download. Instead I had to clone the repository to my Linux machine and run the build script to compile the whole thing, something I was very pleased to observe only took about 40 minutes. It creates a hard disk image and opens QEMU for you, and you’re straight into a desktop.
When they mention ’90s user interfaces they definitely weren’t hiding anything, because what I found myself in could have easily been a Windows 9x desktop from the middle of that decade. There are a bunch of themes including some Mac-like ones, but should you select the “Redmond” one, you’re on very familiar ground if you had a Microsoft environment back then. It’s only skin-deep though, because as soon as you venture into a command line shell there’s no DOS to be found. This is a UNIX-like operating system, so backslashes are not allowed and it’s familiarly similar to an equivalent on my Linux box. The purpose of this review is not to dive too far into the workings of the OS, but suffice it to say that both the underpinnings and the desktop feel stable and as polished as a Windows 95 lookalike can be. The various bundled utilities and other small programs seem to work well, and without any hint of the instabilities I’ve become used to when I’ve experimented with other esoteric operating systems. Continue reading “Jenny’s Daily Drivers: SerenityOS, And In Particular, Ladybird”→
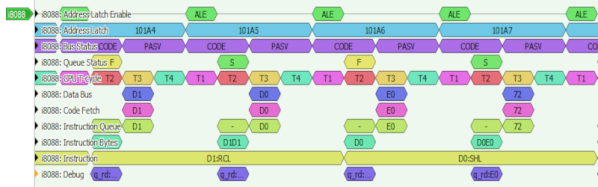
There is a lot to like about open software, and in some areas, a well-thought-out piece of software can really make a huge impact. A great example of this is the Sigrok project. Creating simple devices that act like a logic analyzer is relatively easy. What’s hard is writing nice software for such a setup including protocol decoders. Sigrok has done it and since it is open, you can add your device and decode your protocol. [GloriousCow] had done the hardware part of interfacing to the 8088 in an IBM PC using an off-the-shelf logic analyzer that uses a customized version of Sigrok. But the output was a CSV file you had to process in a spreadsheet program. The next step: write a decoder for Sigrok to understand 8088 bus cycles.
The post covers the details of writing such a plug-in for Pulseview, the Sigrok GUI. It will also work for the command line interface if you prefer that. The code is in Python.
As [Matt Stele] prepared to bike a local 300-mile (~480km) race in addition to training, he had to prepare for food. A full day of riding was ahead on gravel trails, and one of the best options for him was Casey’s General Store pizza. However, as it was a race, other riders were much faster than him. So, all the hot slices were gone when he arrived. With the help of a serverless GPS tracker, some cloud lambdas, and some good old-fashioned web scraping, [Matt] had a system that could order him a fresh pizza at the precise moment he needed. Continue reading “Ordering Pizza While Racing”→
If you like math, you should enjoy [kynd’s] page about simulating fluid in p5.js. You might still enjoy the pretty colors and shapes if you aren’t into math. What’s scary is that the page promises to have as little math as possible, but there’s still quite a bit. Of course, we are sure you could go even deeper down the rabbit hole.
The algorithm’s core is a pair of 2D arrays representing cells that comprise the display area. One array holds the color of the cell, while another holds a velocity vector of the fluid in the cell. A vector, of course, has both a magnitude and a direction.