Tiny Vacuum Chamber Arm To Help With Homemade Semiconductors

[Nixie] wants to make semiconductors at home, and that requires some unusual tools. Chief among them is a vacuum chamber to perform thin-film deposition, and true to the hacker credo his is homemade, and will soon be equipped with a tiny manipulator arm with magnetically coupled mechanical controls.

If [Nixie]’s setup looks familiar, it might be because we featured his plasma experiments a few days ago. He was a little cagey then about his goal, but he’s come clean with his desire to make his own FETs (a project that is his 2018 Hackaday Prize entry). Doing so will require not only creating stable plasmas, but also the ability to move substrates around inside the vacuum chamber. Taking inspiration from the slender and maneuverable instruments surgeons use for laparoscopic procedures, [Nixie] is working on a miniature arm that will work inside his vacuum chamber. The video below is a 3D-printed proof-of-concept model in action, and shows how the arm’s segments will be controlled by cables. What’s really interesting is that the control cables will not penetrate the vacuum chamber — they’ll be moved right through the glass wall using magnets.

We’re keen to see chips from [Nixie]’s home fab lab, but it looks like there will be a lot of cool hacks between here and there. We’ll be watching closely. Continue reading “Tiny Vacuum Chamber Arm To Help With Homemade Semiconductors”

Robotics Module Challenge: Build Robot, Win Prizes

Brand new today, we’re going to go all in with the Robotics Module Challenge! This is the newest part of the 2018 Hackaday Prize which is only six weeks old, and already we’ve seen almost six hundred incredible entries. But a new challenge means a fresh start and a perfect time for you to begin your entry.

This is your call to build a module that can be used in robotics projects across the world. Twenty module designs will be awarded $1,000 and and chance at the five top prizes including the $50,000 grand prize!

Robotics is the kitchen sink of the world of electronics. You have to deal with motors, sensors, spinny lidar doohickies, computer vision, mechatronics, and unexpected prototyping issues accounting for the coefficient of friction of 3D printed parts. Robotics is where you show your skills, and this is your chance to show the world what you’ve got.
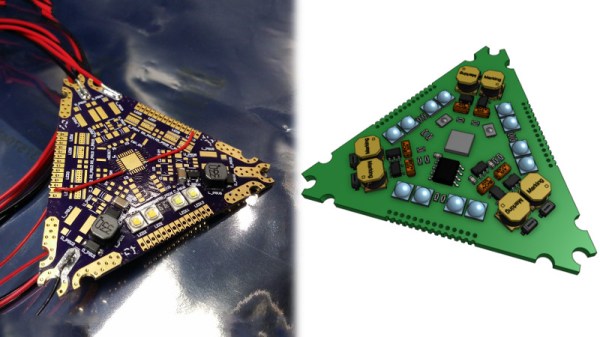
Wouldn’t it be great if there were some more ways to skip around the hard parts? That is the Robotics Module Challenge in a nutshell. We want to see great modular Open Hardware designs that can be used by roboticists all over the world. This might be a motor controller, a chassis or limb design system, a sensor network scheme, a communications system, data collection and delivery — basically anything related to robotics. Build a prototype that shows how your module is used and document all the info needed to incorporate and riff on your design in other robot builds.

Start your entry now and show us your take on a great bit of Open Hardware.

Continue reading “Robotics Module Challenge: Build Robot, Win Prizes”

Counting Without Transistors

The Hackaday Prize is all about Building Hope. We want to see hardware creators change the world with microcontrollers and breadboards. That’s a noble goal, but it also doesn’t mean you can’t have fun. That’s exactly what [Yann] is doing with a pile of surplus Soviet components, a bunch of bodge wire, and exactly zero transistors. He’s building a hexadecimal display module using only relays and diodes. It’s absurd, but still very very cool.

The inspiration for this build comes from homebrew computing. With this, there’s a recurring problem of displaying the status of a bus. Sure, a bank of LEDs will work, but then you have to count to F. The better solution to this is a hexadecimal display. The best solution to this problem is using Numitrons — seven segment Nixies, basically — and doing it all with relays and diode steering.

This module accepts four bits as an input and uses a clever arrangement of diodes to turn those four signals into the digits 0-F. Yes, it’s hexadecimal, but that’s just what you do when you’re building your own computer.

Right now, [Yann] has one module on a slim-profile protoboard that should stack easily enough for an 8 or even a 16-bit wide bus. That’s four tubes and hundreds of diodes for the 16-bit version, but the good news is all of these modules are identical, vastly simplifying the construction of the display panel of a homebrew computer.

Roomba-Riding Beer Butlers Will Serve Us All

[Josh] isn’t one to refuse a challenge, especially when robots are involved. The latest dare from friends and family? Build a beer robot that can bring beverages at everyone’s beck and call.

The build consists of two main parts: the refrigerated cooler and the butler part, which comes courtesy of a Roomba Discovery from a fellow roboticist. [Josh] is basing the design on double-walled and insulated restaurant coolers. He built the refrigerated beverage hold from two stainless steel trash cans, sized an inch or so apart in diameter, and filled the gap with expanding foam insulation. He then cut away several inches from the bottom of the liner can to make room for the cooling unit, reinstalled the drip tray, and made a [airflow-allowing platform] by drilling a bunch of holes in an antimicrobial plastic cutting board.

At first, he tried a Peltier unit from an electric Igloo cooler, but that doesn’t work as well as [Josh] hoped, so he’s redesigning the can to use a mini fridge compressor. This meant making custom evaporator and condenser coils from copper tubing to match the compressor’s load spec. Go through [Josh]’s build logs over on IO and you’ll get a free mini-course on expanding foam and refrigeration.

[Josh] is currently working on some different butler modes for this robot. These run the gamut from simply sitting nearby with cold beverages and opening with the wave of a hand to doing voice-triggered beverage butler-ing at everyone’s beck and call. We applaud his efforts thus far and will be following this one with great thirst interest to see how he handles navigation and voice control.

This Is Your Last Chance To Design The Greatest In Open Hardware

This is the last weekend to get in on the Open Hardware Design Challenge, the first challenge of the 2018 Hackaday Prize. We’re looking for the boldest idea you can come up with. We want to see the beginnings of the next great bit of Open Hardware, and this is your chance to do it.

The Hackaday community has thrown itself into The Hackaday Prize and so far we have more than five hundred entries in the running to Build Hope and become the next great piece of Open Hardware. Next week, we’ll choose the top twenty projects to advance to the finals. Each of those twenty project will be awarded $1,000 and be in the running to win the Grand Prize of $50,000 and four other top cash prizes.

You still have time. This challenge doesn’t require a specific prototype — it’s all about great design. Demonstrate an uplifting use of technology and show a plan to build it. When you make it into the finals, you’ll have all summer to fabricate and refine your vision. This is your chance to be a hardware hero, so start your entry now.

Continue reading “This Is Your Last Chance To Design The Greatest In Open Hardware”

Courtesy of [david.reid]

Bent PETG Fills A Nixie Gap

Have you ever thought that Nixie tubes are cool but too hard to control with modern electronics? And that they’re just too expensive? [david.reid] apparently thought so and decided to create his own version of a Nixie tube, and it doesn’t get much cheaper than this.

PETG Nixie Tube

While working on a 3D printed locomotive with his son, [david.reid] used clear PETG (Polyethylene Terephthalate Glycol) 3D printer filament to move light from LEDs to various parts of the locomotive. He found this was a success, but roughed up the outside of the filament to see what would happen. Lo and behold, a warm glow appeared on the surface of the tube! Like any good hacker, his next thought was of Nixie tubes, as you have seen in many clocks.

His basic idea is that with a little heat you can bend the filament into any shape that you like ([david.reid] uses custom molds). You then use some sandpaper to roughen up the outside wherever you’d like light to show, and add an LED at the bottom to light it up!

[david.reid] isn’t the first person to modernize Nixie Tubes. Over the years, we’ve seen them combined with Wi-Fi boards, individual LED segments, or even laser cutters & WS2812s!

Now’s a great time to get started on a project for the Hackaday Prize! If you’re looking for somewhere to start, we’d love to at least see your own take on a clock!

Tesselated Worklights Are Nifty, Modular

Electric lighting – is there anything it can’t do? Coming in all manner of forms and flavours, you can get everything from a compact reading lamp to a blindingly powerful worklight for your garage. Generally, different lights are built in different ways to suit their purpose, but it’s not the only way to do things. Enter [slisgrinder] and the MOSAIC Lighting System.

At its heart, MOSAIC is a way of building lighting rigs out of individual modules. Where it gets interesting is the design – they’re triangles! The boards carry a variety of LEDs and are laid out in a fashion that allows the power and data connections to be made between adjacent cells by laying them out next to each other.  Many boards can be tesselated together to create larger, smaller, or unusually shaped arrays. The connections are well thought out, allowing the tiles to make a connection along any one of their 3 edges, regardless of orientation.

The project began out of a desire to grow okra in an otherwise inhospitable climate; to this end, there are both general work lighting modules as well as grow light versions with UV LEDs on board. The modules can be combined in different ways and command and control is done over RS-485.

It’s a tidy project that shows how a little thought can create a versatile design through the use of an unusual form factor. We’ve seen modular lighting projects before, too – like this entry to last year’s Hackaday Prize.